Spring finally came. You turn on the air conditioning for the first time of the season. And for some reason, it only blows hot air!?!? Now you’re sweating… What’s wrong… is it the compressor? …Is it the AC belt? …What gives? …Is this going to be expensive?!?!
Don’t worry! The most likely reason the AC stopped working is that over the winter, some of the refrigerant has seeped out of the system through tiny leaks in the tubing, gaskets, or flanges. When the AC system gets low on refrigerant, the compressor won’t even turn on, causing the AC not to work at all. That’s good because then your compressor pump doesn’t burn out, but bad because now you’re sweating all summer…
The good news is that it is a relatively easy fix!
Follow these steps, and you will be basking in the blast of frigid air in no time! Say goodbye to the pit-stains and arrive at your destination calm, cool, and collected!
Tools and Supplies:
- manifold pressure gauge set
- Several cans of R134A Refrigerant
If you purchase something through one of the links on this page, I may earn a commission, at no extra cost to you. Thanks for the help.
Related Posts…
How to Recharge the AC System in a Toyota Corolla
The first step is to pop the hood and locate the low pressure and high-pressure ports of the air-conditioning system. I have drawn red arrows pointing to these ports in the image below.
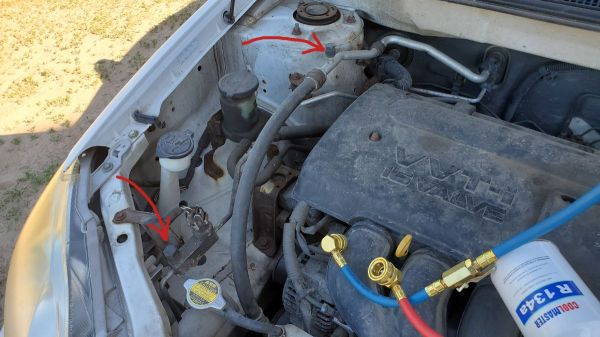
The ports may have plastic caps on them. If so, unscrew the caps and set them aside.
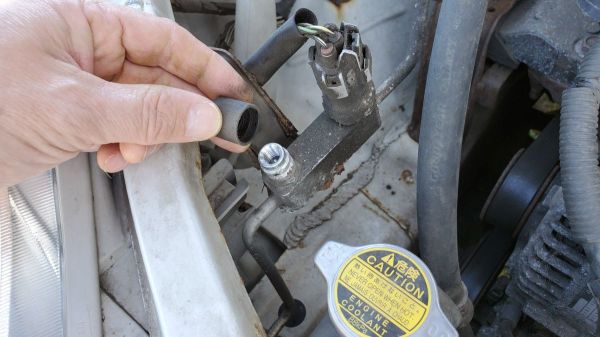
Take the high pressure port fitting (usually the red hose) from you a/c manifold gauge set and attach it to the high pressure port in the vehicle. I recommend doing this with the vehicle off.
Note: The high and low pressure ports are different sizes, so if the gauge doesn’t fit, you may be trying to attach it to the wrong port!

Similarly, find the low pressure port and remove the cap.

Attach the low-pressure tubing line to the low pressure port.

Hook the gauges to some convenient place on the underside of the hood. We will want to be examining the pressure throughout the procedure.
Note: in this photo below, I have the refrigerant attached to the yellow tube already, but that will come in a later step…!

Reading the Dials on an A/C Pressure Gauge Set
One thing I want to mention, is that with the car off, you will get what looks like a high pressure reading on the low pressure side, and what looks like a low pressure reading on the high pressure side.
If you read the numbers carefully, they are actually about the same value since the scales on the two dials are different! (In my case, around 60 psi or so.)
It is good if there is some pressure in the system, as it helps assure you that the system has not sucked in air through any potential leaks in the system.

The next step is to turn on the vehicle, and turn on the Air Conditioning full blast. We want to get a pressure reading with the car on, so go ahead and start the engine. Make sure that none of the tubes are hanging in the area of the cooling fan or serpentine belts.
If the refrigerant is low, generally you will have a low pressure reading on both dials. In my case, the low pressure side read about 10-psi, and the high pressure side read about 80-psi (see picture below):

The following is a good rule of thumb for your A/C system.
| Low Pressure Side | High Pressure Side | What it Means: |
| Proper Range | Proper Range | A/C is working |
| Low | Low | Add Refrigerant |
| Low | High | Blocked expansion valve or orifice |
| High | Low | Bad Compressor |
| High | High | Overcharged (legally remove refrigerant)* |
*Note: It is illegal to vent 134a refrigerant into the atmosphere.
If you find yourself in a situation where both the Low Pressure Gauge and the High Pressure Gauge are reading low (with the engine on), then you need to recharge your A/C system with refrigerant.
Buy several cans of R134a refrigerant from a local auto parts or hardware store; Walmart has it.
One thing I want to mention about these cans is that some of them are single-use, meaning that once you connect the can to your manifold pressure gauge set, it will puncture the top and you must use all of the contents of the can or leave it connected.
The other type of can is resealable, see the photos below.

These types of cans have a small divot inside the opening where the pin from your gauge set presses down releasing the refrigerant. This allows you to disconnect the can when it is not completely empty, and save the rest for later.
Note: When using the resealable type, only back off the pin half-way, or else the seal will close again!

Adding Refrigerant to a Toyota Air Conditioning System
Once you have determined that you need to add refrigerant to your A/C system, take a can of R134a and screw it on to the yellow tube of your manifold pressure gauge set.
Note: Make sure the ‘pin’ inside the fitting of the yellow tube is fully backed out (turn the handle fully counter-clockwise) before you attach it to the can of refrigerant!

Once the can is fully tightened on, we are ready to release the refrigerant from the can. Don’t worry, we’ll introduce the refrigerant into the A/C system in a subsequent step.
Turn the knob (silver knob on the top of the can fitting) fully clockwise. If you have the single-use can of R134a, the pin will puncture the top of the can. Then turn the silver knob fully counter-clockwise to allow the refrigerant to escape the can.
If you have the resealable type of can, turn the silver knob fully clockwise, then back it out about 1/2 way. You need to keep the pin in contact with the divot so that the can does not reseal itself again!
You are now ready to introduce refrigerant into the AC system. To do so, shake the can a few times, then turn the knob on the top of the gauge. In my case, you actually turn the low-pressure (blue) gauge, but other gauge sets have the knobs on the side, which is a little more convenient, so that the numbers aren’t upside down!

Once the blue knob is ‘open,’ shake the can while turning it from upright to sideways. Keep the can in each position for about 3 seconds, continually shaking as you do it.

Every 10 seconds or so, close the knob long enough to get a reading. Typically you will see the pressure on both the High and Low gauges increasing.
Open the knob again and continue shaking the can as you go from upright to 90 degrees (sideways). The close the blue knob and take a reading.
Repeat this process until both of the needles on both gauges are in the proper “In Range” setting.
Below is a photo with both needles in the proper range.
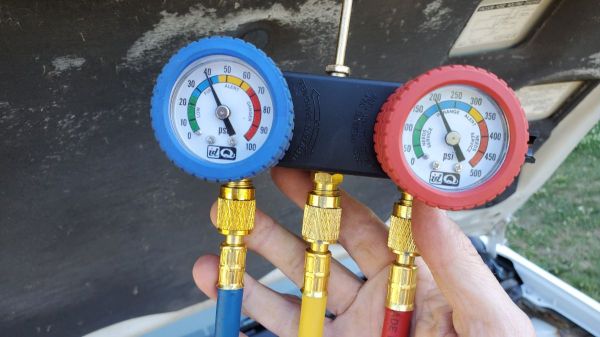
Once both needles are in the proper range, stop adding refrigerant.
Go inside the vehicle and verify that the A/C is blowing cold air! You’re all set!
Tools and Supplies:
- manifold pressure gauge set
- Several cans of R134A Refrigerant
Thanks for visiting PracticalMechanic.com!


