How to Replace the Charcoal Canister in a 2003-2011 Toyota Corolla/Matrix
You’re cruising down the highway in your trusty 2005 Toyota Corolla, feeling the wind in your hair and the thrill of the open road. Suddenly, the dreaded check engine light flickers to life on your dashboard. Panic sets in as you wonder what could be wrong.
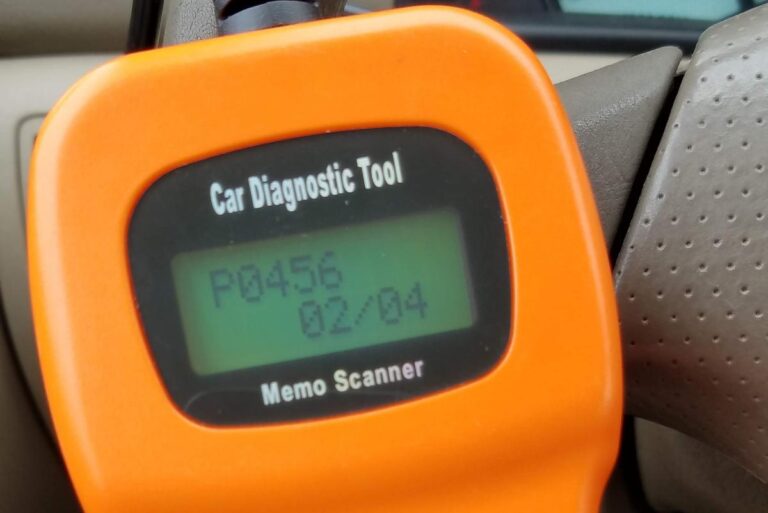
You pull out your handy bluetooth OBD2 reader and find the following error codes: P2419, P2402, P2401, P043F, and P043E. What to do??? This combination of error codes indicates that you have a faulty charcoal canister.
Check Engine Light? This article explains how to read the error codes yourself!
In this comprehensive guide, I’ll walk you through the process of replacing the charcoal canister in your 2003-2011 Toyota Corolla or Matrix, saving you both time and money. This seemingly daunting task can be tackled with ease. Let’s get started!
If you make a purchase through one of the links on this page I may earn a commission, at no extra cost to you. Thank you for your support.

- Why Do You Need to Replace the Charcoal Canister in your 2003-2011 Toyota Corolla/Matrix?
- Error Codes P2401, P2402, P2419, P043E, P043F – What They Mean
- What Does a Charcoal Canister Do?
- How Much Will It Cost?
- Part Numbers and Where To Get an OEM Charcoal Canister
- Step by Step Procedure for Replacing the Charcoal Canister in a Toyota Corolla
Why Do You Need to Replace the Charcoal Canister in your 2003-2011 Toyota Corolla/Matrix?
A malfunctioning charcoal canister in your Toyota Corolla can trigger a variety of error codes, usually including P2419, P2402, P2401, P043F, and P043E. Toyota has even put out a technical bulletin (Toyota TB EG-002-06) relating to this problem, and for the need to replace the charcoal canister.
These codes indicate problems with the evaporative emission control system, which can affect your car’s performance and fuel efficiency. Replacing the charcoal canister is crucial to ensure your vehicle runs smoothly and efficiently.
Error Codes P2401, P2402, P2419, P043E, P043F – What They Mean
Here are the OBD-II error codes for your Toyota Corolla along with their meanings. Generally, if you get all of these codes at the same time, it suggests that you need to replace your charcoal canister. If you onle get one of the codes, it is still possible it is the charcoal canister, but it could also be something else such as a faulty sensor.
- P2419 – Evaporative Emission System Switching Valve Control Circuit Low
- This code indicates a problem with the control circuit of the evaporative emission system switching valve. It could also be due to a wiring issue or a fault in the valve itself.
- P2402 – Evaporative Emission System Leak Detection Pump Control Circuit High
- This code suggests an issue with the control circuit of the leak detection pump in the evaporative emission system. A high voltage condition is detected, which could also be caused by a faulty pump or a wiring problem.
- P2401 – Evaporative Emission System Leak Detection Pump Control Circuit Low
- Similar to P2402, this code points to a problem with the control circuit of the leak detection pump in the evaporative emission system. In this case, a low voltage condition is detected, which could also be due to a faulty pump or a wiring issue.
- P043F – Evaporative Emission System Purge Control Valve Circuit High
- This code indicates an issue with the control circuit of the evaporative emission system’s purge control valve. A high voltage condition is detected, which may also be caused by a faulty valve or a wiring problem.
- P043E – Evaporative Emission System Purge Control Valve Circuit Low
- Similar to P043F, this code points to a problem with the control circuit of the evaporative emission system’s purge control valve. In this case, a low voltage condition is detected, which could also be due to a faulty valve or a wiring issue.
What Does a Charcoal Canister Do?
Before we start, it’s essential to understand the function of the charcoal canister. This component is a critical part of your vehicle’s emission control system. It captures and stores fuel vapor, preventing it from escaping into the atmosphere and causing pollution. Over time, it can become clogged or fail, leading to the issues mentioned earlier.
How Much Will It Cost?
Before we delve into the procedure, let’s discuss the cost. You have three options:
- DIY: Doing this repair yourself will cost you approximately $200, and it’s a rewarding project for those with some automotive skills.
- Dealer: Having the dealership handle the replacement can set you back around $1400, primarily due to labor costs.
- Local Shop: Opting for a local auto shop might cost you approximately $700, making it a middle-ground choice if you just don’t want to have to deal with it yourself.
Now, let’s embark on the journey of DIY replacement, saving you a substantial amount of money.
Part Numbers and Where To Get an OEM Charcoal Canister
For this repair, I recommend getting the genuine OEM charcoal canister.
For 2003-2004 Toyota Matrix, you need Toyota OEM Charcoal Canister Toyota OEM Charcoal Canister (Part# 77740-02121).
For 2005-2012 Toyota Matrix, you need Toyota OEM Charcoal Canister Toyota OEM Charcoal Canister (Part# 77740-02310).
For 2003-2004 Toyota Corolla, you need Toyota OEM Charcoal Canister Toyota OEM Charcoal Canister (Part# 77740-02121).
For 2005-2011 Toyota Corolla, you need Toyota OEM Charcoal Canister Toyota OEM Charcoal Canister (Part# 77740-02310).
Check the following selection tables for your exact Year, Make, Model, Trim and Engine specifications.
| Year | Make | Model | Trim | Engine | Charcoal Canister |
| 2003 | Toyota | Corolla | CE, LE, S | 1.8L L4 – Gas | 77740-02121 |
| 2004 | Toyota | Corolla | CE, LE, S | 1.8L L4 – Gas | 77740-02121 |
| 2005 | Toyota | Corolla | CE, LE, S, XRS | 1.8L L4 – Gas | 77740-02310 |
| 2006 | Toyota | Corolla | CE, LE, S, XRS | 1.8L L4 – Gas | 77740-02310 |
| 2007 | Toyota | Corolla | CE, LE, S | 1.8L L4 – Gas | 77740-02310 |
| 2008 | Toyota | Corolla | CE, LE, S | 1.8L L4 – Gas | 77740-02310 |
| 2009 | Toyota | Corolla | Base, LE, S, XLE, XRS | 1.8L L4 – Gas, 2.4L L4 – Gas | 77740-02310 |
| 2010 | Toyota | Corolla | Base, LE, S, XLE, XRS | 1.8L L4 – Gas, 2.4L L4 – Gas | 77740-02310 |
| 2011 | Toyota | Corolla | Base, LE, S | 1.8L L4 – Gas | 77740-02310 |
| Year | Make | Model | Trim | Engine | Charcoal Canister |
| 2003 | Toyota | Matrix | Base, XR, XRS | 1.8L L4 – Gas | 77740-02121 |
| 2004 | Toyota | Matrix | Base, XR, XRS | 1.8L L4 – Gas | 77740-02121 |
| 2005 | Toyota | Matrix | Base, XR, XRS | 1.8L L4 – Gas | 77740-02310 |
| 2006 | Toyota | Matrix | Base, XR, XRS | 1.8L L4 – Gas | 77740-02310 |
| 2007 | Toyota | Matrix | Base, XR | 1.8L L4 – Gas | 77740-02310 |
| 2008 | Toyota | Matrix | Base, XR | 1.8L L4 – Gas | 77740-02310 |
| 2009 | Toyota | Matrix | Base, S | 1.8L L4 – Gas, 2.4L L4 – Gas | 77740-02310 |
| 2010 | Toyota | Matrix | Base, S | 1.8L L4 – Gas, 2.4L L4 – Gas | 77740-02310 |
| 2011 | Toyota | Matrix | Base, S | 1.8L L4 – Gas, 2.4L L4 – Gas | 77740-02310 |
| 2012 | Toyota | Matrix | Base, S | 1.8L L4 – Gas, 2.4L L4 – Gas | 77740-02310 |
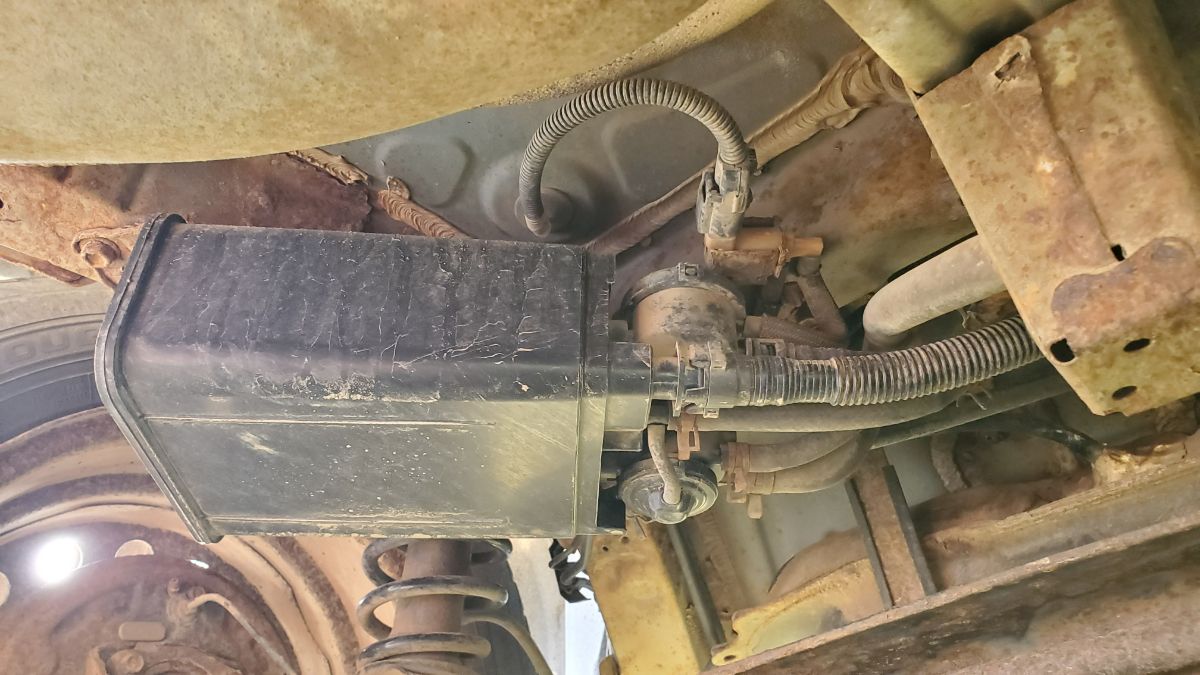
Step by Step Procedure for Replacing the Charcoal Canister in a Toyota Corolla
There are only two tools required for this job: a 12mm socket and a small flat-bladed screwdriver. If you don’t mind lying on the ground, you don’t even need to jack the car up, so let’s get started.
Note: There are a few differences between the 2003-2004, and the 2005-2011 models. In general, the process is the same. The photos in this tutorial are from a 2004 Toyota Corolla.
Step 1: Clean up the area. If there is a lot of dirt and debris around the charcoal canister, use a garden hose to spray around the area. This will help keep dust and dirt out of the system when you remove the old canister. Allow the area to dry.

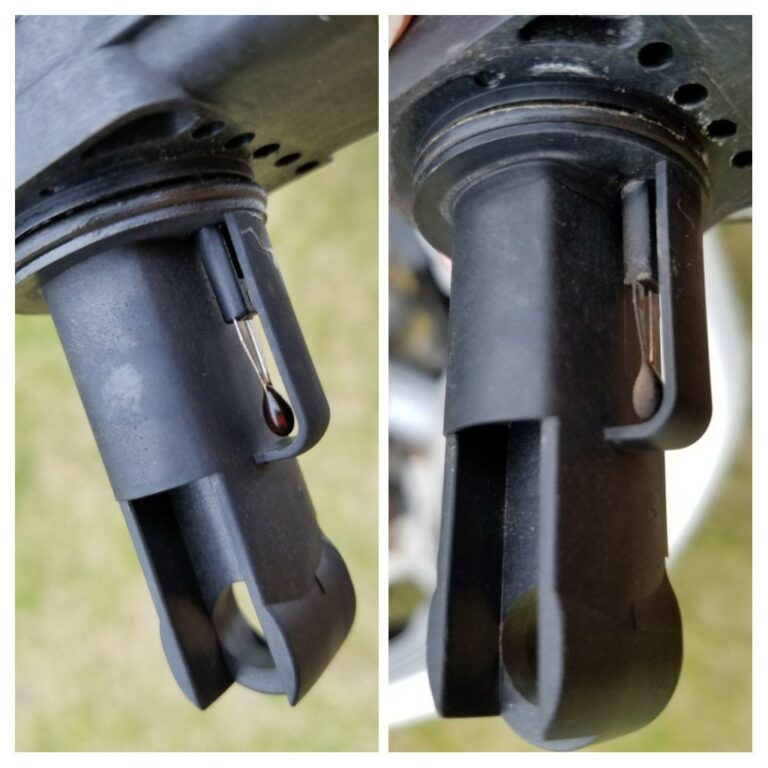
Step 2: Next, disconnect the electric connector. There is a small plastic tab that you will need to gently pry outward. Use a small flat-bladed screwdriver to release the tab, then pull the connector off.

Step 3: Remove the small breather hose. Compress the compression clamp to release it and pull the small hose off of the canister.

Step 4: Remove the large connector. Pry the clamp outward to disengage the connector.
Step 5: Squeeze the last connector to ungrasp the keepers holding it in place.
Step 6: Finally, remove the three 12mm bolts securing the charcoal canister and remove it from the vehicle.
Step 7: Install the new charcoal canister is simply the reverse of the previous steps.
Follow these steps carefully, and you’ll have successfully replaced your Toyota Corolla’s charcoal canister, saving you a significant amount of money and ensuring your vehicle runs smoothly once again.
Replacing the charcoal canister in your Toyota Corolla/Matrix is a manageable task that can be accomplished with minimal tools and a bit of patience. By doing it yourself, you not only save money but also gain a sense of accomplishment as you maintain your vehicle. You’ve got this!