

Out of the blue my Honda coughed and bucked whenever I tried to accelerate above 2700 rpm! The check-engine-light came on and gave a P2647 error code. This post walks step-by-step through the easy fix. I hope you find this helpful!
Table of Contents
- What is a P2647 DTC Error Code?
- P2647 Error Code Definition
- Instructions for Replacing the VTEC Solenoid
What is a P2647 DTC Error Code?
The vehicle I am working on here is a 2004 Honda Accord (4-cyl). This repair also applies to 2002, 2003, 2004, 2005, 2006, and 2007 Honda Accords, as well as other Honda’s using the i-VTEC engine (Honda Element, Honda Civic, Honda CRV), with perhaps some slight variations depending on the vehicle. This issue can also produce a P2646 error code.
If you purchase something through one of our links we may earn a commission, at no extra cost to you.
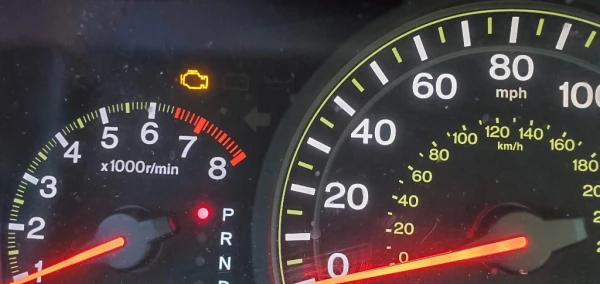
I was heading off to work one day in the 2004 Honda Accord, and about a mile from my house I tried to accelerate. As soon as the tachometer touched 2700 rpm, the car bucked and the check engine light (CEL) came on!
Luckily I had my trusty engine code reader handy, so I pulled over and read the error code.
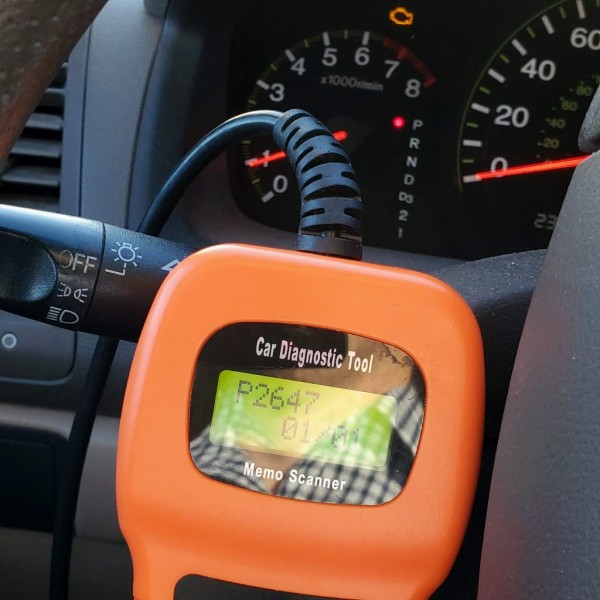
P2647 Error Code Definition
The error was P2647. A related error is P2646.
- P2647 – Rocker Arm Actuator Control System Stuck On
- P2646 – Rocker Arm Actuator System Performance/Stuck Off Bank 1
These errors relate to the VTEC solenoid. This is a really interesting mechanism! Read more details on the VTEC system.
To summarize, these cars have a variable timing system, meaning that at higher RPMs and engine loading, the computer throws a switch and changes the valve timing in order to give you better acceleration. The VTEC solenoid is that switch; it diverts oil from the low-lift cam lobe to the high-lift cam lobe.
If the VTEC doesn’t get the signal, is clogged, or leaks then problems occur. The vehicle goes into “limp mode,” meaning that you cannot accelerate beyond about 2700 RPM or so.
Note 1: One thing you should check before jumping into a repair is your oil level. Sometimes low oil can cause issues with the VTEC system, so be sure to check your oil level first. If the oil is dirty or hasn’t been changed in a while, try changing the oil as well.
Note 2: I have also had success performing an engine flush to clear the P2647 code. It is a relatively inexpensive method to help clear sludge from your engine and has been known to eliminate the P2647 issue.
Note 3: Are you using the correct and recommended oil for your Honda Accord? Using oil that is too thick or too thin can cause issues with the VTEC system which relies on oil passing through small passages! Use a high-quality synthetic oil to reduce or eliminate the P2647 issues. I recommend Mobil1 0W-20 or Mobil1 5W-20 High-Mileage for Honda Accords.
The following are common symptoms:
- No signal getting to the VTEC – Vehicle feels ‘gutless’ at high RPM
- Clogged VTEC – Vehicle stutters or stalls at lower RPMs, esp when engine is warm
- Leaking VTEC – Vehicle bucks/jerks when accelerating above about 2500-3000 RPM
The problem I had was the last one. The following is the repair I did to fix the problem.
Tools and supplies used to Fix 2647
- 10mm socket wrench
- torque wrench (able to deliver a small amount of 8.7 ft-lbs)
- Official Honda OEM VTEC Solenoid or aftermarket VTEC solenoid
- just the gasket
- flat-blade screwdriver or pliers
- rag
- drain pan
- dielectric grease (optional)
VTEC Solenoids for Honda Vehicles
- Honda Civic 2001-2005 (VTEC Solenoid)
- Honda Civic SI 2002-2005 (VTEC Solenoid)
- Honda Civic 1996-2000 (VTEC Solenoid)
- Honda Odyssey 2005-2007 (VTEC Solenoid)
- Honda Pilot 2008 (VTEC Solenoid)
Instructions for Replacing the VTEC Solenoid
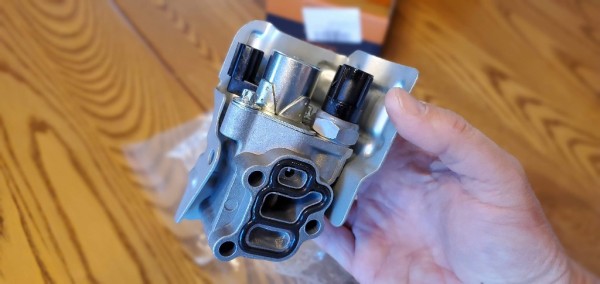
Here is the aftermarket VTEC solenoid I purchased and installed. It came with a new gasket as well.
Depending on your situation, it is possible that only the gasket is shot (completely flattened, cracked, leaking, etc…). If this is the case for you, you might try just replacing the gasket first to see if that fixes the problem. The following instructions would still mostly apply.
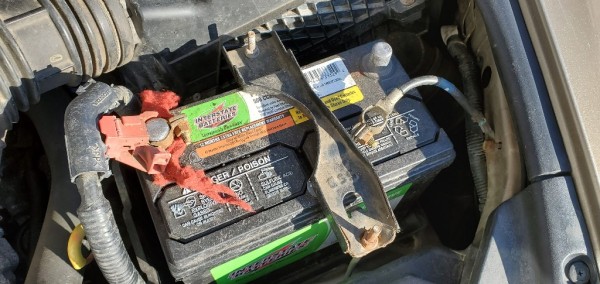
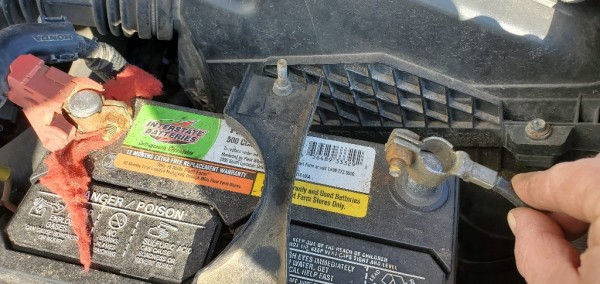
Since the solenoid has electrical connections, it is a good idea to disconnect the negative battery terminal so nothing gets shorted out.
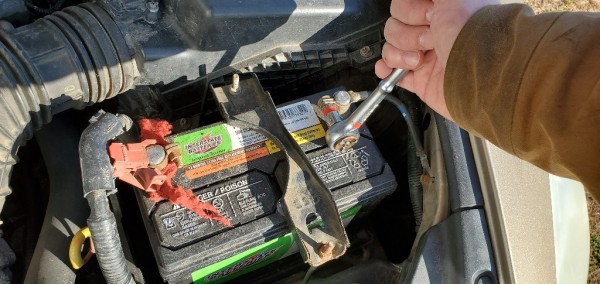
Mine uses a 10mm socket to remove.
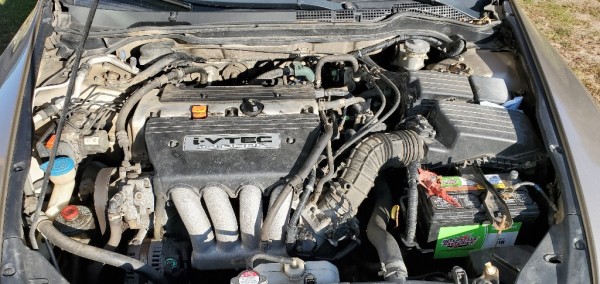
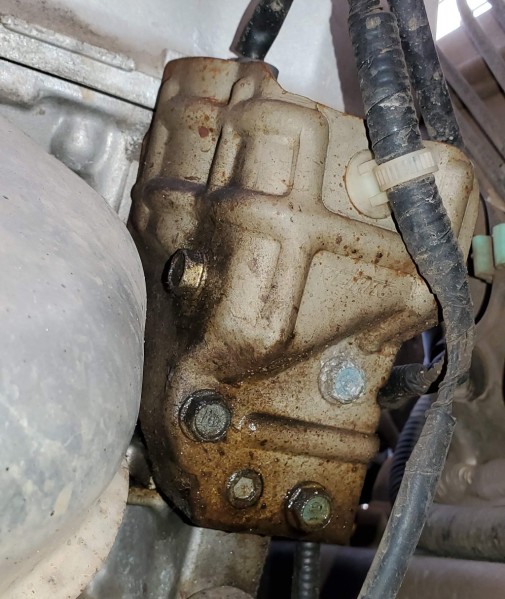
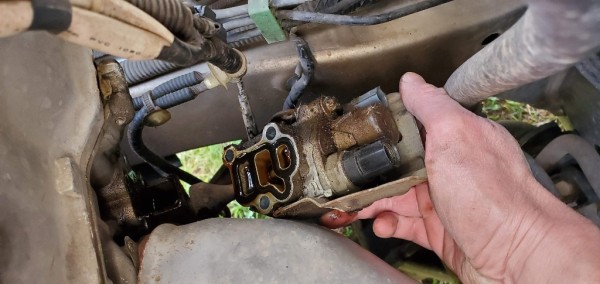
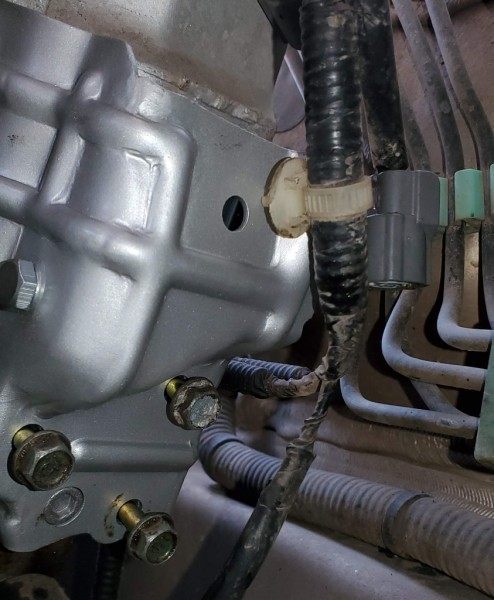
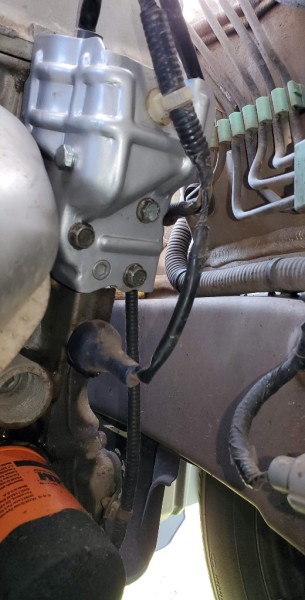
The VTEC solenoid is located at the back of the engine on the left side. In the picture below, it is about 8 inches behind the orange oil dipstick.
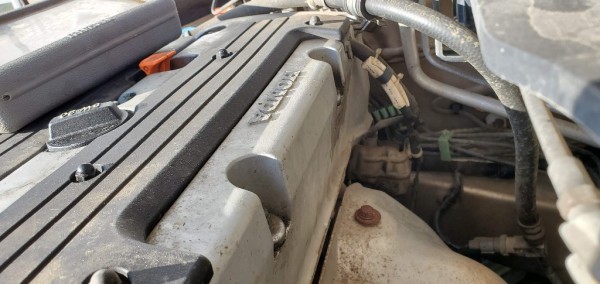
Here is the view from behind. You can see the VTEC near the center of this image with a bunch of wires going to it.
Here is a better view.
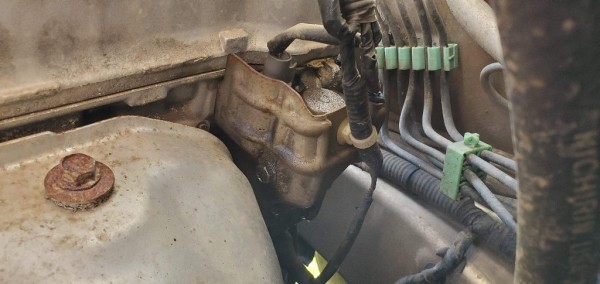
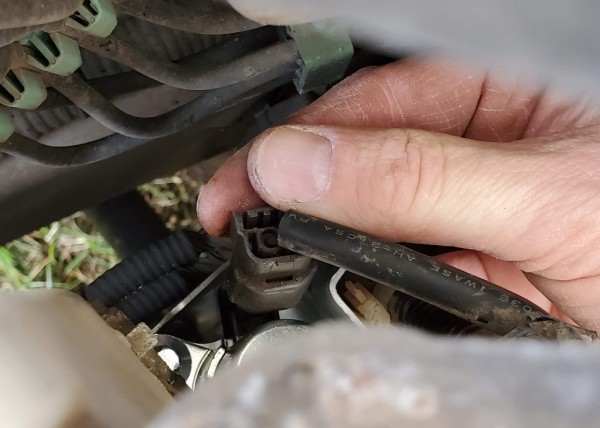
To remove the unit, we will unplug the 2 connectors at the top, then remove the three (3) 10mm bolts shown below.
Note: notice how the solenoid is all oily, particularly at the bottom. This is a good clue and suggests that it was leaking oil.
I recommend disconnecting the electrical connections first. At the top of the solenoid, press the plastic tab on the connector, then pull up to release the first connector.
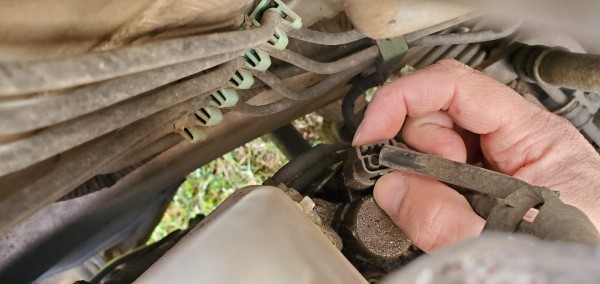
Do the same for the next connector.

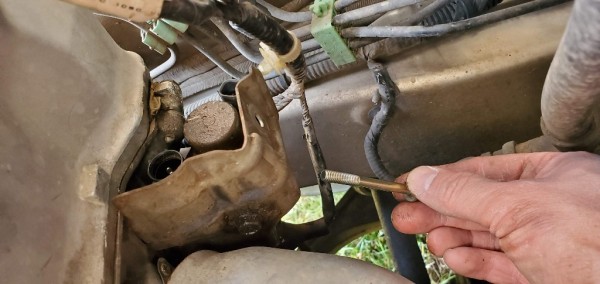
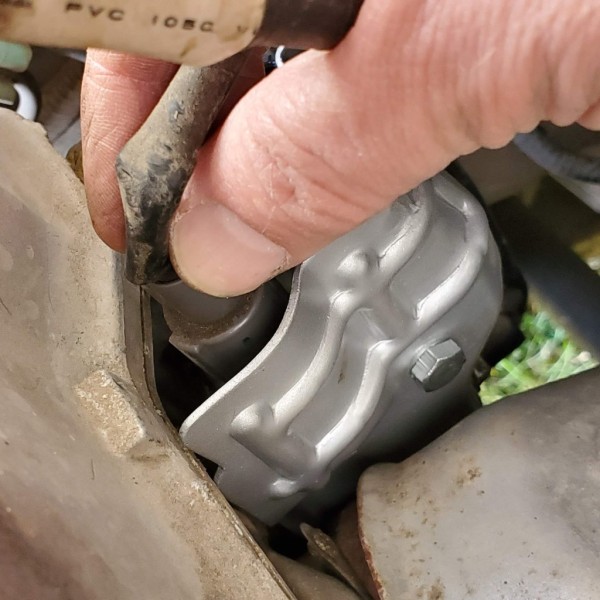
The wiring harness is attached to the solenoid heat shield with a plastic zip-tie plug connector. I used a flat-bladed screwdriver to wedge it out of its hole. It slightly damaged the plastic connector in the process, but not too bad.

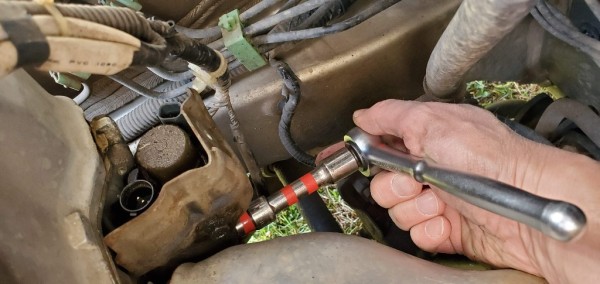
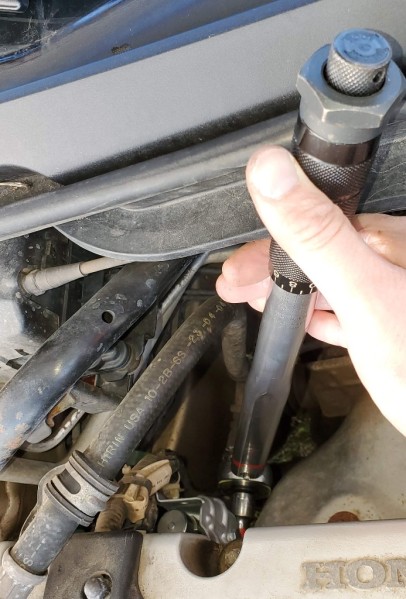
Next, use a 10mm socket to remove the 3 bolts holding the VTEC solenoid in place. I also used a short pipe as a cheater bar (not shown) to get these loose, as they were fairly tight; it can be helpful to avoid knurled knuckles…
Note: When the solenoid is removed, about a cup of oil will leak out. Put a catch pan of some sort underneath it so that the oil is contained.
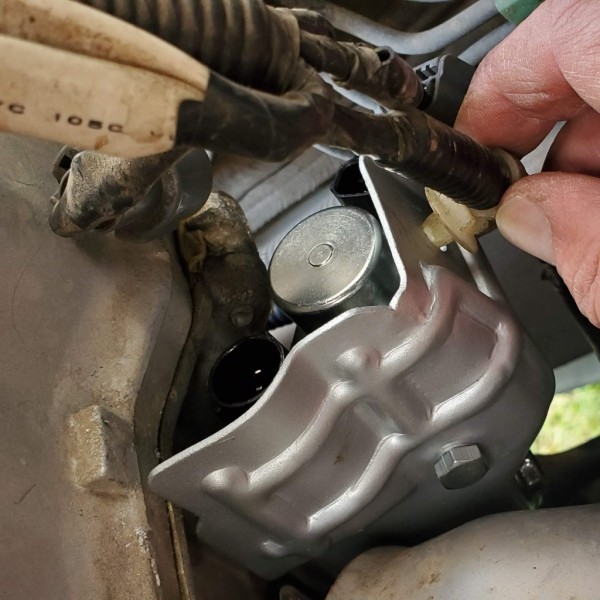
After the 3 bolts are removed, give the VTEC solenoid a twist, and it will come off. Some oil will drain out, so be ready for that with a drain pan underneath.
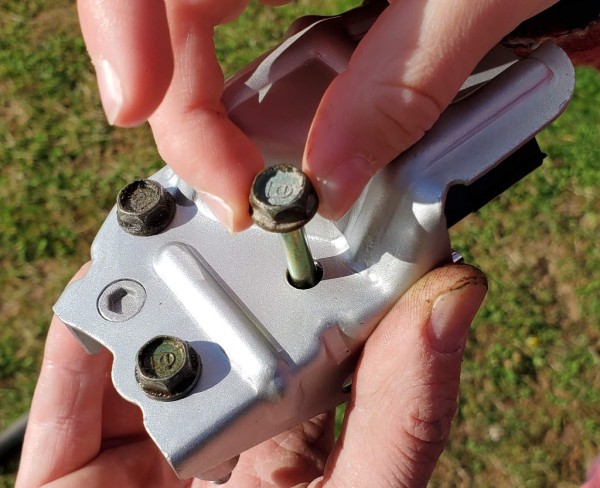
Here is the old and new ones, side by side.
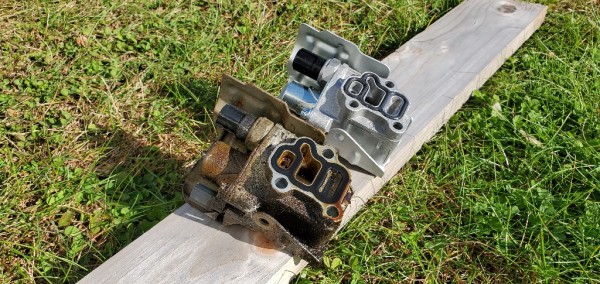
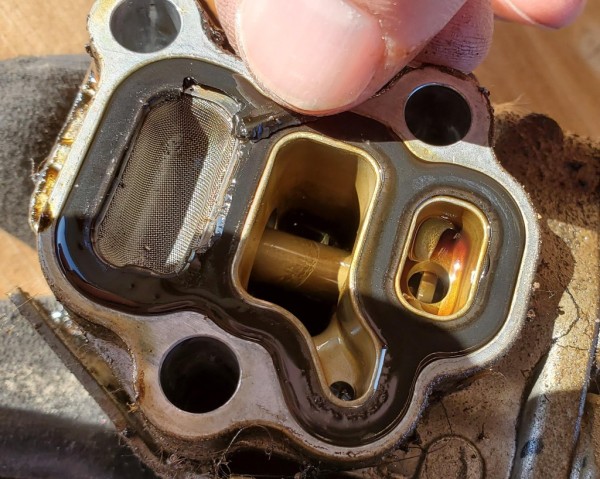
Notice how the gasket on the old one is completely compressed.
Here I picked at it and it just cracked away. It was due for replacement. Also, notice that the screen is pretty clean, so I don’t think clogging was my problem.
Here’s the link if you want to buy just the gasket. (The filter screen comes with the gasket.)
Re-use the old bolts. Fit them into the new solenoid body.
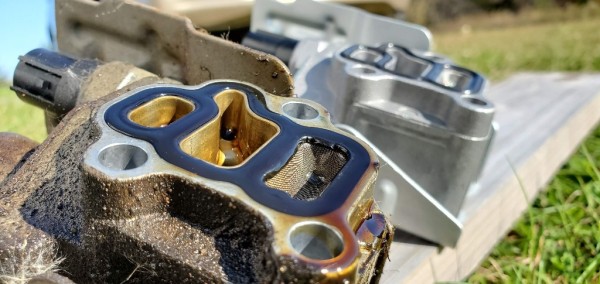
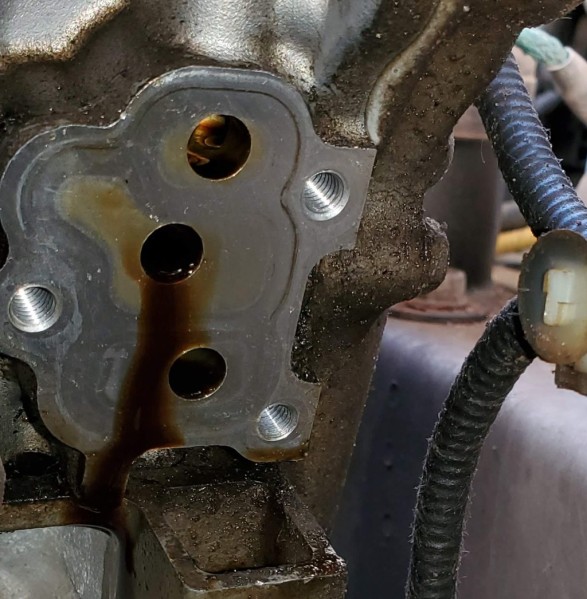
Here is a view of the mating surface. Use a clean rag to wipe off any residue.
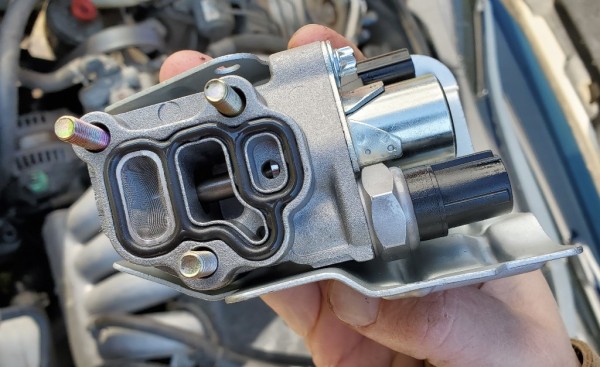
Here is the new VTEC solenoid with the bolts installed and ready to be put in.
Line up the solenoid and the bolts.
Get each bolt started and snug it up a bit with the 10mm socket.
DON’T GO OVERBOARD on tightening these bolts! They can strip out…
We will torque these in a subsequent step, and it is surprising how little these need to be snugged up in order to seal, but not crush, the gasket.
Next, use a torque wrench to tighten the bolts to 8.7 ft-lbs (104 in-lbs). Go from one bolt to the next, tighten each one a little at a time, in order to get an even seal for the gasket.
Next, fit the plastic connector for the wiring harness into the hole in the heat shield of the new solenoid.
Plug in the electrical connections.
A common problem with these electrical connections is that due to the way they are oriented, it is easy for water to get into the connector and just sit there, causing corrosion build up. If your electrical connections were corroded, put some dielectric grease into the plug before plugging in the connectors. This will help to keep water out in the future.
Make sure to press them in far enough until you hear or feel a small clip indicating that it is fully seated.
Repeat for the other electrical connector. They have different shapes, so it is difficult to get them in the wrong spot!
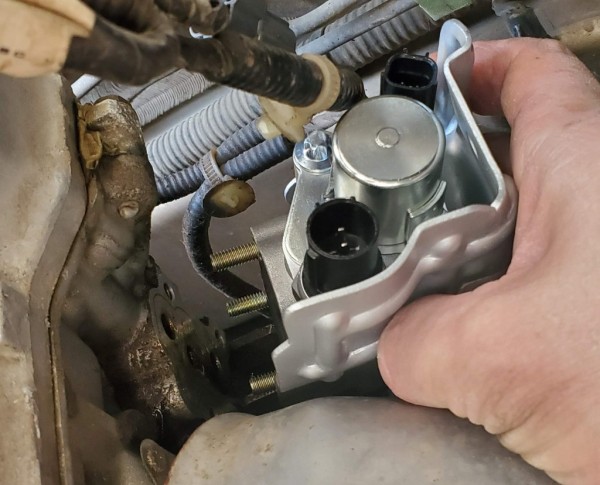
Here is the new VTEC solenoid installed.
Once everything is put together, then go ahead and re-connect the negative battery terminal and snug it up.
The final step is to check the oil level and replace any oil that may have leaked out in the process.
I hope this helped you out! If so, what were the symptoms you were experiencing? Let us know in the comments section below.
Tools and supplies used for Fixing a P2647 Trouble Code:
- 10mm socket wrench
- torque wrench (able to deliver a small amount of 8.7 ft-lbs)
- Official Honda OEM VTEC Solenoid or aftermarket VTEC solenoid
- just the gasket
- flat-blade screwdriver or pliers
- rag
- drain pan
- dielectric grease (optional)

Richard,
Many, Many Thanks for the deep explanation. I haven’t had the issue with ‘08 Element, 135K with clean oil, but replaced the gasket (s) proactively after hearing all others issues. Will go back with dielectric grease. Interestingly, I did get the code briefly after gasket replaced. Then went away on its own.
God Bless You,
Tim McCarthy
You’re welcome! Glad it was helpful!
Hello,
I have a 2004 Honda with a D17A1 that does not have this VTEC Solenoid. But I am getting a p2647 error. Do you have any idea what this could be?
It also could be the loss of air inside the air box/tube that goes to the intake manifold. So you want to check the airbox for leaks and if so replace.
You need to replace the cam sensor screen and gasket – Part number 15815-RAA-A02, please check to see if this fits as this is for an Element.
Also you have to replace the sensor, part # 37250-PNE-G01
It could be the knock sensor you need to replace
This is one of the most inscrutable mind-numbing problems on earth. Often changing the VTEC solenoid, VTEC oil sensor/switch, VVT/VTC solenoid, cleaning the screens, plus changing the oil, DOES NOTHING TO HELP! Often, when the VTEC solenoid is replaced, the vehicle may run OK until it gets hot, you stop, then go again, or it may work for a few days or weeks (if you’re lucky), then it’s Ground Hog Day all over again!!! [My facial expression as I contemplate the realization of that ever-repeating, dreadful and fully expected moment, is fearful indeed]. This is because VTEC is a very complex hybrid mechanical/hydraulic/electronic (ECU computer) system. For many victims Honda VTEC problems are never solved because debugging the ECU, and its programming and propensity to “learn” and “adjust”, are beyond human understanding!!! Super-complex modern vehicles are designed to be more efficient and durable WHEN EVERYTHING IS NEW, but after that, repair can be impossible because all the interconnected components are worn and no longer function or interact correctly. OH, and let’s not forget the VTC actuator on the camshaft and the pot full of other cam and rocker related crap involved in VTEC, especially the timing chain, which if worn will affect valve timing !!!!!!!!!!!!!!
I had the same problem for over 1 year, and finally after replacing the Block on a different matter, then I replaced the timing belt, and also the VTEC solenoid again, then everything started working great and no more issues. My car is a 2009 Honda Civic SI Coupe, most of my parts are now new, so I guess this is what it takes, wow!
Your comment is what everyone should see. I’ve replaced both front and rear filter screens and the cam VTC actuator. Hopefully that is it for now until I can get rid of the darn thing.
What’s next if it DOES NOT solve the issue? I’ve completed the swap, no leaks but it still bucks at 2700.
Happened to me today 2003 Accord 198k runs like a dream.. after reading this I went down to my friend at Honda bought OEM for $157 took 30 minutes to swap it fixed the problem..
Great Write up than you so much! God Bless America 🇺🇸
Glad to hear it! Yeah, these Hondas will last forever, I’m at 267k!
My 04 CRV has started the P2647 code thing driving a steady 75 mph let off to slow down then when lite accel it started the jumpn buck. Changed oil 50 miles ago. Only has 136,000. Could it be the same issue?
Thank you very much! Just replaced the vtec solenoid and the car is back to normal.
Awesome! Glad to have helped!
I’m still getting the same p2647 code even after I just replaced the vvt with a new one from oreillys and just had the oil changed today. Someone told me to check the rocker arms and possibly grease them. And I have a 2004 Honda CR-V xl
I’m still having the p2647 code popping up even after I replaced the vvt with a new one and new gasket from oreillys plus we just had the oil changed. Any ideas or comments would help please?
Thanks
This has happened now to my 2008 CR-V THREE TIMES!!! Had it replaced second time because filter was clogged..started happening again First time just over a year ago and have driven less than 5000 miles during that time
Dangerous!!! Has low miles, what is causing clogged filter! Since first one have 3 three oil changes and an engine flush
John
Great article and comments. I have a 2008 Accord that started to buck at 2500 RPM but only when I turned on AC. I plugged in my trusty OBD Bluetooth Adapter and pulled a P2647 code. My mechanic checked and told me the car was low on oil which I verified and an estimate of $670 to fix the spool valve and solenoid. Just for kicks I added one quart of 10W30 went for a ride. Immediately there was an improvement in acceleration but the check engine light was still on. Driving for ten miles confirmed the effectiveness of the “fix” then I stopped turned off the engine and restarted and check engine went away.
Hi, thanks alot on your infomation about this article as i am also driving an accord of year 2004 . Its very helpfull as i hv been searching on this particular topic for sometimes.
Hey author! (Richard). Great article! But maybe could you update your article to let readers know which engine you are working on? My 2006 Accord V6 doesn’t look much like this one. I spent a bit of ‘huh?-time’ before I realized you had a 4 cylinder. Thanks either way!
My 2004 Honda Element that I purchased in Feb 2020, started bucking and jerking 4 months after I purchased it. I had the oil changed with full synthetic and then after a time it started to buck and jerk again. I got a code reader and it said to replace the solenoid. I had the solenoid replaced and it was fine until I recently had the oil changed (two weeks ago), and last night when accelerating from a stop light, it started to buck and jerk again. This morning I took it to the auto store to get the code read as the check engine light was on, it read P2647. Could changing the oil be just a thing that needs to run a cycle or two reset things? The oil was dirty when I had it changed. as I was about 500 miles past the time to change the oil. Also, after I had the code read, and started it up, the check engine light went out and it seems to be running ok now.
I would change the oil, and also make sure the screens on your solenoids are clean. Plus replace the VVT solenoid aswell.
A yellow triangle with ‘!’ inside comes on. VSM light as well.
These problems still persist after replacing: variable valve timing solenoid assembly, adjustments, front alignment, and replacing the right outer tie rod.
What else causes the struggle to gas at 2700 rpms? the stuttering when Idle. using the ac or the heat triggers it too.
A week ago I started leaking oil, had low oil, refilled it, and have new codes: P2647, P0420, P1009. related? maybe?
It was a bad Solenoid Spool Assembly unit! Replaced and car is running fine now!!!
May need a new oil pump!
This was extremely helpful in my efforts to make a gasket swap. Thanks for this!
Hi Richard,
I have an Element like Cephus. Mine is fine at highway speeds, but will barely idle and dies at stops.
I had zero issues with this car until replacing the tensioner. The chain was a tooth and a half off. Fixed that, but it won’t ever idle more than 500-600. It is fine for the first few miles and then it wants to die at stops.
Did valve adjustment, cleaned throttle body and replaced gasket, but that did not help. Replaced ICV and that didn’t help either. New spark plugs. No vacuum leaks.
Three months chasing this issue. Never threw a code. Could there be an issue with the VTEC without a code?
You mentioned this…
“Clogged VTEC – Vehicle stutters or stalls at lower RPMs, esp when engine is warm“
So I thought maybe that could be my issue?
Suddenly after several months I finally threw a code, but it is P0420 (O2 sensor / cat) and I don’t know if it has anything to do with the other issue or is a separate thing entirely?????
Any advice would be appreciated.
same ^ now i have new codes P0420 Cat syst bank 1. see my prior comment
Hi Jen,
Bummer! That really stinks, struggling with an issue like this can be so frustrating!
All of these codes sound related to the vtec system, and the p420 could be tripped by the others.
Leaking oil is a huge red flag, since the vtec relies on oil pressure to function, a leak can cause reduced oil pressure and not allow the system to work properly.
Are you able to identify where the oil is leaking from? If it is leaking from around the vtec solenoid, this could suggest that it was either over- or under-tightened, did you use a torque wrench when tightening it the last time? You can try re-positioning the vtec solenoid, clean the meeting surface, then re-install, using the correct torque when tightening.
If the leak is somewhere else, you may need to get that fixed first…
Another thing to check is the VTC strainer screen, make sure it is not clogged. If it is, clean it out. It is located near the front of the engine, to get at it, you will need to remove the power steering pump and the tensioner.
If ‘oil sludge’ is the problem (can be caused by infrequent oil changes), and is clogging up the small passages within your engine, sometimes performing and engine flush can help. It’s not a magic bullet, but it has helped me in the past with these sorts of problems:
I hope this helps, and really hope you can get this figured out!
Good luck,
Rich
I had similar problem, and replaced the solenoid. However after about 600 miles the problem came back, except this time it would happen at about 65 miles an hour. It’s now back to happening at lower speeds. Anyone know what the solution is? Is it possible the amazon solenoid was just not a good part and I should go OEM? I did change the oil at the same time when I replaced the solenoid. Car is a 2003 Honda Element with 262,000 miles, so I don’t want to spend too much money on it. It’s my son’s first car and just need to have it running reliably.
Same error code? Almost sounds like the VVT solenoid, like this one:
https://amzn.to/2Y09EIp
When this part is bad, it can cause hesitation at highway speeds, such as when taking your foot off the accelerator slightly…
I replaced both Vtec Solenoid Spool Assembly, also VVT Solenoid. Even replaced the Engine Harness, even did the Engine Flush with Liqui Moly. Also made sure both screens where replaced. Now ready to take the head, and it get it resurfaced, vale job, and make sure all the ports are blocking flow of oil. If you can think of anything I have not done, please send me your advice, it would really help me, because this has really stumped me.
I had already replaced the timing solenoid when I replaced the VTEC solenoid. One thing I forgot to mention. I had misfiring in Cylinders 1 and 3 that wouldn’t go away even after replacing spark plugs and coil packs. I eventually did the valve adjustments and the misfiring stopped however the VTEC started acting up within 50 miles of the adjustments. Is it possible that if I didn’t do the valve adjustment just right that it could cause the VTEC to start bucking and throw the P2647 code?
Update:
I tried liquimoly’s engine flush as a solution. Followed the instructions then did an oil change. I have now driven over 4000 miles and the bucking and surging has not returned.
Cephus, that is awesome! I’m so glad to hear it, as this has been an issue for a while!
I had similar problem, and replaced the solenoid. However after about 600 miles the problem came back, except this time it would happen at about 65 miles an hour. It’s now back to happening at lower speeds. Anyone know what the solution is? Is it possible the amazon solenoid was just not a good part and I should go OEM? Car is a 2003 Honda Element with 262,000 miles, so I don’t want to spend too much money on it. It’s my son’s first car and just need to have it running reliably.