How to Replace the Alternator in a Honda Accord
Here is a quick and easy picture guide for replacing the alternator in a Honda Accord including troubleshooting steps. The alternator is quite easy to replace in an Accord, and should take no longer than 1 hr, and likely less!
Note: PracticalMechanic.com is reader-supported. If you buy through links on our site, we may earn an affiliate commission – at no cost to you. Thank you for your support!
Tools Required to Replace the Alternator
- 10mm socket
- 12mm socket (deep socket works best)
- 14mm wrench with cheater bar (or Serpentine Belt Tool)
- torque wrench
- needle-nose pliers
- Alternator for Honda Acord 2003-2007
- Serpentine Belt 2003-2007 Honda Accord (recommended to change at the same time)
Alternator Problem Description
I am going to describe in detail the failure mode of the alternator in my Honda Accord, in the hopes that knowing how mine failed (and the warning signs) may help someone else out there with the same problems. It was not immediately obvious that the problem was the alternator for me, so I want to let you know what diagnostic steps I did and ultimately what convinced me that the problem was the alternator.
The first set of issues that indicated that there was a problem happened while driving at highway speeds. Items on the dashboard started to act sporadically:
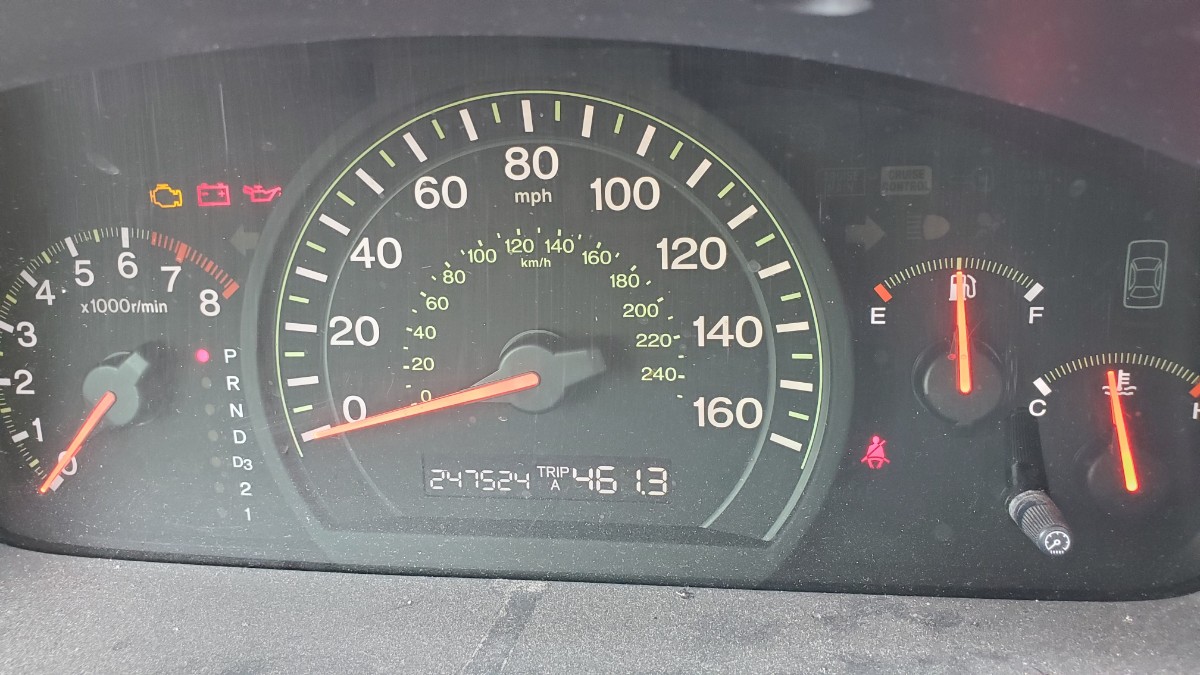
- The speedometer stopped working and went to zero (even though going 55 mph).
- The ABS light on the dash came on.
- The light next to “D” indicating that the car was in ‘drive’ turned off.
- I believe the airbag and/or seatbelt light came on (don’t remember exactly).
Again, all of those things happened while driving. There was no discernible indication from the engine that there was a problem.
I pulled over, put the vehicle in park, and took the following image. Some of the gauges/lights had started working correctly at that time, but the ABS light was still illuminated.

After turning the vehicle off for about 1 hour, it started fine, and I was able to drive it home. It did not exhibit any of the issues on this short 10 minute drive.
No steps were taken at this time to resolve the problem. Another time driving it, the vehicle sputtered around 35 mph or so while accelerating, and the check engine light came on and gave a P2647 error code indicative of a leaking VTEC solenoid, and the ABS lights came on again, and the speedometer failed. I later determined that the P2647 error code occurred because the VTEC solenoid was not getting sufficient power due to a failing alternator.
The car was driven several more times, and each time it would intermittently exhibit the electrical issues on the dashboard (but no check engine light). Sometimes revving the accelerator would cause the dash lights and speedometer to work again temporarily.
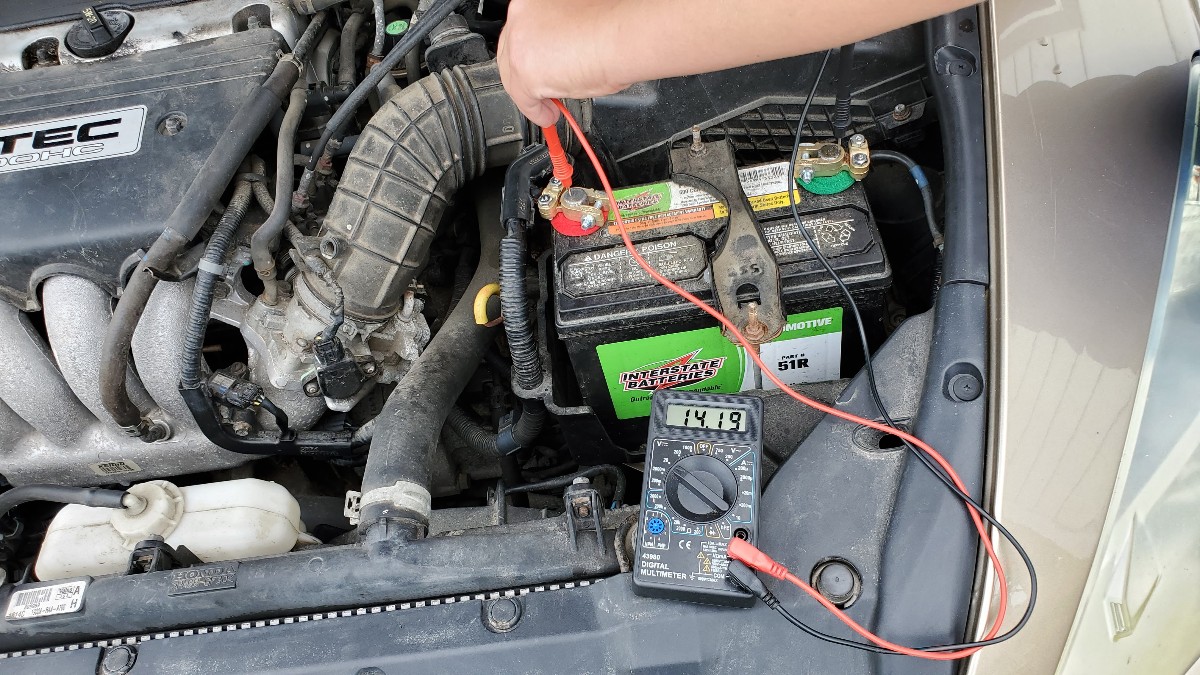
As a diagnostic step, I checked the battery voltage with the vehicle idling. The voltage was only 11.86v as shown, indicating that the alternator was unable to provide sufficient charging to the battery. This was a good clue that the alternator was going bad, but it is important to stress that other things could also cause problems like this, so the following list of items should be checked before replacing the alternator.
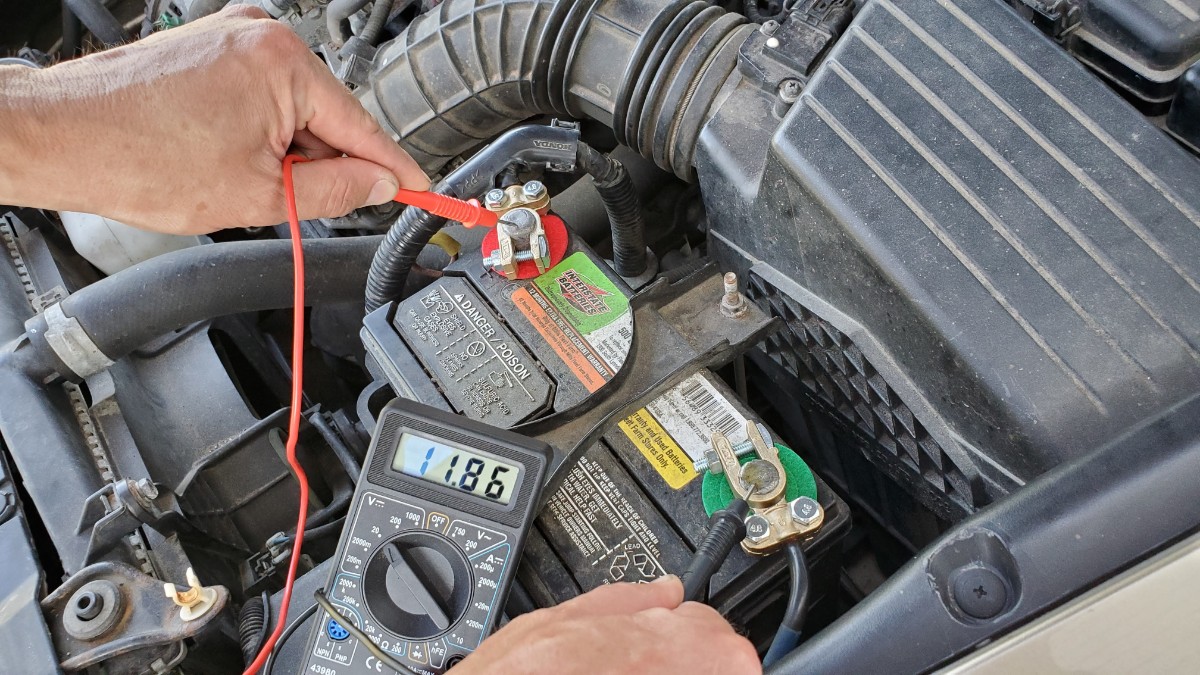
One thing to note is that the battery light DID NOT COME ON throughout this time.
A good clue was the following. When the car is off, and the key is turned to the “On” (or II) position, normally all of the dash lights should come on, so that you can tell if they are burnt out or not. However, in my case, the battery light did NOT come on during that time, either. This suggested to me that there was some sort of issue with the charging system.
The following items were checked before replacing the alternator, and I recommend you check these as well if you are seeing similar problems.
Diagnostic Items to Check
- Since the problem was intermittent, a loose battery cable or bad grounding was suspected. The battery cables were loose (the positive one ended up cracking) so the battery clamps were replaced with a much more robust clamp.
- The voltages between the battery, ground, and positive terminal lug on the alternator were checked to verify good connections.
- Wiggle and re-seat the electric plug to the alternator.
- Check the connections from the battery to the fuse box under the hood are tight (large Phillips screws).
- Check all the fuses. There are fuses located inside the vehicle by the driver’s left knee, and fuses in the fuse box under the hood. Pay special attention to the 100 amp fuse in the fuse box as well as fuses #5, #7, #10, and #15 under the dash. Sometimes just removing the fuse and putting it back in if okay has resolved the issue for some.
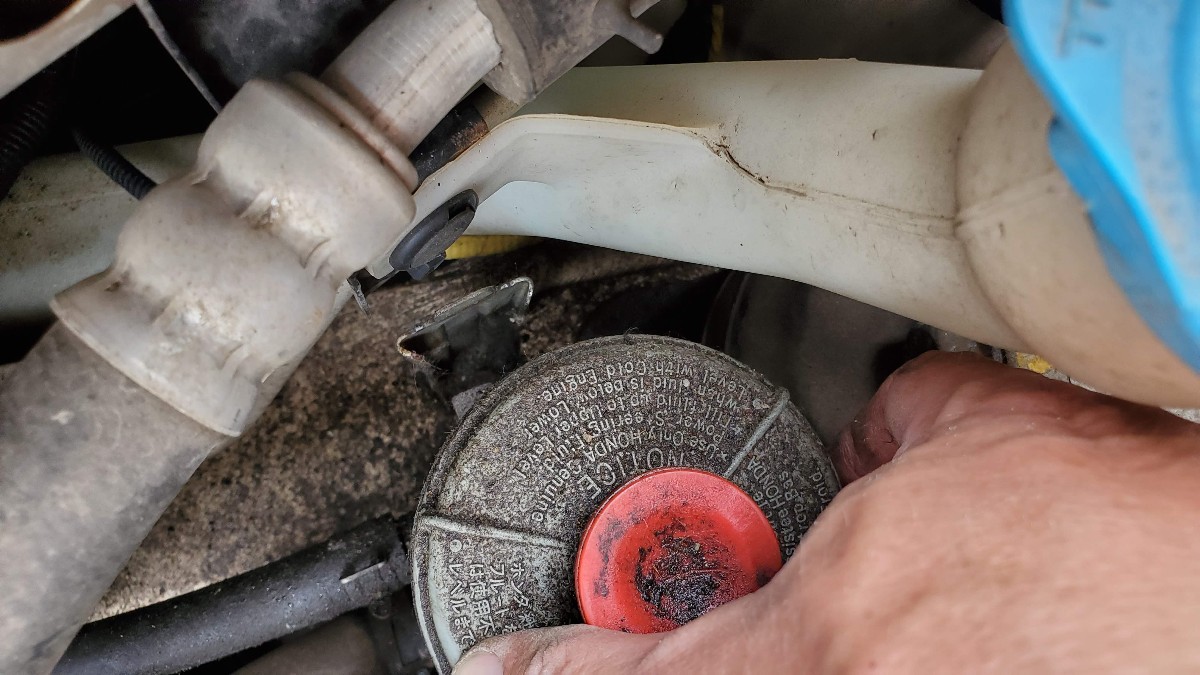
- Verify anti-freeze level is okay. If low, this has been known to cause issues with the ABS light coming on intermittently.
- It has been said that if an alternator is bad or cannot provide sufficient voltage, electrical components will begin to fail, roughly in order of importance. Things like dashboard lights, radio, even the speedometer are of less importance that other things in the vehicle, therefore those may fail first.
Additional Diagnostic Items to Check
Other possible issues that it could have been but I did not check. I include these for purposes of completeness in case someone else has this problem:
- Bad ABS relay or main relay (found inside the fuse box).
- The O2 sensor wires can sometimes short out against a metal part underneath the vehicle causing intermittent electrical issues.
- Spark plug wires old or cracked, consider replacing.
- Spark plugs old or cracked, consider replacing.
Ultimately the clues pointed toward a failing alternator, so I decided to replace it. The cost of a new alternator is only slightly more than a good car battery these days, and the installation is very straightforward.
Tools Required to Replace the Alternator
- 10mm socket
- 12mm socket (deep socket works best)
- 14mm wrench with cheater bar (or Serpentine Belt Tool)
- torque wrench
- needle-nose pliers
- Alternator for Honda Acord 2003-2007
- Serpentine Belt 2003-2007 Honda Accord (recommended to change at the same time)
How to Change the Alternator in a Honda Accord
The alternator is actually pretty easy to replace on a Honda Accord, so this can be done in about 1 hr.
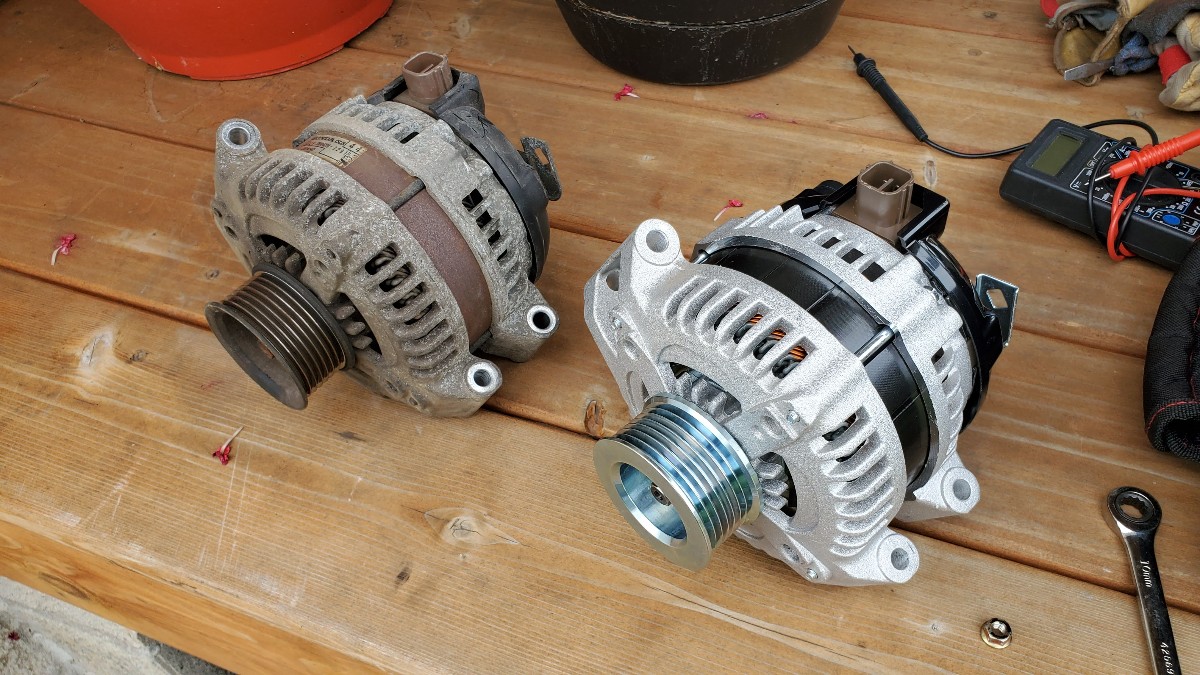
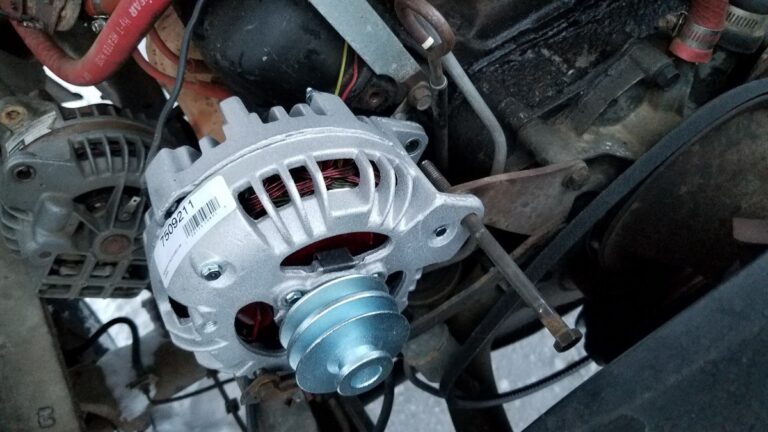
I bought a new 105 amp alternator off of Amazon.com:
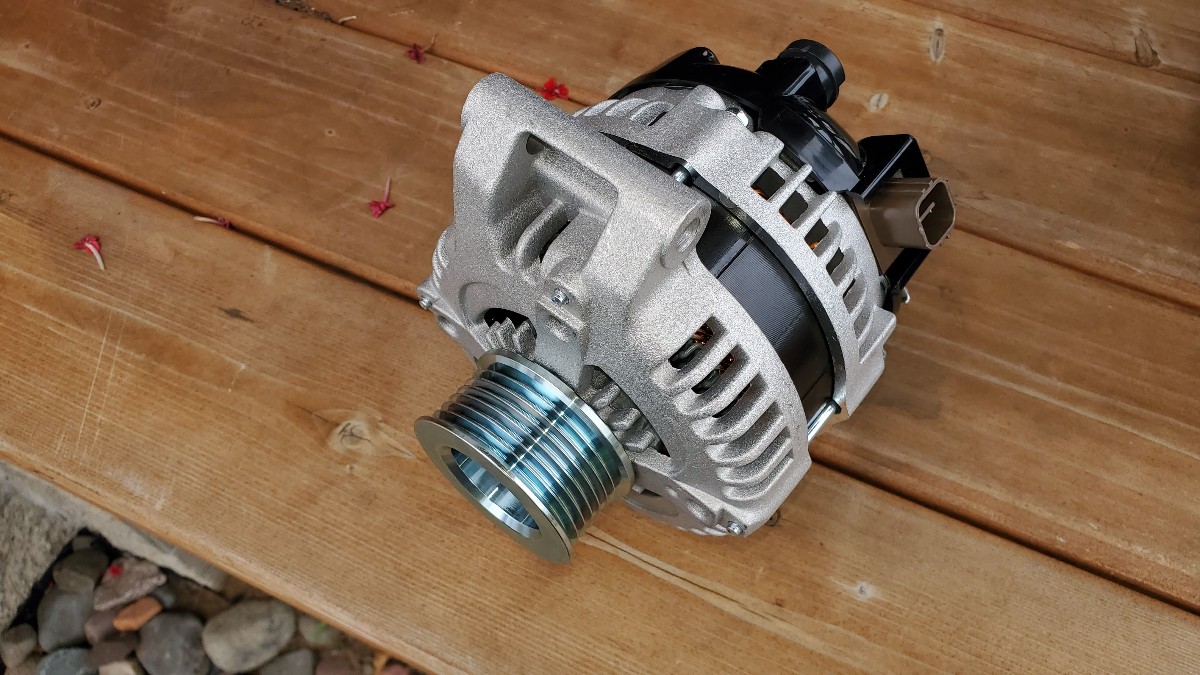
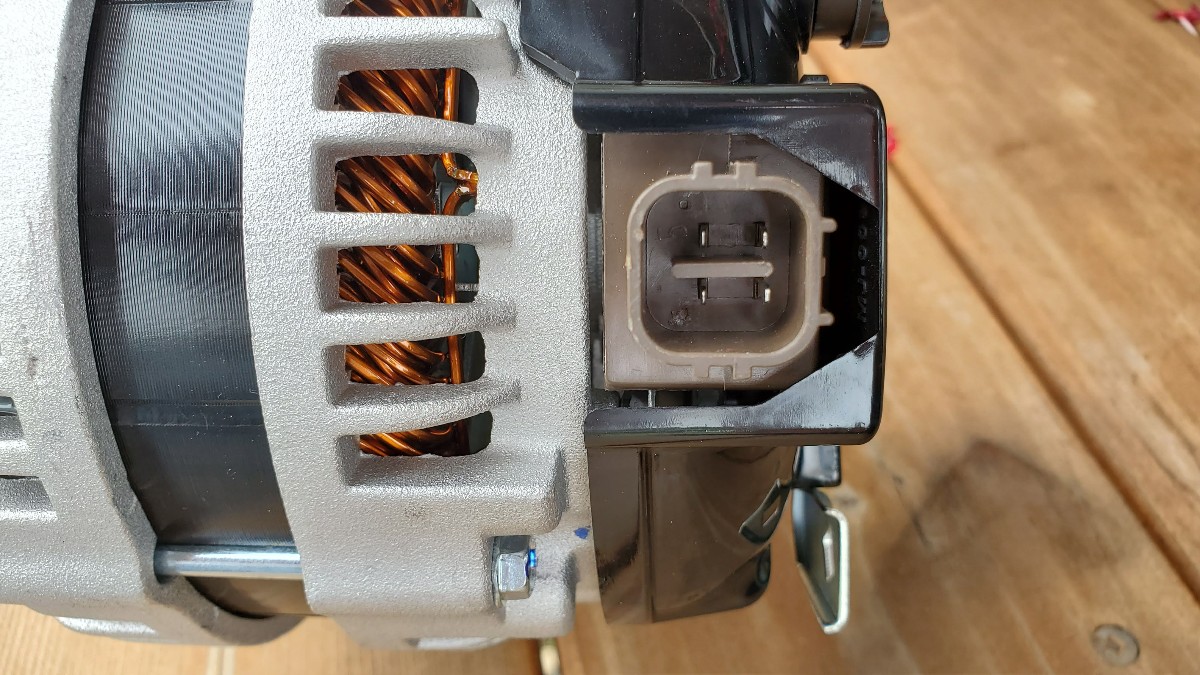
When you get the new alternator, verify that the connections are the same as the existing one.

Also verify the plug slots.
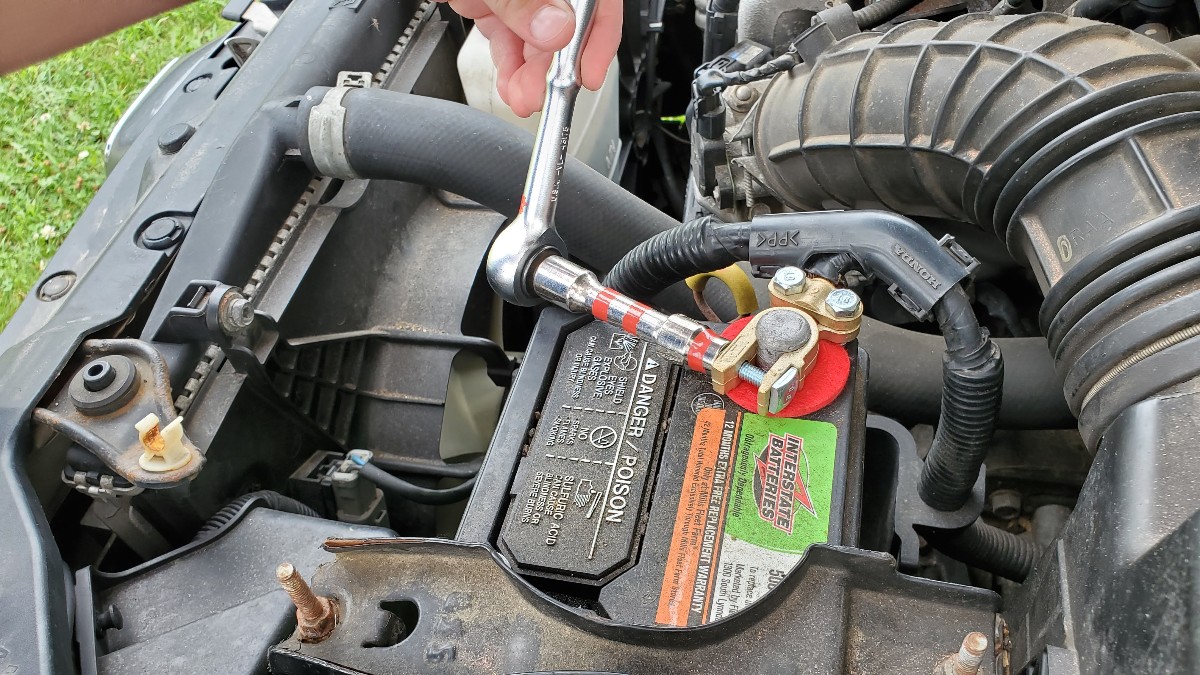
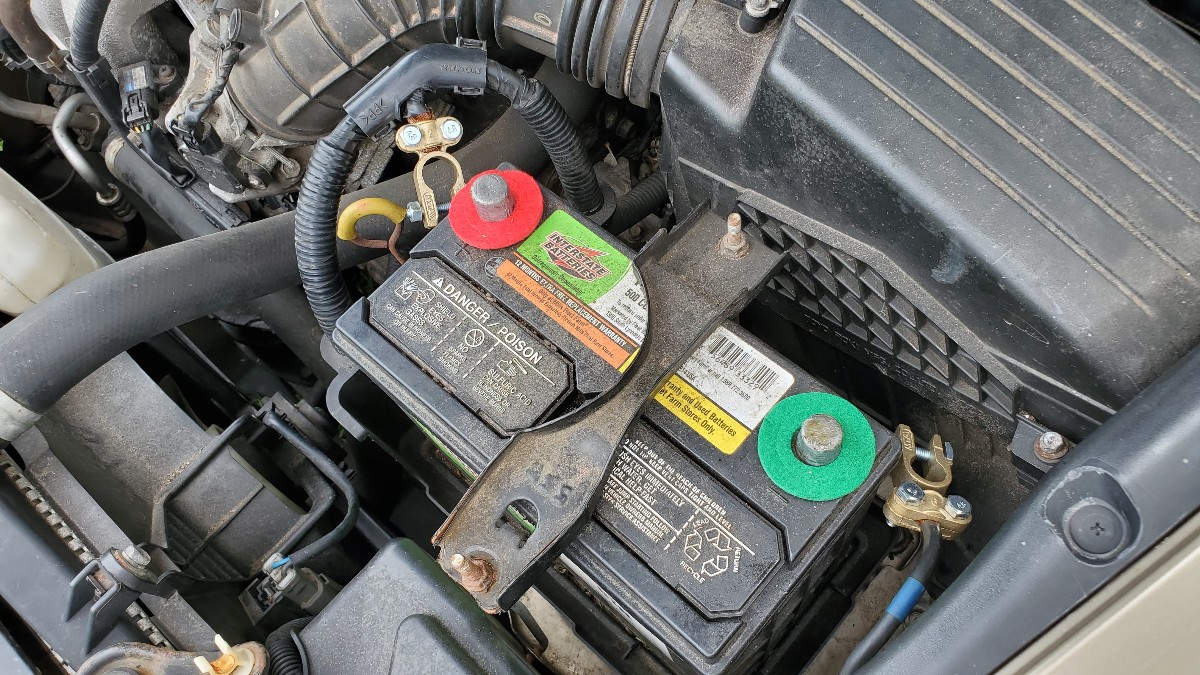
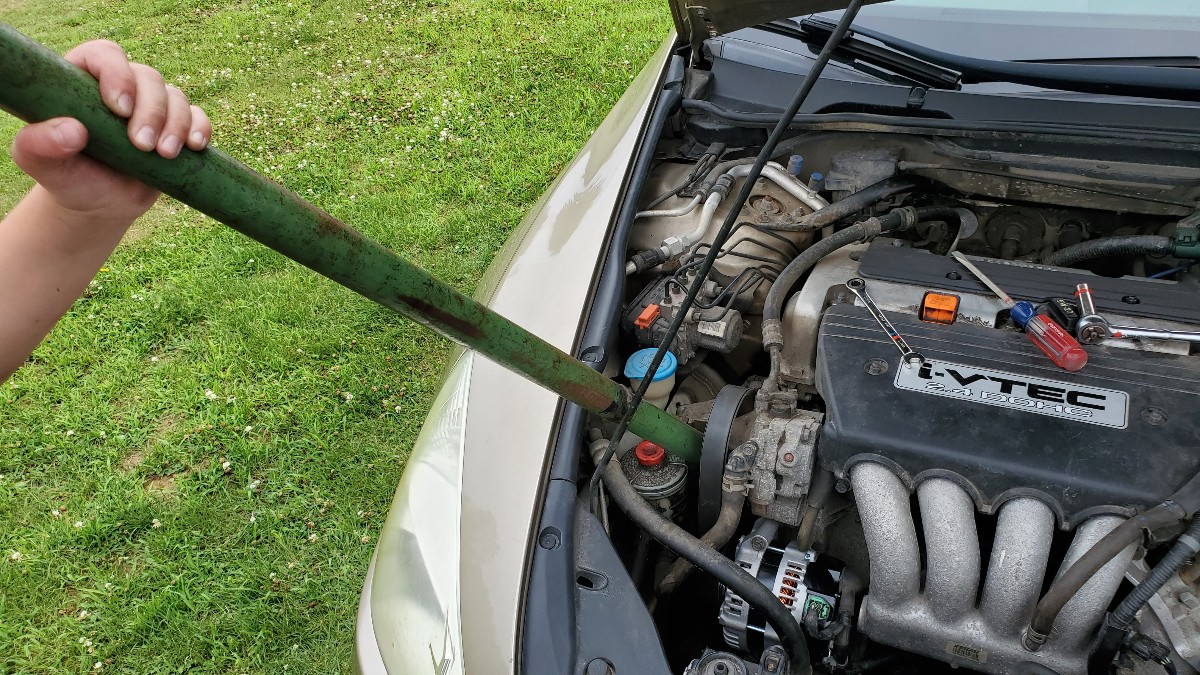
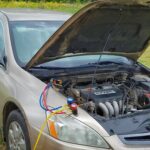
The first thing to do is disconnect the negative (first) and positive (second) battery cables. using a 10mm socket.
Push the connectors out of the way so that they do not inadvertently come into contact with the battery while you are working.
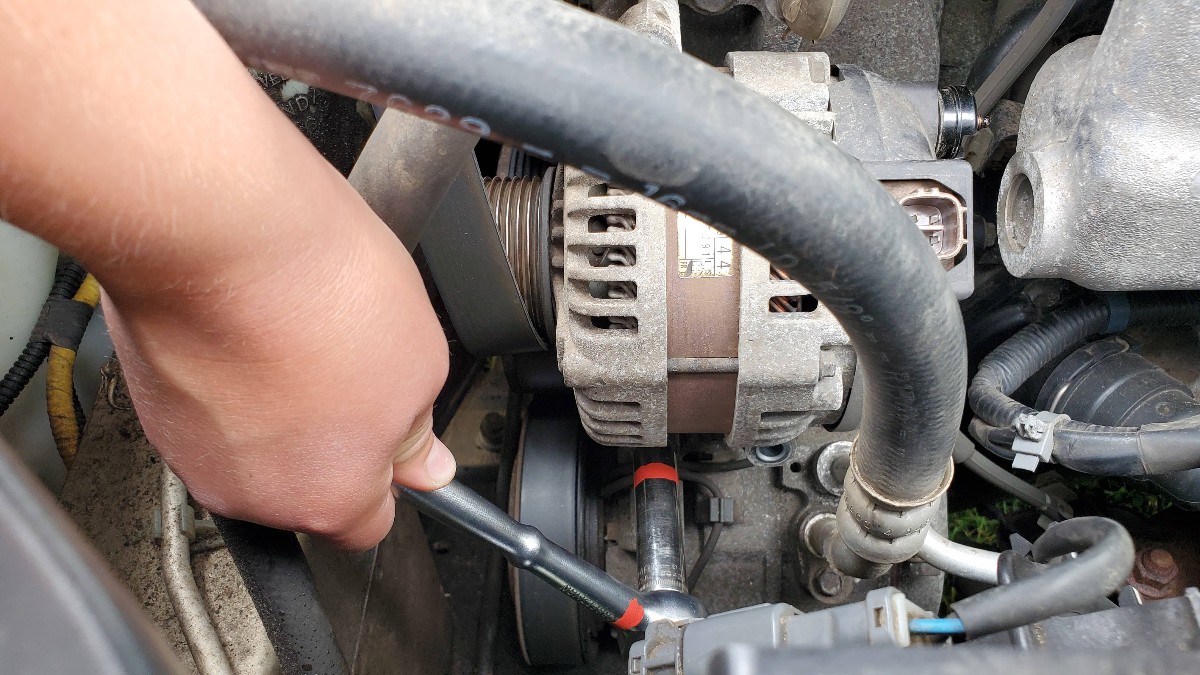
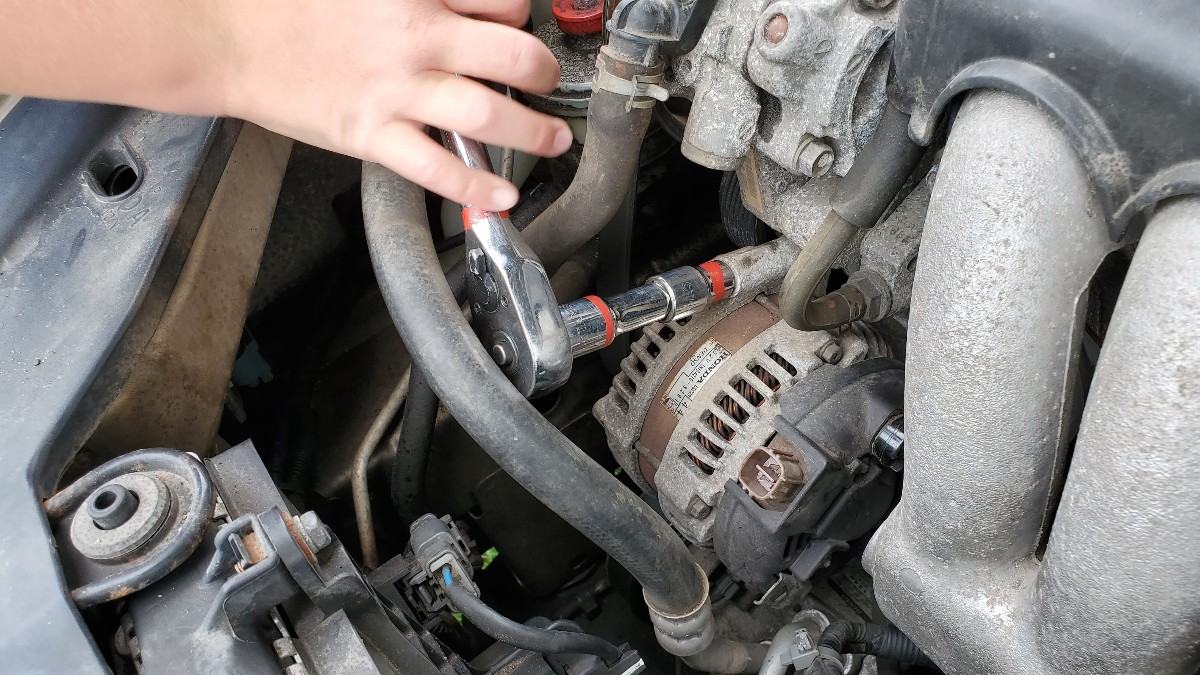
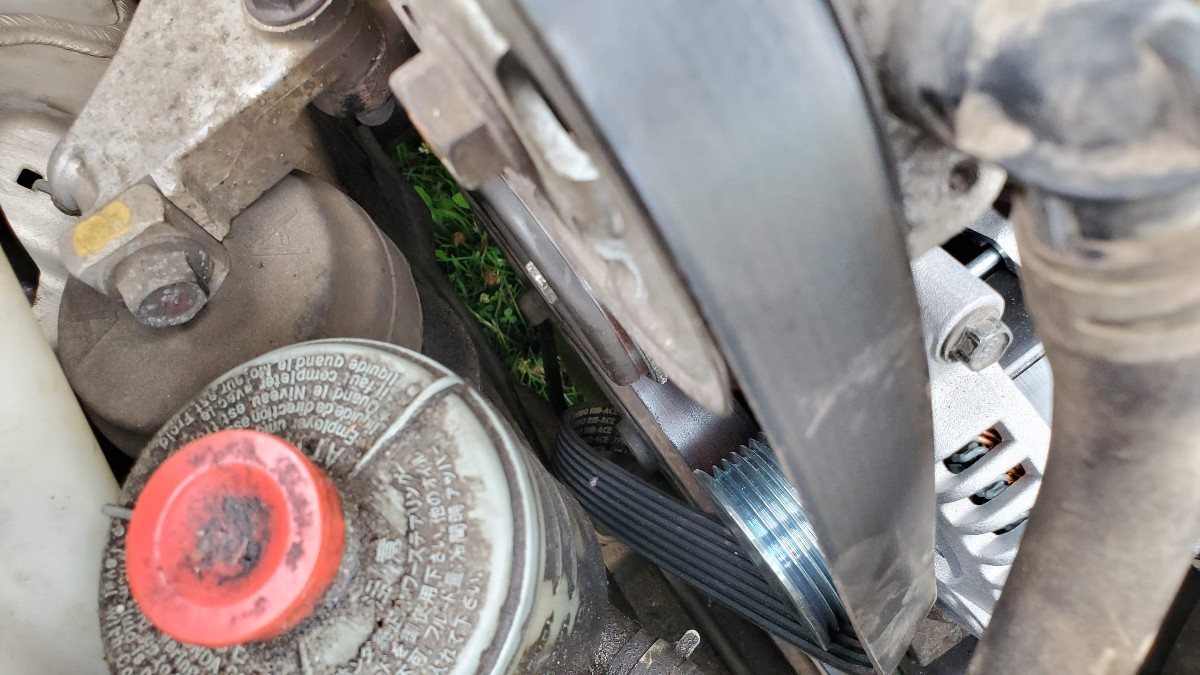
The next step is to remove the serpentine belt. Use a 14mm wrench with a handle extension or a serpentine belt removal tool to relax the tension on the tensioner pulley, as shown.
Check out my previous article for detailed instructions on removing the serpentine belt.
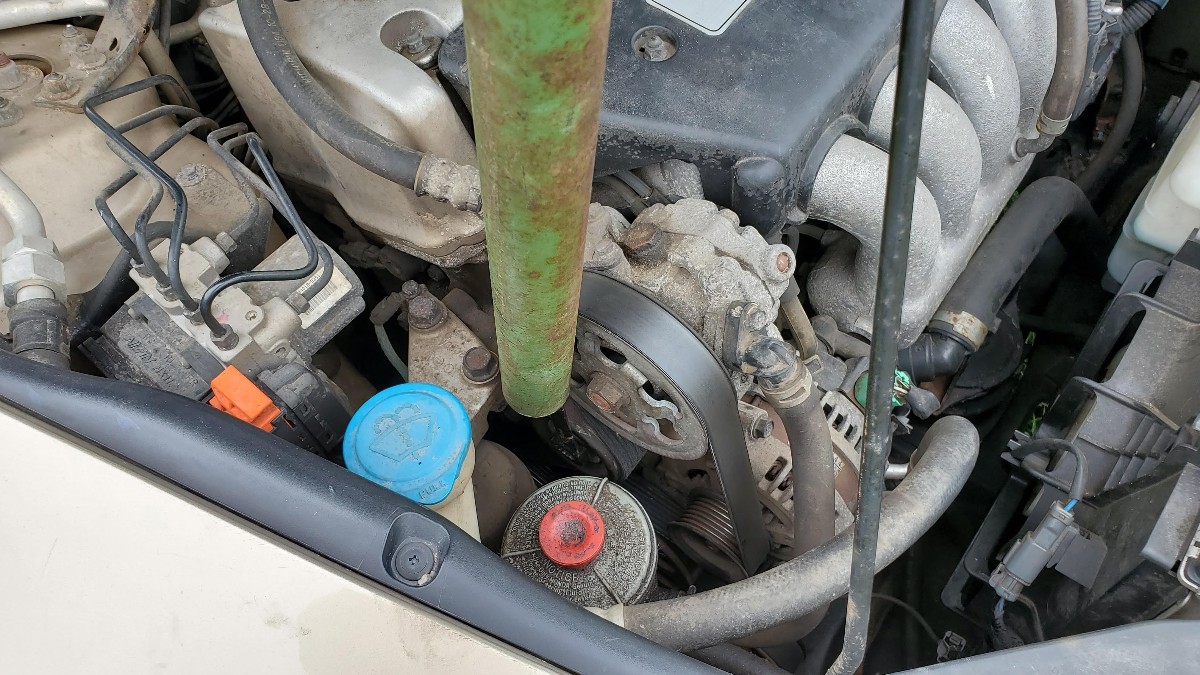
Slide the belt off of the power steering pulley, then release the tension.
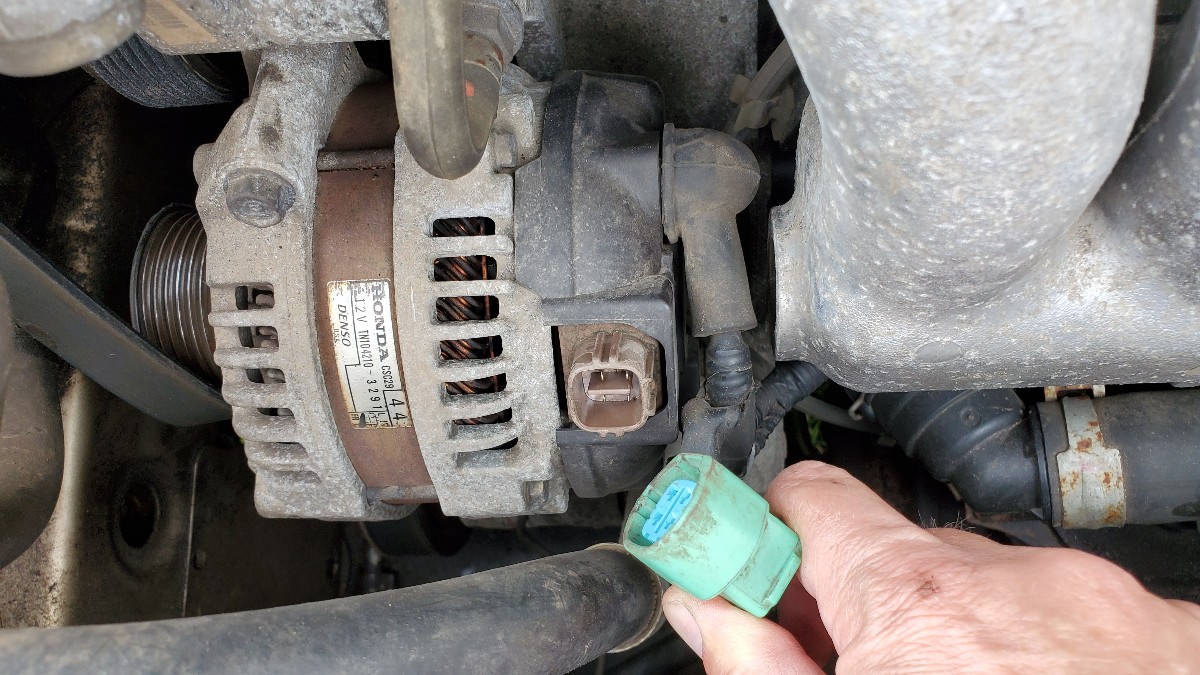
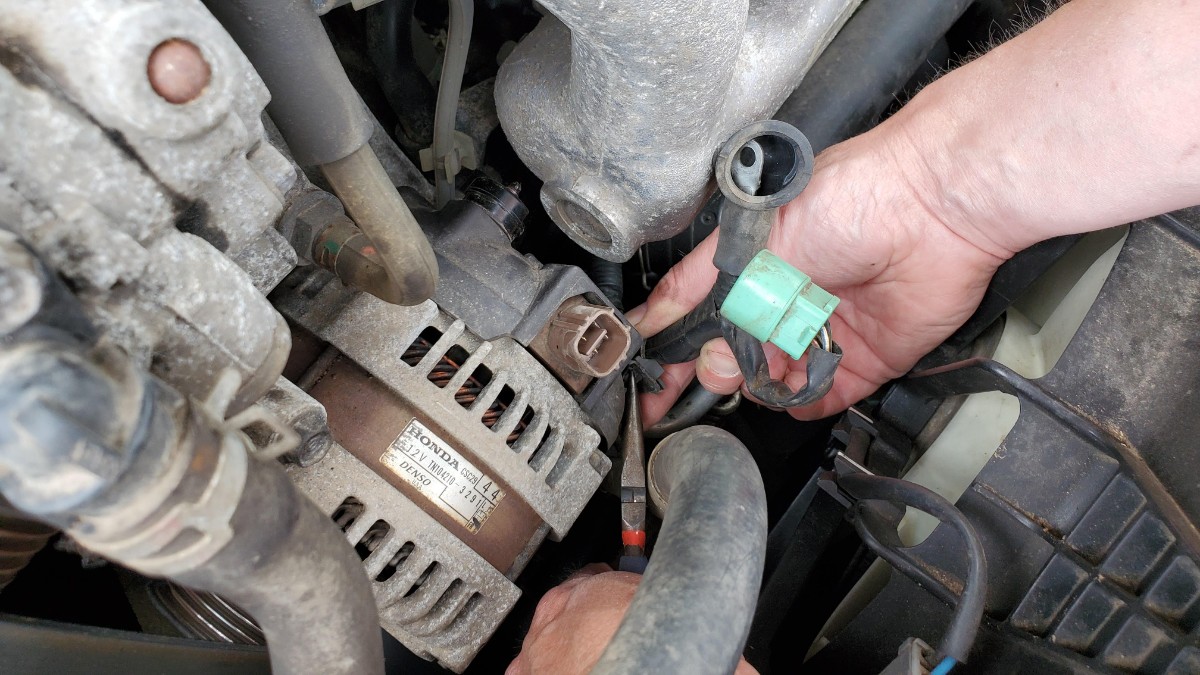
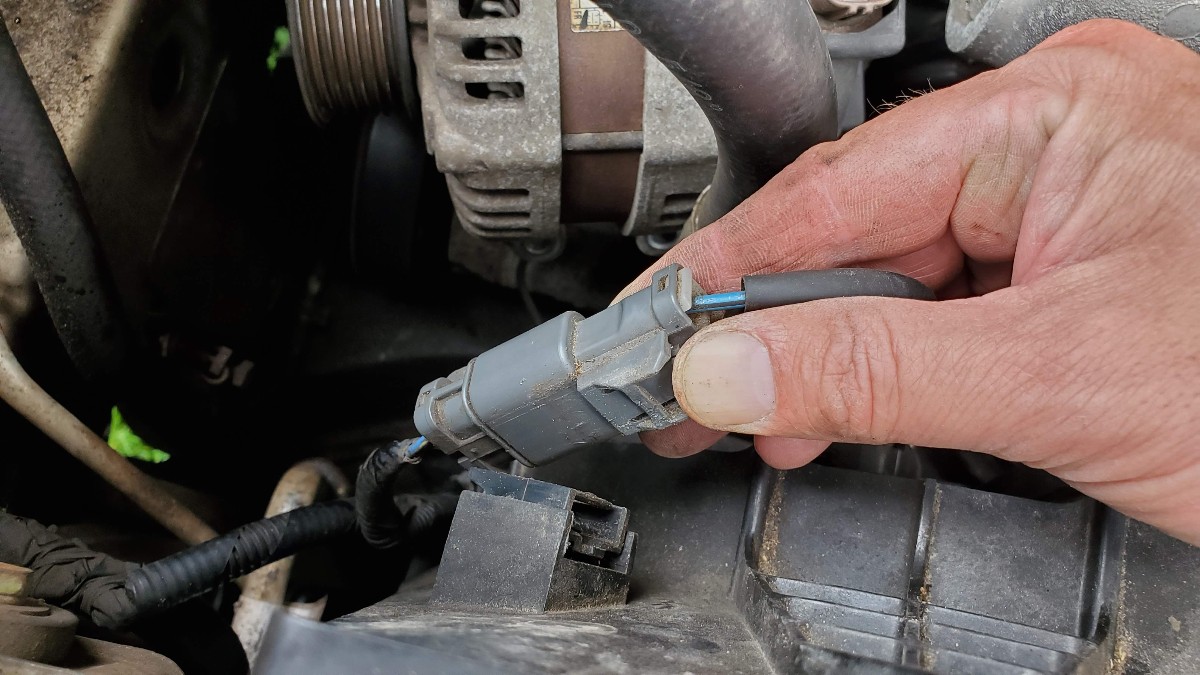
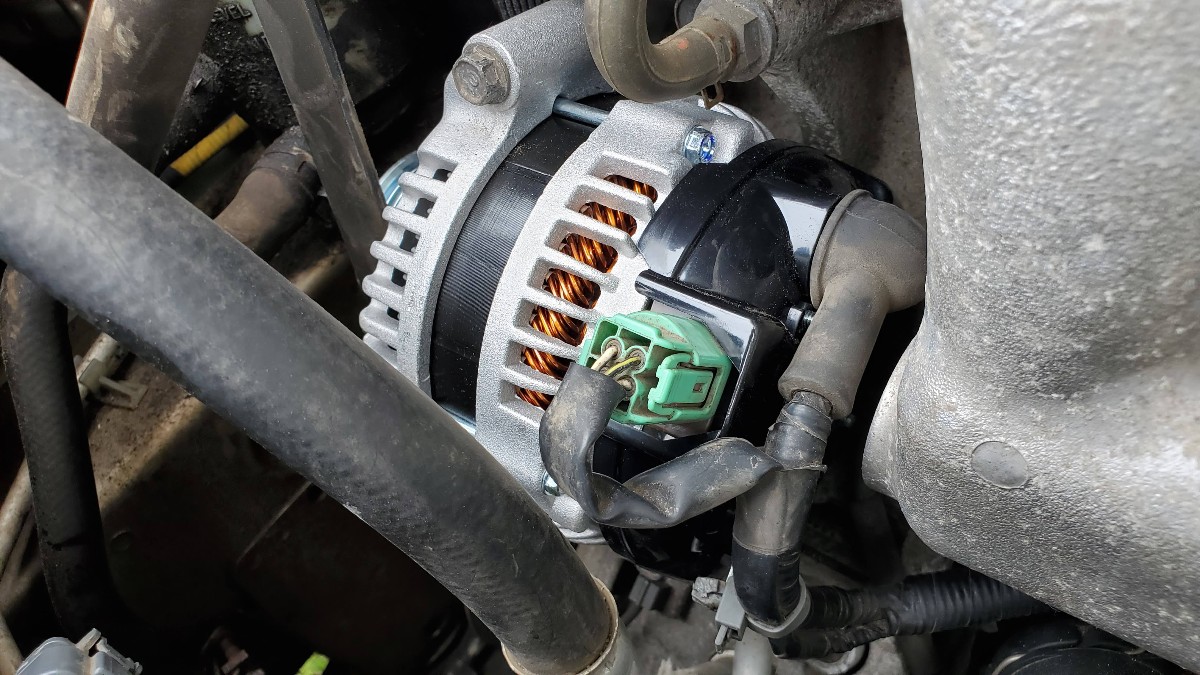
Press the clip on the electrical plug to the alternator and carefully pull it off.
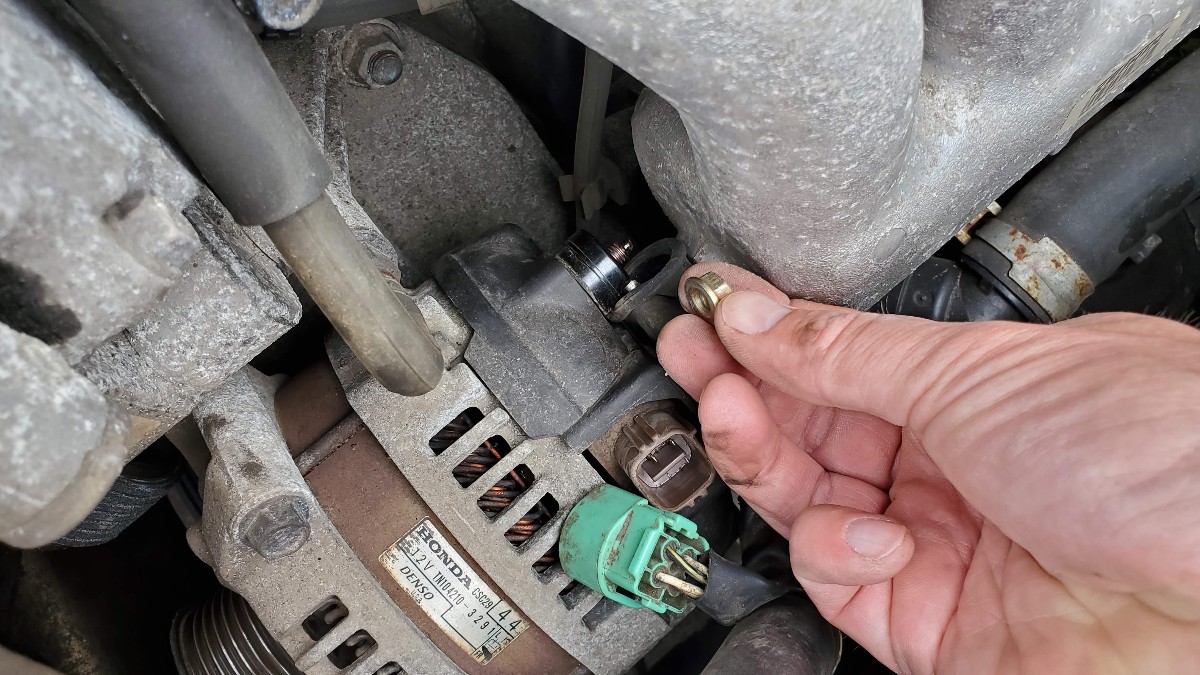
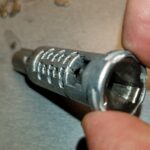
Pull back the rubber boot on the battery cable to the alternator then use a 10mm wrench to remove the nut.
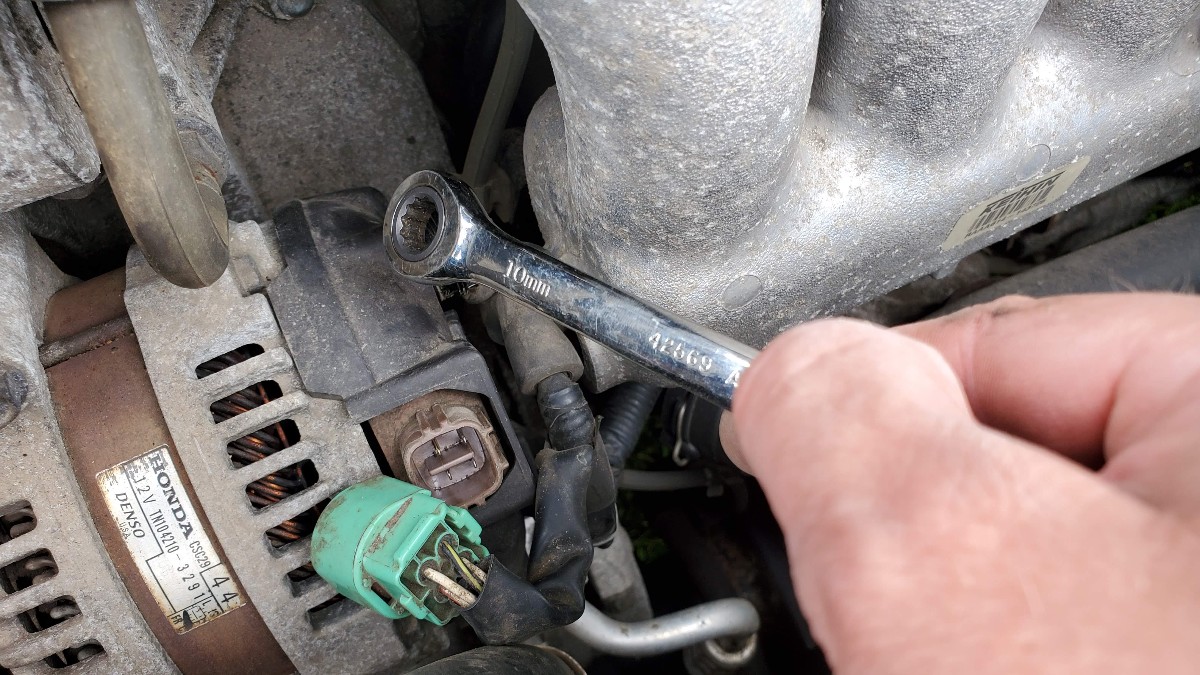
Take care not to drop the 10mm nut, as it is easy to do.
Next, use a needle-nose pliers to compress the plastic clip holding the electrical bundle to the side of the alternator, then press it through the hole. If it breaks it is not a big deal, you can use a zip-tie to secure to the new alternator later on.
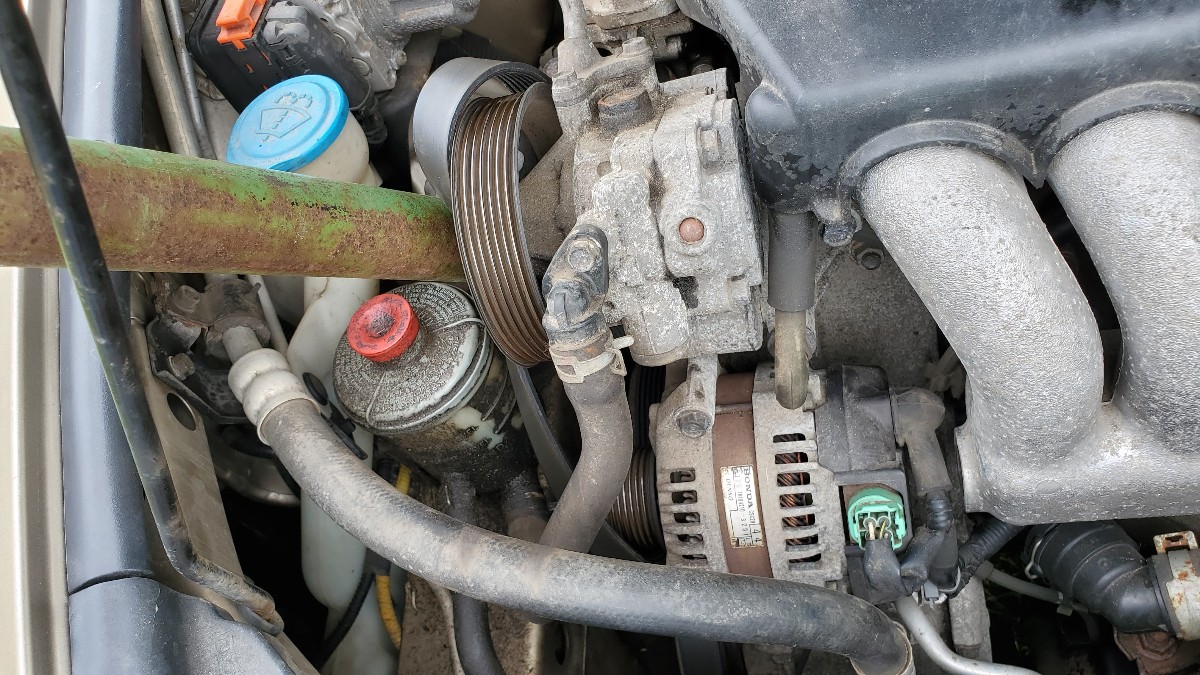
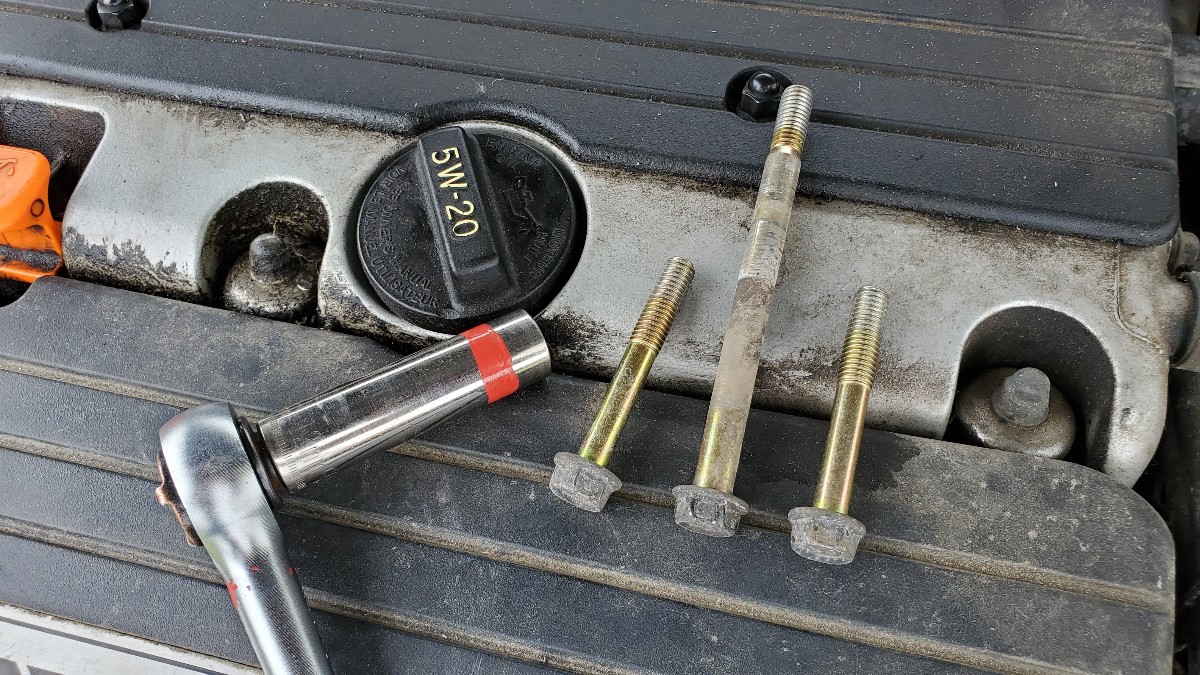
The alternator is held on by 3 bolts, one on the top and 2 on the bottom.
Use a 12mm socket to remove the 2 bottom mounting bolts from the alternator. I found that an extended length socket worked well for getting the bottom 2 bolts.

Remove the bottom 2 mounting bolts completely and put them in a safe place, these bolts will be re-used.

After the bottom 2 bots are removed, remove the top 12mm mounting bolt.
Now the alternator should be loose and ready to come out. It is a bit of a tight fit, but not too bad. It works best if you move a couple of things before wiggling the old alternator out underneath the a/c hose.
Press the clip on the fan electrical connector to disconnect it from the fan shroud and move it out of the way temporarily.
Lift up on the power steering fluid reservoir to un-seat it from its clip, and gently push it aside.
Fanagle the old alternator out.
Helpful Tip: I found the it works best to orient the pulley on the bottom, and the 2 mounting brackets as shown, while lifting it from underneath the a/c line.

Compare the old and new alternators and confirm the mounting holes and connectors look the same.
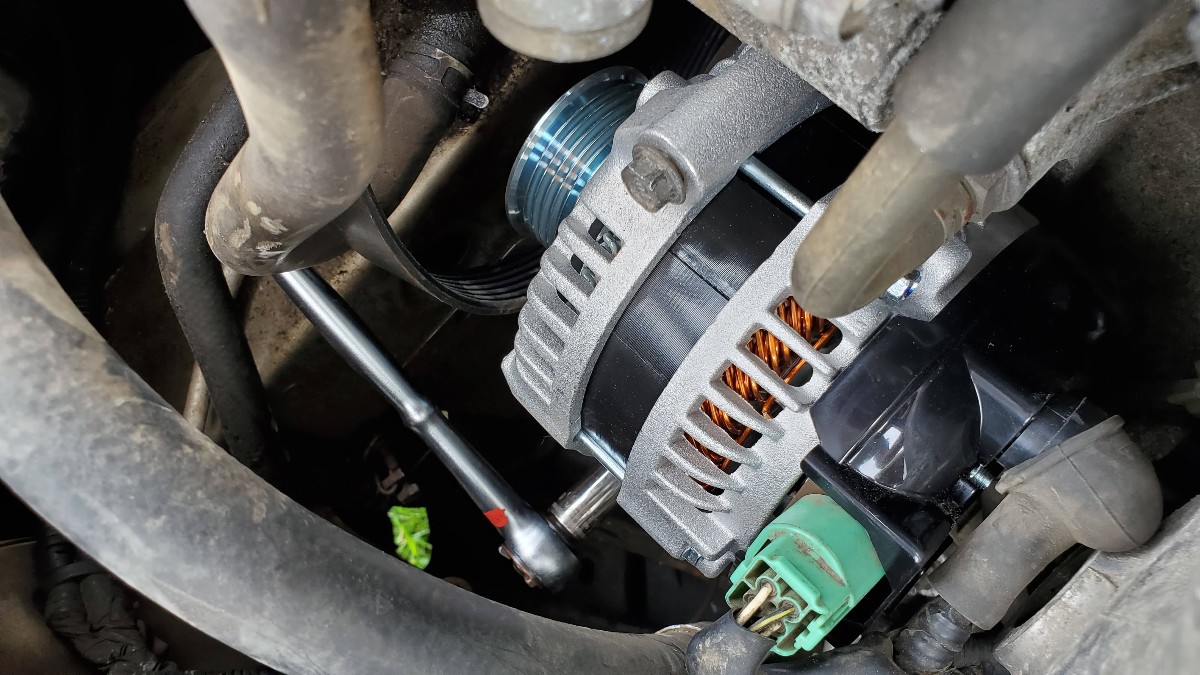
We are now ready to install the new alternator. Fit it into the vehicle in the same orientation that you took the old one out.
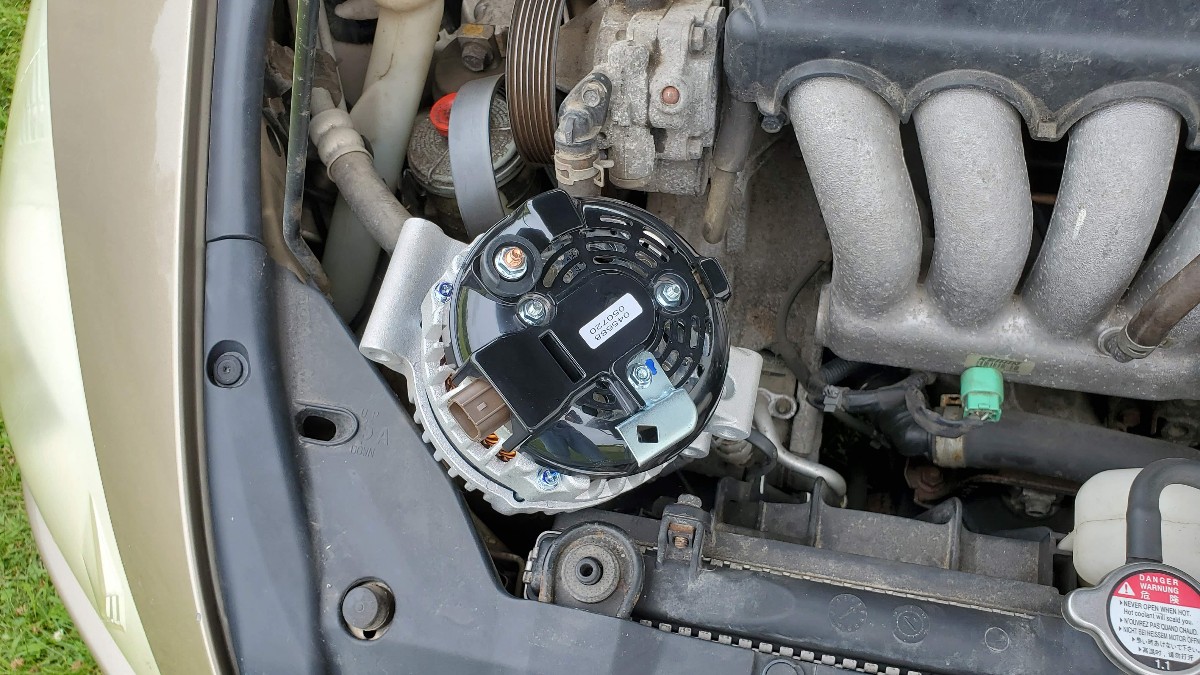
Slide it under the a/c hose, then turn it so that it is roughly in the right position.
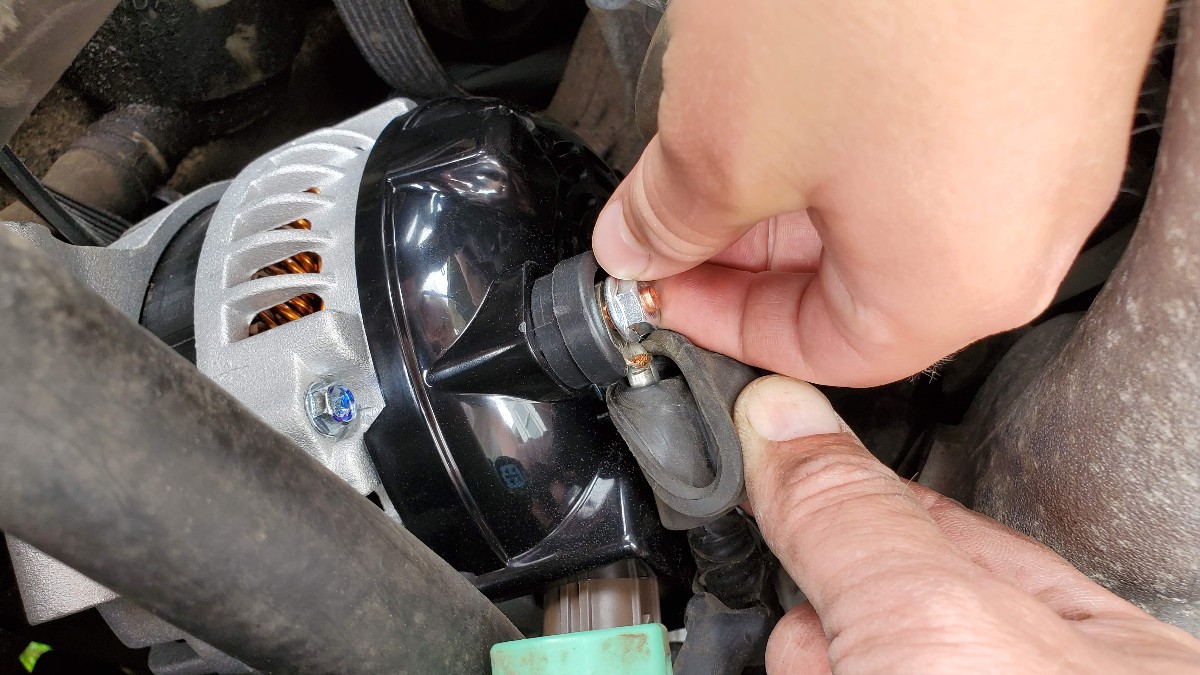
Helpful Tip: It works best to connect the power cable to the alternator now, before the 3 mounting bolts.
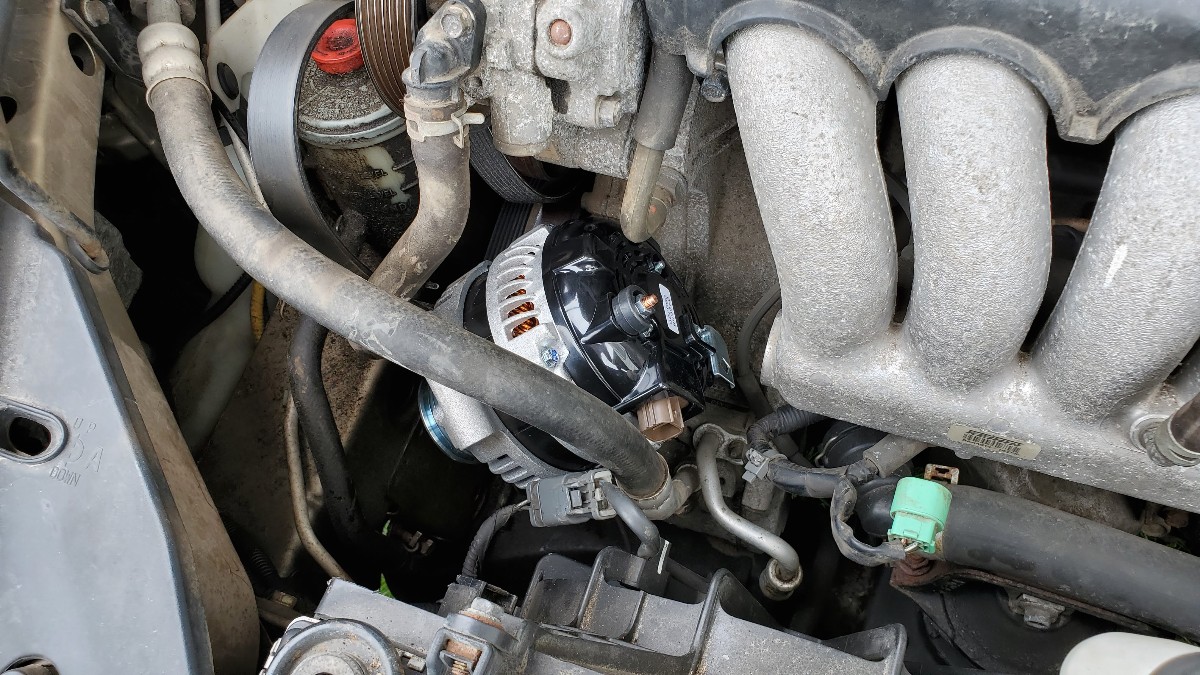
Put the battery cable onto the post and secure the 10mm nut with 6 ft-lbs of torque (which is to say, not very much).
We’re now ready to re-install the three 12mm mounting bolts. The longer one goes on top. Install that one first.
Move the alternator into position and put in the top mounting bolt. Get it started by hand.
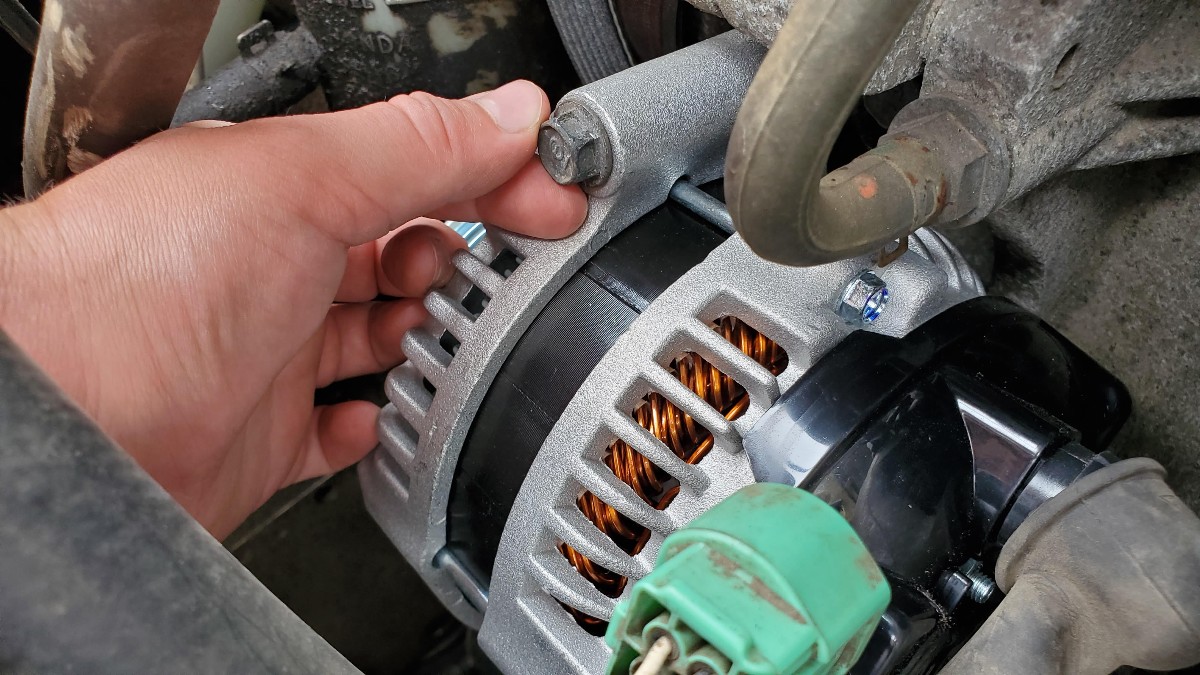
Then put in and tighten the bottom two 12mm mounting bolts. Tighten all alternator mounting bolts to 16 ft-lbs using a torque wrench.
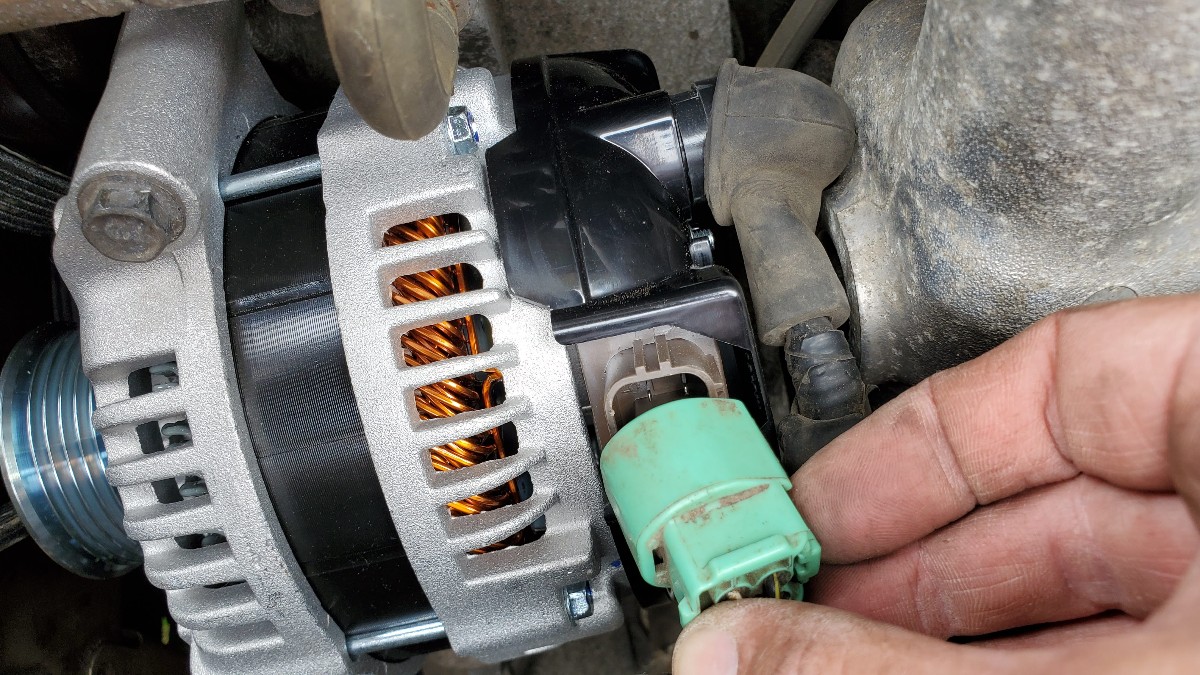
Connect the electrical plug. Press it on until it clicks into place.
Re-connect the fan electrical plug to its holder.
Press the power steering reservoir back into its clip.

It is recommended to replace your serpentine belt at the same time as the alternator. This is the serpentine belt for these Honda Accords:
Serpentine Belt for Honda Accord 2003-2007
Read this article for more details on how to replace the serpentine belt.
I recommend routing the serpentine belt over all the pulleys except for the idler pulley, like shown below.
Use the 14mm wrench and handle extension (cheater bar) to pull the tensioner pulley toward the front of the car. At the same time, slip the serpentine belt over the idler pulley. Release the tensioner. Verify that the serpentine belt is properly seated on all of the pulleys.
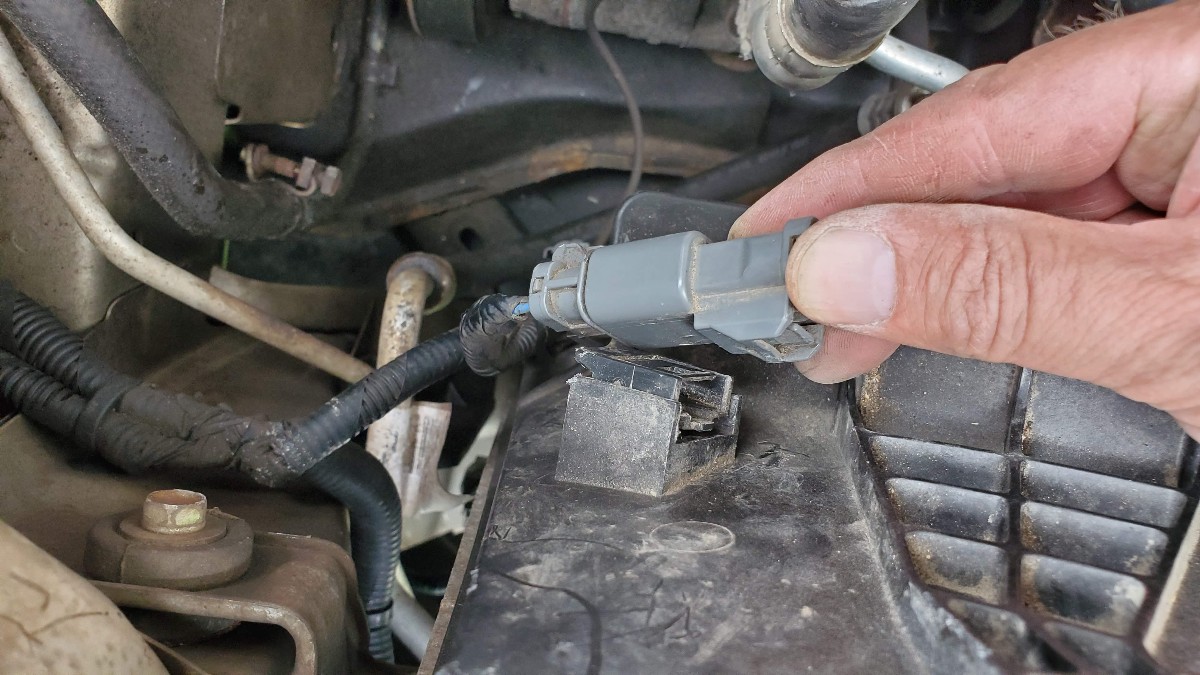
The new alternator is now installed! Reconnect the battery cables. Start with the positive cable first, then finally, the negative battery cable.
After installing the new alternator, verify that you didn’t forget to re-connect anything, remove all tools from the engine bay.
After starting the vehicle and letting it idle, the alternator was delivering 14.2v to the battery. This means that it is working properly.
Also, when turning the key just to the ‘on’ (II) position on the ignition, now the battery light does come on. After starting the vehicle, the battery light turns off. Another verification that the alternator is working correctly.
How to Reset Idle Speeds in a Honda Accord
Rough Idle, What Gives? Please don’t stop reading yet! There is one more thing that is important to note…
When replacing the alternator, or instances when the battery is disconnected for longer periods of time, the ECM (computer) in the vehicle can ‘forget’ its settings, and needs to ‘re-learn’ its appropriate idle RPM settings.
For this reason, you may notice that the car runs rough, or even threatens to quit when it is idling, or when you stop at a stoplight. This is normal. The vehicle needs to re-learn the proper idle settings.
The following procedure will help your car re-learn its RPM settings.
In order to do these steps, turn on the car with all of the electrical items turned off (radio, A/C, fan, etc…). Let the car run at idle for about 15 minutes. Then turn on some of the heavier current draw items, such as the A/C fan, rear defrost, radio, high-beam headlights, etc… Then let the vehicle run for another 10 minutes or so.
You will notice the vehicle ‘surging’ as it adjusts the idle setting from high to low and back to high again. This is normal. It is re-learning the idle settings.
After that, you can turn off the vehicle and drive it as normal. It may take up to a week or two for the computer to fully re-learn the RPM settings and start sounding normal again.
I hope this article helped you! If it did, please shoot me a comment below, I appreciate all feedback!
Thanks,
Rich
Tools Used in this Guide to Replace the Alternator
- 10mm socket
- 12mm socket (deep socket works best)
- 14mm wrench with cheater bar (or Serpentine Belt Tool)
- torque wrench
- needle-nose pliers
- Alternator for Honda Acord 2003-2007
- Serpentine Belt (Model# 070701) (recommended to change at the same time)


Good guide. Only major complain is when I used my torque wrench to tighten the 12mm bolts to 16ft/lbs, it snapped off my top 12mm bolt. Bolts were non-rusted and silver in color (original bolts) would not recommend torqueing those bolts.
Thanks for sharing. I’m a disabled elder living in Seattle and unfortunately I’m on disability so funds are low and debts are high. But Praise God for awesome Poeple like you who help. May God Bless and Keep you and urs..amen
Thank you, Monica! All the best to you.
This is the best posting I’ve read thus far, and I’ve owned my 2003 Honda Accord EX for almost 10 years now. Thanks so much and God bless.
Thank you, much appreciated!
Thank you so much, very helpful, God Bless
Thank you!
THANKS! Your guide made replacing my alternator a breeze! I’m more of a visual learner, so my Haynes doesn’t help with some repairs. Appreciate the serpentine belt post & suggestion about the idler pulley. It did make it easier.
I’m happy to hear this post helped! It makes my day, thanks for the feedback.
I wish you all the best!
cool