
How to Replace the Bearings – VERY Noisy Washing Machine – Maytag Bravos
Does your washer sound like a jet engine? This article provides detailed instructions and lots of PICTURES showing how to replace the bearings in a Maytag Bravos (or Whirlpool Cabrio – which I heard is almost an identical machine).
How to Replace the Bearings on a Washing Machine that Sounds Like a Jet Engine
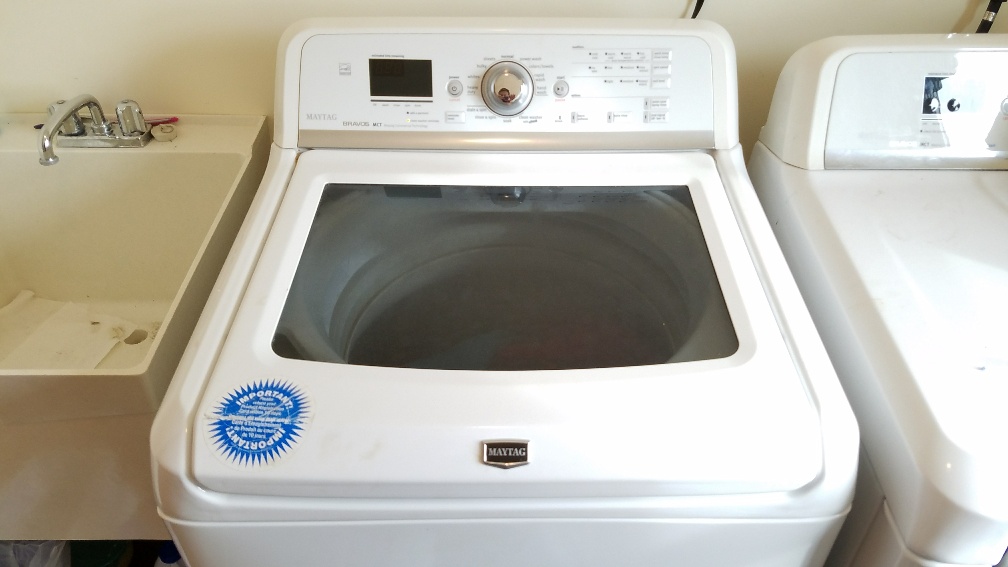
The Maytag Bravos Washing Machine began getting progressively louder and louder as the weeks and months passed. After about a year of ignoring the problem, I finally decided it was time to do something about it. People couldn’t sleep while clothes were washing. The loudest portion was the spin cycle, when the sound was like a jet engine or a freight train.
When you purchase through links on our site, we may earn an affiliate commission at no cost to you, and it helps me cover the website hosting fees.
Step 1: Ordering Parts
I ordered the parts off of Amazon, and everything fit okay for my washer. There’s a handy “make sure this fits your washer” tool at the top of the page, so in case you’re not sure, click here to see the kit:
Bearing and seal Kit With Tool Fits Whirlpool W10435302 and W10447783
The kit includes both bearings, seal, axle shaft, grease, and adhesive, spacer tube, washer, bottom nut, and the installation tool. Basically everything I recommend for fixing this issue.
The kit above includes the bearing press-in tool. In case you don’t buy that, I will show you how to work around needing that tool with some tips various people have posted on blogs and youtube. BUT, if you don’t want to mess around with work-arounds, and want everything to “just work,” I get it.
There is also a hub kit that I recommend if you want to replace it before it fails (as long as you have everything apart). The hubs on this particular model are pretty good even though they are plastic. They don’t endure tons of stress, so I would say with about 85-90% certainty that you won’t need to replace the hubs. However, if this is the second time you are replacing the bearings, then it would be a good idea to replace the hub. Also, they are relatively cheap, so if you don’t want to be disassembling things in the future to replace one of these, here is the link to the correct hub set that you would need.
Here is a list of the tools you will need for this repair:
- Putty Knife
- Pliers
- Vise grips (qty 2)
- Flat bladed screwdriver
- Flat bladed screwdriver (small)
- Socket Set with 10 mm, 11 mm,
- 1/4″ Allen wrench
- Scissor Car Jack
- Board about 20.25″ long
- Hammer
- Bearing Pusher Tool or Bearing tool that comes with the Bearing Kit
Supplies used:
Step 2: Disassemble the Washing Machine
Okay, let’s get started! The first step is to take your washing machine apart. It is not difficult, but I’ve included a lot of photos of the steps, anyway.
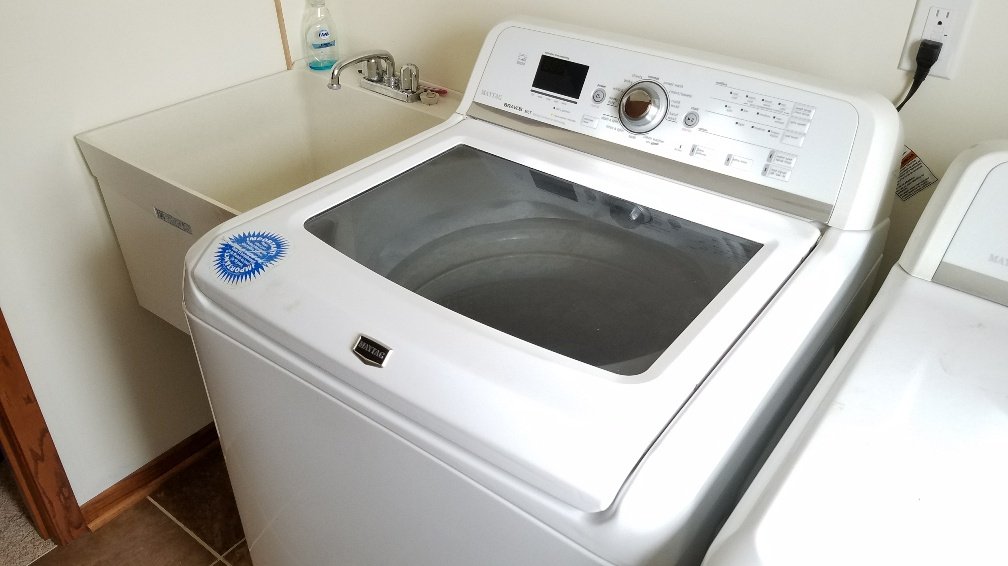
Firstly, this is the machine that I will be showing in this guide. It is a Maytag Bravos. The model number is MVWB750WQ1.
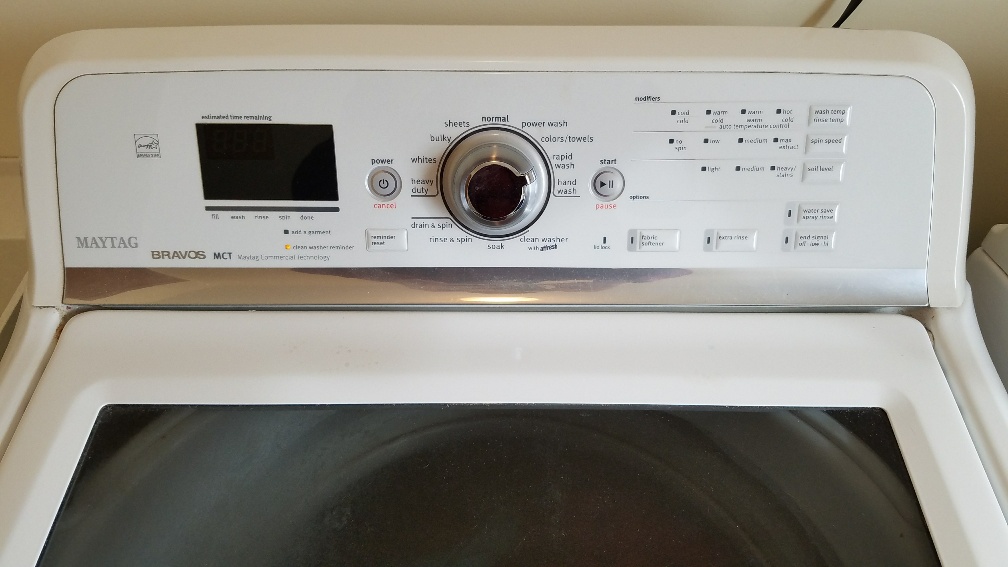
Here is a close-up of the control panel for purposes of comparison, in case you have a similar model. Of the guides and videos I found online, I was not able to get a clear view of this information, so it was difficult to know if it was the same unit.
Unplug the washing machine and turn off the water supply at the back of the unit.

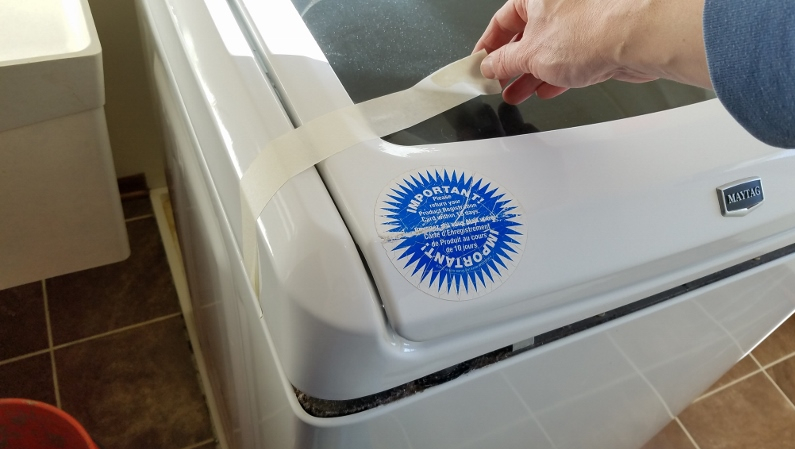
Use a putty knife to press in 2 tabs. The tabs are located about 6 inches in from each side. Slide the putty knife in the seam as shown. You will press inward, releasing the metal spring-tab. Repeat on both sides, and when loose, the top of the washer will be loose to flip up.

Once both of the tabs are loose, go ahead and tape the top shut, so it doesn’t slam open when you lift the flip-top.
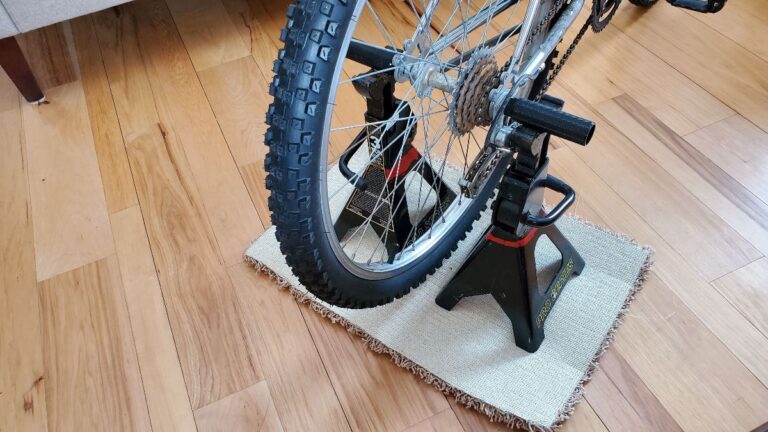
Now the top can be flipped back and either leaned against the wall, or better yet, secured with a rope or strap, like I’ve shown in the next image. You will eventually be tipping the washing machine onto its back, so give yourself plenty of space to work, if possible.
This may be a good time to mention that there are some handy washing machine cleaning tablets available on the market that will hopefully keep your washing machine cleaner than mine!
Also, a rope or strap to hold the top lid open (without relying on the thin metal tab ‘hinges’ in the back) will come in handy when you are tipping the unit up and back multiple times to alternately get at things from the top and bottom.

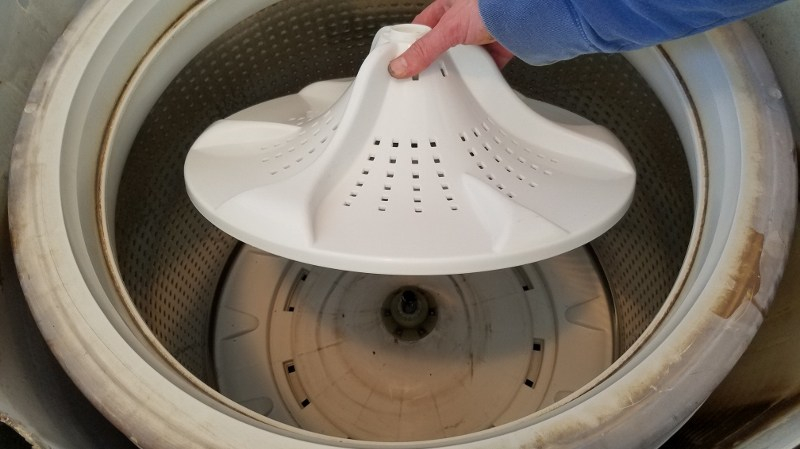
The next step is to remove the plastic cover that prevents larger items from slipping down between the drum and the washer walls. Un-clip the plastic clasps all around the edges. There are about 16 clasps around the circumference of the cover. Slip a flat bladed screwdriver into the clasp and pry it apart, as shown. Repeat for all the clasps.
There is also a water fill hose that needs to be disconnected from the plastic cover. It is located near the top of the drum on the back left as you face the front of the unit. I have seen these connected with a spring clip like I have shown below, or with a pipe clamp. Either way, use a vise grips (or pliers) to squeeze the clamp and slide it backward, or a screwdriver to loosen the pipe clamp. Leave the clamp on the hose, just move it further onto the hose, so that it does not get lost.

Then gently pull the hose off of the plastic input port.

The plastic cover can now be removed. Pull it out and set it aside. This is a great time to clean out some of the gunk that has built up over the years!

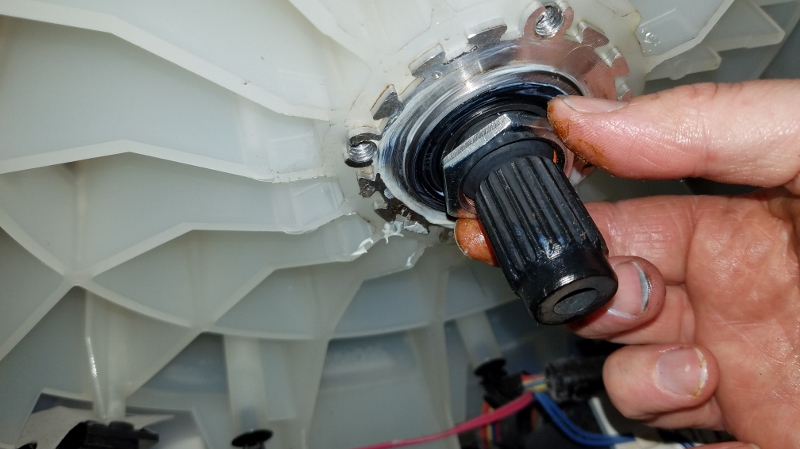
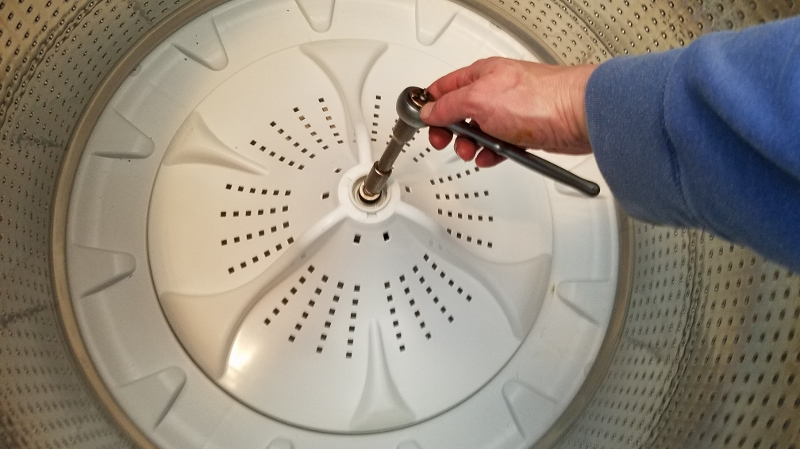
We’ll now move inside the washer. At the center of the agitator is a plastic cover. This can be removed by gently prying it up with a small flat bladed screwdriver.

Once the plastic cover has been removed, the top axle bolt is exposed.

Remove the top axle bolt. I used an 11 mm socket.

This is a closer view of the top axle bolt after it has been removed.

Now, the agitator can be pulled upward. It might be a bit snug, so rock it back and forth and twist it a bit as you pull it out.

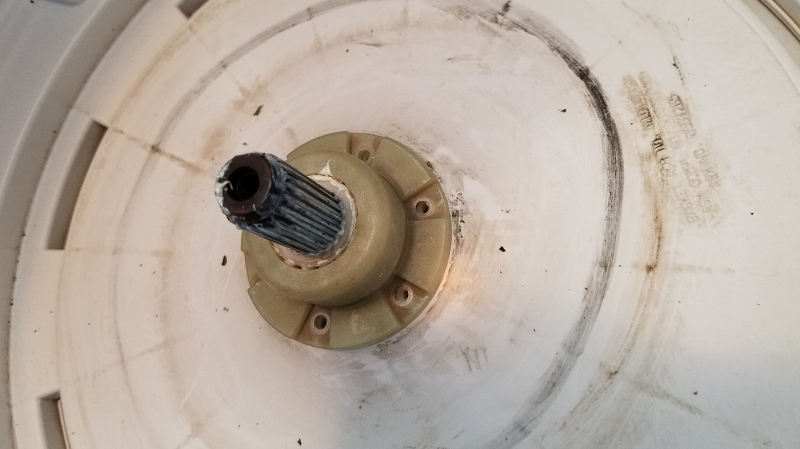
You can now see the top of the main axle exposed.

We’ll now remove the plastic hubs. Use a Phillips screwdriver to remove the 6 screws around the circumference of the hub. Take care not to drop the screws. If you do, they could fall through some of the water drain holes in the bottom of the drum and may be difficult to retrieve. Stuff towels into the drain holes in the bottom of the drum if you are worried you’ll drop the screws, or just be careful.
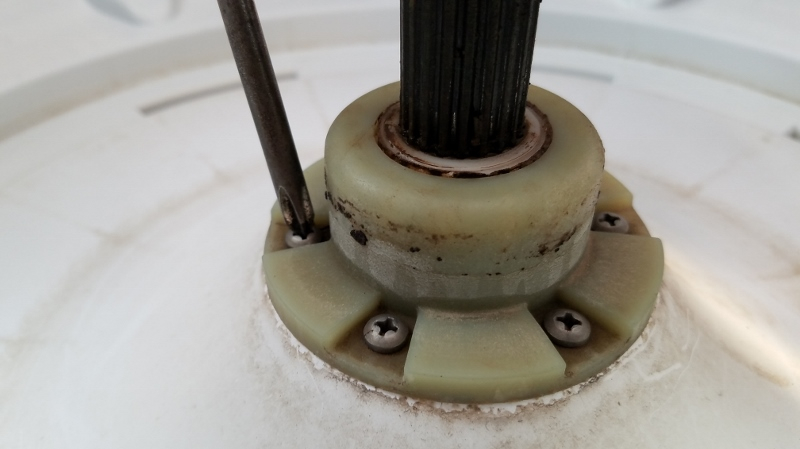
Once the screws are out, pull the hub off. There is also a smaller hub underneath. Pull that one off as well. You’ll notice that the smaller hub has a thin silver washer nested into its base. In the photo below, they have come apart. Not a big deal, just be sure to put that silver washer into the base of the small hub with the correct orientation, and don’t lose it.
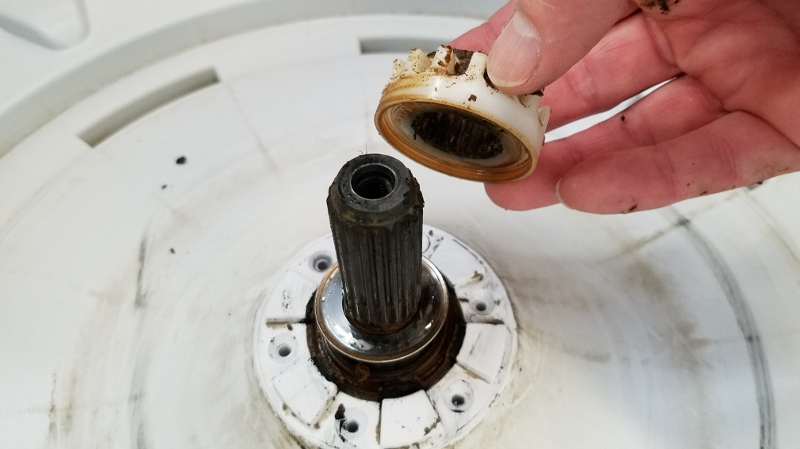
After the hubs are removed, This is what you will be left with.

Okay, now we are ready to work underneath the washing machine. If you have not already done so, turn off the water, and disconnect the water supply and drain hoses from the back of the unit.

Now, gently tip the washing machine backward. I put a 5-gallon pail for the top to rest against. Put something for it to rest on, since eventually it will be handy to have the unit tipped backward, but also to have the flip top open, so that you can get at the axle from both the top and the bottom at the same time. If it is resting on the floor, it is more difficult to open the flip top, but could probably still be done, will just require lifting the unit a bit when you want to get in there.
Now the bottom of the washing machine is exposed. We will begin removing these components.
The first step here is to remove the bottom axle bolt. This is a 1/4″ Allen (hex) driver. Take the bolt all the way out and set it aside.

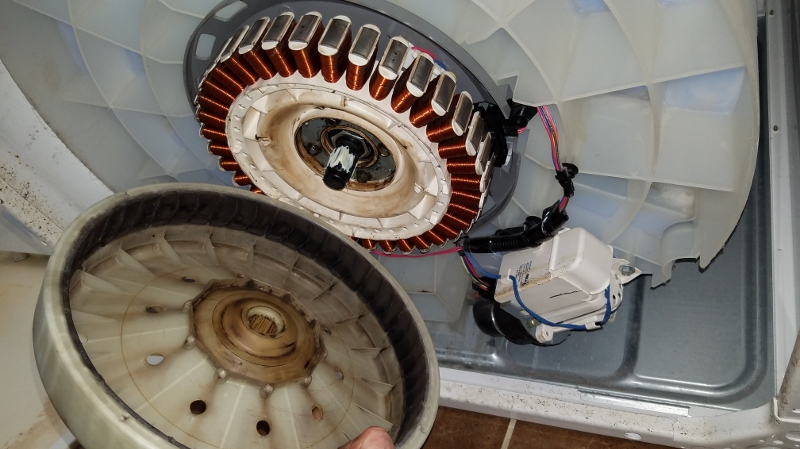
The bottom plastic magnetic cover will now slide off revealing the coils underneath.
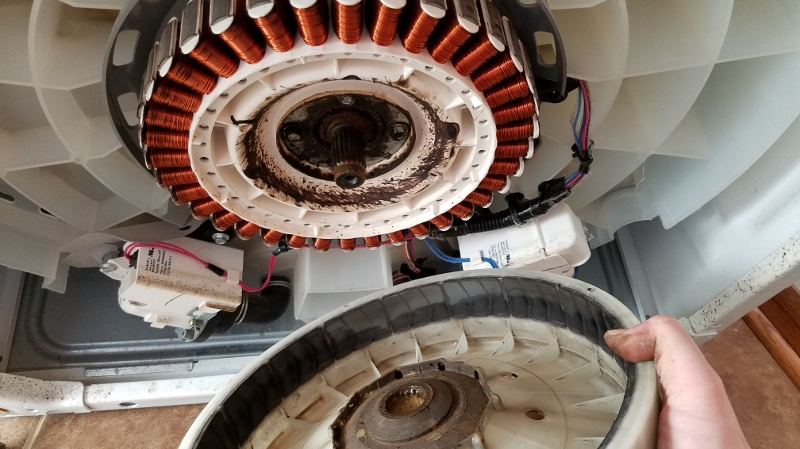
To get the coils off, remove 4 bolts around the central hub. Here is a close up view of where you will be removing these 4 bolts from.

Remove the 4 bolts, I believe a 10 mm socket worked for these.

Once the bolts are removed, there is a circular metal plate that will slide off. Remove it and set it aside.

Now the plastic housing holding the coils will pull off of the axle. Remove it.

There is a white plastic wiring harness that will need to be removed. It is shown below. Pull it outward away from the axis of the coil unit to unplug the connector.

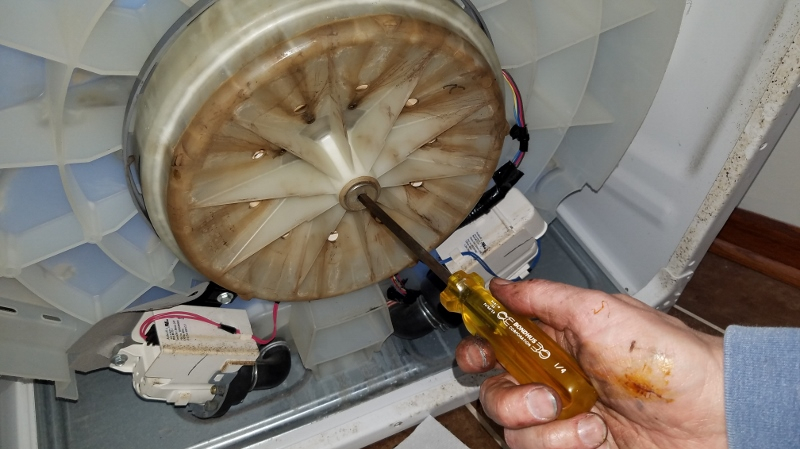
With the coils removed, the bottom of the axle is exposed. We will now remove the retaining nut.

This is a very large nut. I didn’t have a wrench large enough, so I used a vise grips. This is probably okay, since a new nut comes in the repair kit, so even if you mar it up, it will not be re-used. If you are re-using this nut, take care not to damage it in removal. You also need to hold the axle from rotating while removing the nut. I used a rag with a vice grips to hold it steady while loosening the retaining nut. A new axle comes in the kit as well, so if you have that, don’t worry too much about marring the old axle. Turn the 2 vise grips in opposite directions to loosen the axle retaining nut.

Step 3: Un-boxing the Replacement Parts Kit
We’re now ready to un-box the repair kit with the replacement bearings.

These are the items you get in this kit. If you find this guide helpful, I appreciate it if you click through this link to see the kit on Amazon, every click helps!
Update: Since I did this repair, the kit now comes with the bearing install tool.
Bearing and Tool Part# W10435302 Bearing Kit
Inside the kit comes 2 bearings, seal, axle, spacer bushing, washer, retaining nut, grease and adhesive.

Step 4: Drum Removal
We are now at a point where the drum can be removed. There is apparently a special tool for this drum removal. I heard it was $130. But there is a work-around using a car jack and a 20 1/4″ board.

I found this trick on YouTube by this guy who is some kind of genius. If you have a scissor jack like this in your car, grab it, or go buy one, they are relatively cheap.

Balance the jack onto the top of the axle, then put the board across the inside of the drum, so that it is pressing up against the inner lip of the drum. This is why a board of about 20.25″ is necessary.
Then twist the jack screw to extend the jack, so that the top of it presses against the board, forcing the drum upward. Use a screwdriver to turn the jack screw if necessary.

The drum will slowly come upward, and you will hear a satisfying “pop” when it comes loose, with very little effort on your part!
Once the drum is free from the axle, pull it out and remove it.

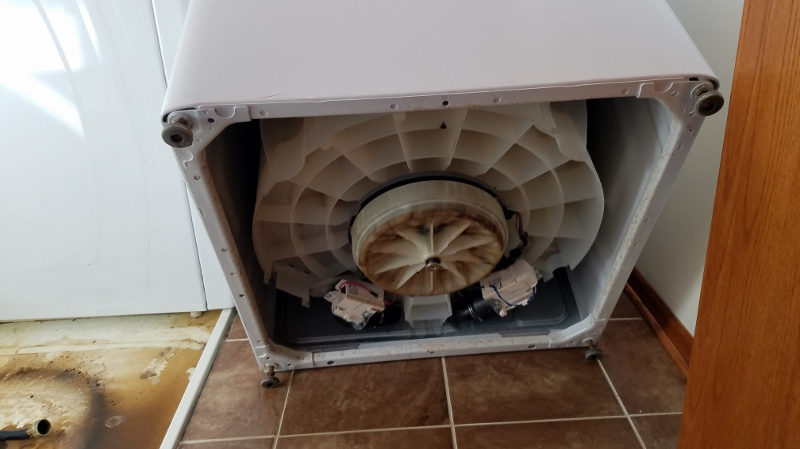
This is the view inside the washer, now that the drum has been removed.

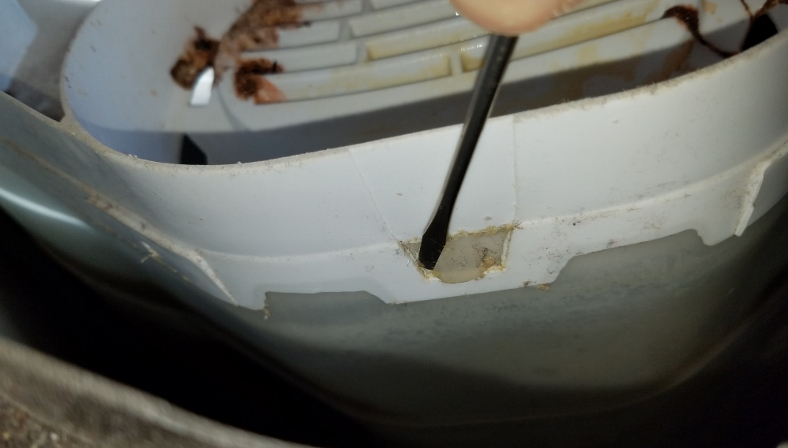
There is a trap that is used to catch larger items from clogging the drain. It is probably a good idea to remove the cover (2 Phillips screws) to check for anything that may have gotten in here.
This is a picture of the trap with the cover removed and it cleaned out.

Step 5: Axle and Bearing Removal
We’re now ready to remove the axle. Use a hammer to pound the axle up from the bottom. I pounded directly on the axle, since I was replacing it. If you are planning to re-use the axle, use a piece of wood to pound on to protect it.
The axle takes quite a few good whacks to get it out. In order to remove it, the seal (that is glued in) is pushed out.

Once you have pounded the axle out, set it next to the new one to make sure they are identical.

Now it is time to remove the bearings. To remove the bottom bearing, tap from the top. Use a screwdriver or chisel, and put it at an angle through the hole where the axle was. Use a hammer to tap around the edges to force the bearing out. It is important to move around and tap at 90 deg positions, so that the bearing comes out straight. You do not want to deform the pocket that the bearing sits in, since it is made of plastic.

Once the bottom bearing has been tapped out, repeat the process from the bottom to tap out the top bearing. Use the same technique of tapping on one side, then the other, to get the top bearing out.

Once the bearings are out, there is a metal tube and a washer inside that will come out as well. Note the position of these parts. New parts for those are included in the replacement bearing kit.
Here is a photo of the old parts. Nice and rusty.

Now, clean out the tub hole thoroughly. I used WD-40 spray and a rag to clean out the hole.

Step 6: New Bearing and Axle Installation
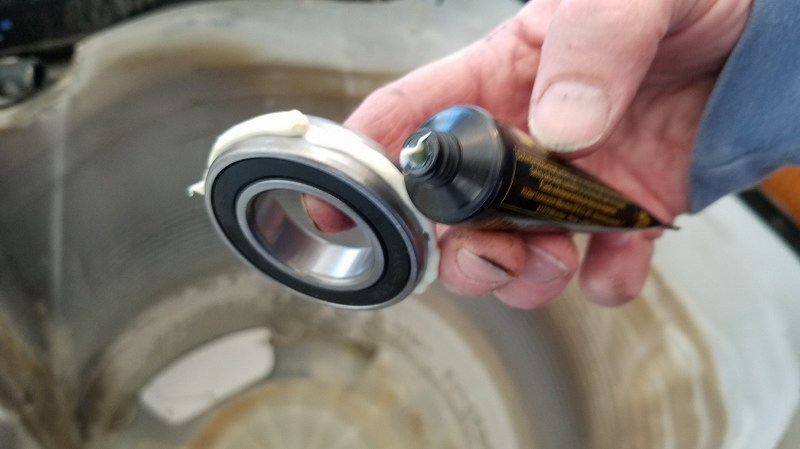
It is now time to put in the new bearings. We will start with the top bearing, which is the larger of the 2. Use some of the grease provided, and spread that on the outside of the bearing. This will assist in getting the bearing pushed into place.
Place the bearing into the seat on the upper part of the wash barrel. It will go part-way in. We will need to press the bearing in the rest of the way in a subsequent step.

Here you have a choice. We need to press both bearings into position. One option is the bearing tool specifically made for this job that comes with the kit.
Or alternatively, if you do not purchase the kit, you can use a mechanic’s bearing pusher. This is the bearing pusher I used, since the kit did not include the tool when I did this!
I’ve used one to replace the bearings on a Toyota Corolla and replace the bearings in a Toyota Sienna. Here is a link to the bearing pusher I recommend:
Bearing Removal and Installation Tool Set – See on Amazon.
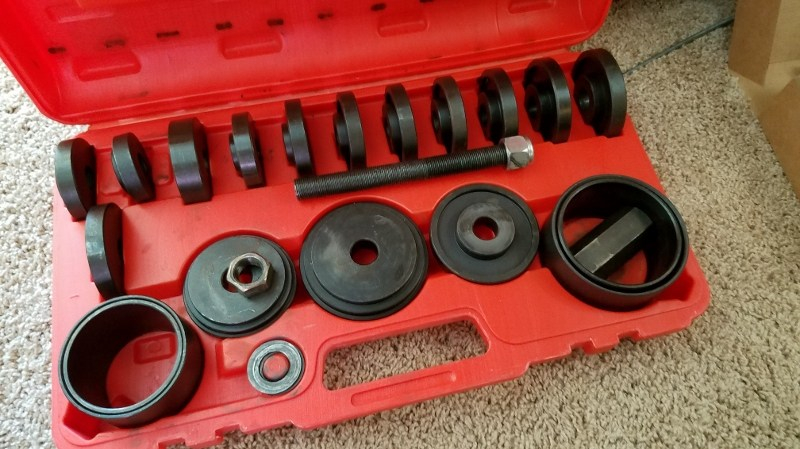
The bearing pusher tool made for washers includes instructions with it. I’ll show the steps I took.
Put the smallest ring into the nested area on top of the top bearing, as shown below.

Then place the threaded rod into the hole.

The view of the top bearing with the bearing pusher tool installed, is shown below.

Now go around to the bottom. Grease the bottom bearing (the smaller of the 2). Put in the metal spacing tube (that came in the kit) and the large washer around the threaded rod. Then position the bearing in the hole as well, with the threaded rod coming through the center.

Put the 2 large washers (from the bearing pusher tool) onto the threaded rod, then put the bottom nut (from the bearing pusher tool) onto the threaded rod. The assembly of all that is shown below.
The tricky part here is to make sure that the spacer tube and the washer inside are positioned correctly. Make sure that the washer is not crooked. Take some care to position that with your finger before putting the lower bearing in place.
Now use 2 socket wrenches, one on either side, to tighten up the nuts on the bearing pusher tool.
You may need a helper to hold the socket on the upper nut in place, while you tighten the bottom socket. Tighten up the nuts to press the bearings into place. DO NOT OVERDO IT! These should be snug, but not overly tight. Over-tightening can cause undue stress and an early failure of your new bearings.

Once you have the bearings pressed in, it is time to put the new axle in. Before you do that, put some grease on the inner part of both bearings.

Then put the axle in from the top. Slide it down until it is snug against the bearings.
Step 7: Bearing Seal Installation
Now it is time to put the seal in. The seal is glued into place.
Note: Since you’re bearings went bad, the most likely cause for this was that this seal failed/leaked! Make sure you do a thorough job of spreading glue around the circumference of the seal.
Both adhesive and grease are included in the kit. Put adhesive around the outer part, and put grease on the inside of the seal, where it will be in contact with the axle.

The seal goes in with the spring-side down. Think of it this way, the top part of the seal will be exposed to water, so that is the side that is rubber. The bottom side is the side where you can see the spring inside.
Put the seal onto the axle and press it down to the bottom until it contacts the tub. Press the seal in place. Some guys use an appropriately sized PVC pipe that fits over the axle, and a rubber mallet to tap the seal into place. I just pressed it in with my thumbs. It took some force, but was not that hard. Just make sure you press evenly on both sides, so that the seal goes in evenly. The top of the seal should be flush with the tub.
Make sure the adhesive glue is all the way around the seal and makes a good bond with the tub.

Step 8: Re-Assembly of the Washing Machine
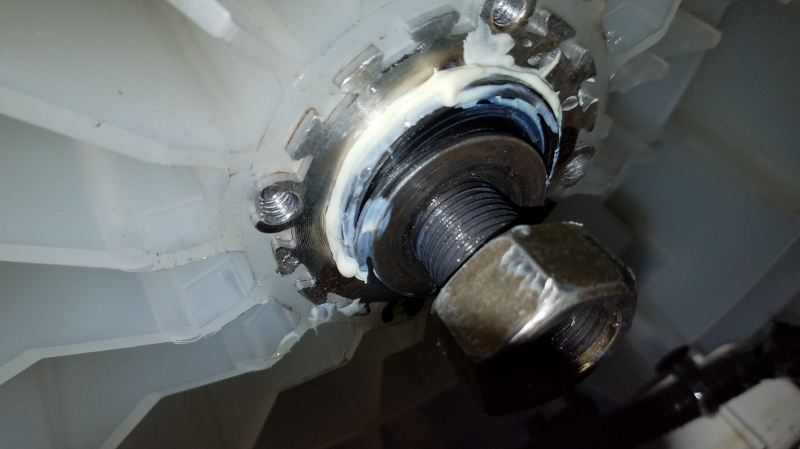
We now move to the bottom of the machine. This is what the axle with new bearings installed looks like. Give the axle a few turns by hand. It will be a bit snug, but should turn freely with some force.
If you can’t get it to turn by hand, even with a good hard twisting motion, something is wrong. Go back and make sure adhesive didn’t get on the axle or in the bearings!

Put on the new retaining nut. And tighten it up snugly, but not overly tight. Use the 2 vise-grip method again, being careful not to mar the surface of the new axle.
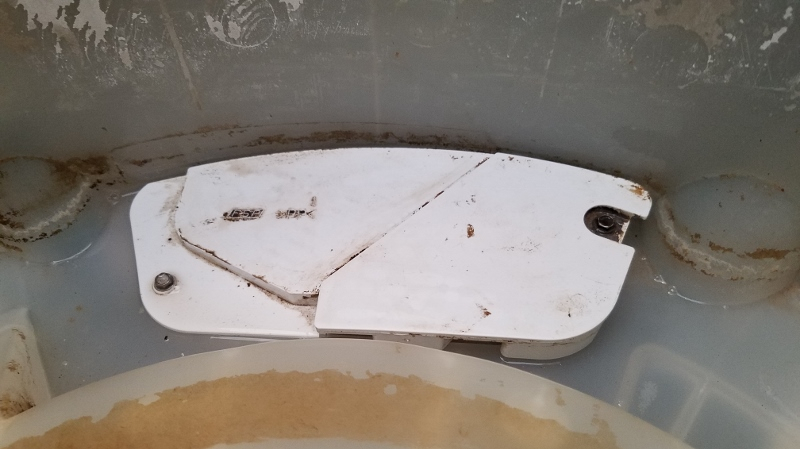
Now press the gray plastic guard into place. It has some foam inserts that will press-fit in. Make sure you get it in the correct orientation, it should go in a certain way, where there is a cutout for the connectors. Use the photo below to help orient the guard.
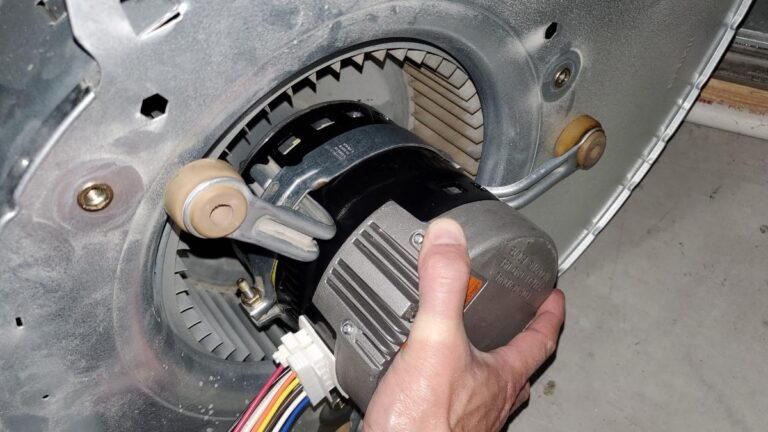
Then plug in the wiring harness into the coil pack. Make sure that the silver circular metal plate is in place on the coil pack.

Slide the coil pack into place onto the axle. Note the location of the wiring harness. It is not intuitive at first, so look at the photo below as a guide. Note that the black plastic fingers slide in between the coils to hold the assembly in place. Make sure that the wires are routed away from the coils, so that they do not get caught.
Put the circular metal plate back on, and re-insert the 4 bolts. Tighten up the bolts.

Now it is time to put on the bottom plastic cover.
Slide it into place and put the bottom axle bolt in. I put a little bit of Anti-Seize on the threads.

Tighten up the bottom axle bolt with the 1/4″ Allen wrench.
That is it for the bottom of the washer. You can tip the unit back up, in order to work from the top for the rest of the re-assembly.
Now it is time to put the washer tub back in. Carefully lift it into place. You don’t need the jack and board anymore. I still had those in for some reason. They should be removed.
Then fit the tub over the axle.
Inside the wash tub, put the plastic hubs back on. Remember to make sure that the thin metal washer that nests inside the bottom plastic hub, is put on first (or still inside the smaller hub).

Put the bottom hub on.

Then put the top hub on. I put a little grease between the 2 hubs. I’m not entirely sure if this is necessary, but in an effort to extend the lifetime of the parts.
Insert and tighten the 6 screws. DON’T OVERDO IT! You don’t want to crack the hub. Remember to be careful not to drop the screws down the water drain holes…

Now put the agitator back in place. Fit it over the axle and gently press it down until it is snug.
Get the top axle bolt and clean it off. I put anti-seize on this one too, so that it doesn’t lock up for the next time (hopefully there is not a next time!).

Tighten up the bolt with the 11 mm socket.
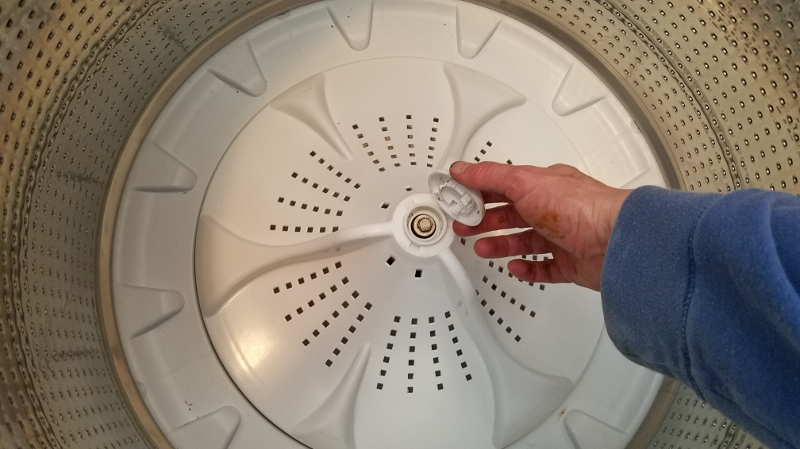
Press on the center plastic cover until it clicks into place.
Now re-install the plastic cover assembly. Remember to line up the drain hose with its port. Then click the 16 or so plastic clips around the edges back into place just by pressing them down.

Re-attach the water fill hose by squeezing the hose clamp and working it back to a snug position on the port.

Once that is done, look around inside and make sure there are no tools left in there, and that everything looks back in place.
Close the flip-top lid and gently press downward on the lid to clip it back in place with the metal spring clips.
Finally, re-attach the water hoses in back (don’t forget to turn the water valves back on), and plug the unit in.
VERY IMPORTANT NOTE! In order for the adhesive to set correctly, it should dry for 24 hrs before getting wet. Therefore, do not use the washer for 24 hrs, resist the temptation to run a load right away!
Step 9: Testing it Out
The next day, go ahead and run a load. Probably a good idea to run clothes that you don’t care about as much, in case there is extra grease that may get on them.
You will notice that it is much quieter! People will ask, “Is it even on? I can’t hear it!” (Especially after what they have endured leading up to this repair!)
That’s it, I hope you found this guide helpful!
Once again, here are the links to the parts and tools used in this guide.
P.S. Is your dryer squealing?
Click here now to learn how to repair a squealing dryer!
Here is the list of the tools used for this repair:
- Putty Knife
- Pliers
- Vise grips (qty 2)
- Flat bladed screwdriver
- Flat bladed screwdriver (small)
- Socket Set with 10 mm, 11 mm,
- 1/4″ Allen wrench
- Scissor Car Jack
- Board about 20.25″ long
- Hammer
- Bearing Pusher Tool or Bearing tool that comes with the Bearing Kit


Thanks for producing this.
My washer dismantled easily following your instructions.
The parts kit you provided are ordered with amazon one day delivery.
Thanks
Thank you, glad it helped!
Great directions! You made this job easy. I had trouble with the bearing press I bought that’s used just for this washing machine’s bearings – should have bought the much better one you used here. Besides this, it went great. Thanks for your help.
That’s great! Glad to hear it!
My machine did not have the spring tabs referenced in “step 2”. Instead, remove the two brackets on the back of the machine that secure the top. Then slide the top forward about 1/2″ and it will release from the front. Be careful lifting the top, as there is a small wiring harness that runs from the top, down into the base. Don’t want to break that!
Thanks for the tip. I’m sure this will be helpful to someone! All the best,
Richard,
I followed your instructions and replaced the bearings and seal on my Maytag Bravos Quiet Series 300. When ready to do test run I chose to do rinse and spin to remove any grease and debris. After pumping the water out it sounds like it is starting to spin and reaches the first speed plateau then locks down and gives me the uL code with nothing in the machine but water.
Any thoughts to what the trouble may be?
Thanks for all the info, don’t think i could have changed the parts without it.
Mike
Can’t get past the first step, putty knife won’t do the trick, any other suggestions!
Bummer! You might need something a bit stronger so it doesn’t bend, like a thicker metal ruler or square. Also, pushing down (or pulling up) on the lid may help.
Good luck!
Great writeup! Thanks, it made my job so easy!
One quick question – the allen bolt that hold the rotor on. In your 1st photo of the bottom of the machine, the bolt is not flush with the bottom of the rotor. Mine was the same, and after putting everything together I can’t get it flush. It seems like the rotor floats between the 2 surfaces of this bolt. I tried to crank it down and think I stripped out the axle a bit. was yours sitting flush after tightening? Could you press your rotor farther up onto the stator?
Thanks!
Thanks, I’m glad it helped!
Yes, there is a small amount of ‘play’ even after tightening! I just screwed it in until it was nice and snug, and that worked great. The washer is still running well now.
Bob, I have put the bearing and seal kit on several times. I bought another new kit and installed and removed and still have the same issue each time. The basket hub is about quarter inch from sitting flat on the tub. This has happened each time. I have repressed the bearing hoping the shaft would sit lower and the hub basket would touch the tub and allow it to be screwed down. I have probably over tighten the nut on the shaft hoping to draw the shaft down allowing the basket hub to fit. I have hammered the shaft down from the top to get the basket hub to sit correctly. The driver hub fits fine but the basket hub still does not rest on the tub. What ever I’m doing wrong I have been consistently about a quarter inch from the basket hub being able to be screwed down. Model WTW7600XW1 looks just like your pictures. I have compared the new parts to the old parts and they are the same. Thank you in advance for any help you can provide. Nice pictures and descriptions of each step!
Hi Dave,
Thanks for the kind words, and I’m glad you found the site! If I understand correctly, the issue you are seeing is that something is causing the plastic hub to sit about a 1/4″ too high, so that it cannot be attached to the tub.
It has been a while since I performed this repair, but I remember a couple of things that could potentially cause a problem like this. The first is the metal tube and washer that sit between the two bearings. I seem to remember that the washer didn’t want to sit correctly. If the washer gets in there crooked, it would leave a gap about that size.
The second is the process of fully seating the bearings. There is a small lip inside of the plastic tub part that the top bearing sits in. If it is not fully seated by pressing it in with a press tool of some sort, it will sit a bit too high, and could cause everything to sit about a 1/4” too high.
The third is important. The bottom bearing is supposed to be installed with about quarter inch of it protruding out of the bottom.
I am suspecting something related to this…
A 4th thing, is that the rubber seal, when glued in place, should be flush with the tub. It takes a bit of force to push it into place. An appropriately sized PVC pipe can be used to press it evenly on all sides.
I hope this helps, Dave!
Good luck, man,
Rich
Rich,
I needed a quick response but did not expect one. Major appreciations.
You understand the problem but after reading your words I’m going to look at it that maybe the drum is sitting to low, just to look at the issue from a different viewpoint. I’m going to address your points but you were right on with your memory.
One the washer that goes with the spacer is pretty close to the exact measurements we needed so on one attempt we left it out and just went with the spacer. It didn’t make a difference when we measured the height of the shaft in the drum. The spacer was also loose and would have made noise in a cycle.
Two I have the press tool and even used a breaker bar to get added compression. Glad we didn’t break something. Lol. The top bearing is seated low enough the when the rubber seal is lubed and glued it sits below the lip. Had to buy a new kit because after sitting for 24 hours the rubber sealed was ruined when we started over.
Three the compression tool has a lip the makes sure that after tightening the lower bearing is at a nquarter inch exposed. That is what led us to get out the breaker bar. Over tightening just pulled down the upper bearing. Not sure if that wording properly described the procedure.
Four when we did put the rubber seal in. It seamed to sit below the lip and allowed for a perfect amount of glue to be applied to make a water tight seal.
I have just one more idea that I’ll try on Sunday. Raise the basket to have the basket seal sit properly. Just seems like to much pressure to put on the six screws that hold the basket hub to the tub with wet clothes I snidest of the tub.
Really appreciate someone to share the pain with. Enjoy the fourth and if you think of something I’ll check back. Thank you for the help. The glass half Full theory is that I’m teaching my son how to scratch a bald spot on his head.
Dave
Dave,
Okay, sounds like you have a plan! I’m not thinking of anything else to try at the moment… Try to enjoy some of the holiday! I’m sitting on the deck sweating at the moment! By the way, well done teaching your son to be handy! Those are skills (and memories) he’ll treasure forever!
Best of luck to you,
Rich
Rich,
As discussed earlier in this thread I could never get the basket hub to sit flush. After several redos with the same results we decided to screw the basket hub back in place. Putting the six screws back in and tightening in a pattern. The hub did not look deformed. Had doubts that this would work but several weeks of washes including one cycle with a comforter and many loads of towels all is quiet and working fine.
Thank you for your assistance!
Dave
Dave,
Excellent! So glad to hear it and thanks for reporting back with the great news!
All the best,
Rich
Thanks for the info and suggestions from all replies. I am going to try it. Maybe it will turn out better than my boat motor repair.
Larry
Awesome article. I ran into some snags. Maybe newer or bigger model? Had a large nut fastner for drum removal, needing a spanning wrench. Instead of replacing bearings it was actually a gear box. While the gear box replacement was easier, it was much more expensive.
Overall, thank you. Could not have done without you.
Thanks Bob!
I have a Maytag Bravo Quiet Series 300. Your instructions were perfect. But I have a problem getting the top bearing in. It wont pop in. There are two lips it fits in the top lip and thats it. The problem.. When I put the shaft in I still cant see the bottom threads on the shaft.. Even after I hammered it down. And suggestions? Desperate in Ohio.
Hi! It sounds to me like the top bearing needs to be pushed in further. It is a VERY tight fit! I used a bearing pusher to push it into place. But there is a tool specifically designed for doing this:
https://amzn.to/2U7AaMu
Good luck!
I just completed this repair using your very useful guide. Thank you for taking the time to write this. It took me about 5 hours to complete by myself.
Here are a few additional tips that I learned:
Do this repair as soon as you start to notice it making more noise on spin cycle. It is an easier repair if you catch it early.
Make sure to use thread locker on the bottom allen bolt and the bottom ring nut. These were both very loose from the factory after years of use.
Use some grease on the bottom bearing to “stick” the washer to the bearing. This will allow you to properly center the washer before pressing into place.
While you have the top off, spread a little grease on the 4 suspension “cup” bushings that support the tub. Just grab the suspension rod and push up to separate the white plastic bushings. By putting a little grease there, you will greatly quiet the washer while it runs.
Finally, I purchased the knock-off bearing repair kit and not the more expensive Whirlpool one. This kit works fine, but I recommend you use quality bearings rather than the ones included. You will need 1 6005 and 1 6006 bearing with rubber seals. Look for bearings from NSK, SKF, Nachi, etc. I used Nachi because they were made in Japan, and they worked out great. I also used “Goop” adhesive that is available at any home improvement store.
Good Luck
Bryan,
Thanks for posting these very helpful comments. I agree wholeheartedly. I recently took this unit apart again to replace the drain pump that had failed, and sure enough, the bottom Allen bolt was loose, so good suggestion for some threadlock on that. Here’s to many more years of service from this unit!
All the best,
Richard
I can’t fix this myself and hubby is too busy. I just need to know an approximate cost a repair person charges. We live in East Tn.
R. Aesque
Bummer! I imagine repair prices could vary quite a bit depending on a number of factors, but in general, I would estimate that a repairman would charge $150 – $300 for this repair.
Great article! Very helpful! Thank you!
Learned a lot. Now I can fix my Maytag Bravo’s with confidence. Tnks a lot!!