How to Change the Dome Light – Honda Accord
Is your dome light burnt out? Bummer! Follow these simple steps to replace it. It is an easy repair, but also easy to screw it up if you don’t know where it comes apart! I’ve included the part number of the replacement bulb as well.
Tools and parts required:
- flat-bladed screwdriver
- replacement dome light-bulb for Honda Accord (part# 3175)
Dome Light Replacement Steps
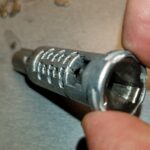
First, use a flat-bladed screwdriver to gently pry the transparent plastic lens away from the dome light housing, as shown.
Note: Put the blade of the screwdriver between the clear plastic and the opaque plastic, not the fabric!

The lens is held in place by 4 small tabs, two along each of the long sides. These tabs fit into slots in the housing. Bend the outer plastic just enough to pull the lens down on that side, and the lens will tilt out.

Now the dome light-bulb is exposed. Pull it straight down, out of its holder.

Push the new light-bulb into the place where the old one was. Then put the cover back on. Start one one side, and tilt the cover into place.

With one side of the cover in, gently press the other side in as well, until the 2 small clear plastic tabs are pressed in.

The cover will pop in with a snap.

I hope this helps you. A common mistake is to pry between the fabric and the outer (darker) plastic part of the light housing. It is easy to do because you cannot see right away what is inside! Anyway, if you follow these steps you should be just fine!
Click here for more helpful maintenance articles on the Honda Accord.
Tools and parts required:
- flat-bladed screwdriver
- replacement dome light-bulb for Honda Accord (part# 3175)