How to Make a Homemade Disk Sander from an Old Motor
In this article I want to show the steps I used to make a homemade disk sander using an old motor, in this case, the motor from a home furnace system.
If you purchase items through links on this webpage, I may earn a commission, and it won’t cost any additional for you.
This is a fun project that re-purposes an old motor and makes something that is really useful. There are times in life where you end up with an old motor out of something, and it seems like a shame to toss it out, but on the other hand it does tend to clutter up your workspace. In that case, use it to make a disk sander.
If you don’t have your own motor on hand, ask around, you are bound to have a friend or friend-of-a-friend that would be happy to give you one. Another way to come up with old motors is to go to any farm auction. You can probably pick up a good one for about $5-10.
Tools and Supplies Needed:
- Motor – 1/4 to 1 hp (I used a 1/3 hp motor with 1800 RPM)
- Motor Shaft Hub Flange
- Wood for Motor Mount (3/4″ thick)
- Flat wood plate for Sanding Disk (3/4″ laminate sided)
- Jig Saw
- Phillips Screwdriver
- Cordless Drill (Best One)
- Hole-cutting Drill Bits
- Hook and Loop (Velcro) with Adhesive backing
- On/Off Switch
- 9-inch Sanding Disks (hook and loop)
DIY Disk Sander – Steps to Build
Once you have acquired the parts, make sure the hub fits onto the motor shaft. It should fix to the shaft without wobbling.

Next, draw a circle on the wood that will be used for the sanding disk. This should be super smooth. If it is not, there will be vibration when the disk is spinning. I used a 3/4″ thick laminate covered particle board for this which worked quite well.
Draw a circle with 9-inch diameter.

Use a jigsaw to cut out the circular sanding disk. Try to get it as round as possible. We will be sanding it down later, so it is better to make it too large vs too small.

Once the sanding disk has been cut out, attach the hub to the center of the disk.

Make sure the screws are short enough that they do not penetrate the front surface of the sanding disk.

Next, build the motor mount. For the furnace motor I used, it had a circular protrusion on the front and back, as well as several protruding mounting bolts.
I used a hole-cutting drill bit to cut out the center hole, and then several holes (not all the way through) around the edges to accommodate the protruding bolts on the front of the motor.

Place the mounting boards on either side of the motor and draw lines on the bottom mounting plate to measure the dimensions of the bottom and top spacers.

Cut out the top and bottom spacers and screw them to the front and rear mounting boards.

The disk needs to be perfectly round, or it will wobble.
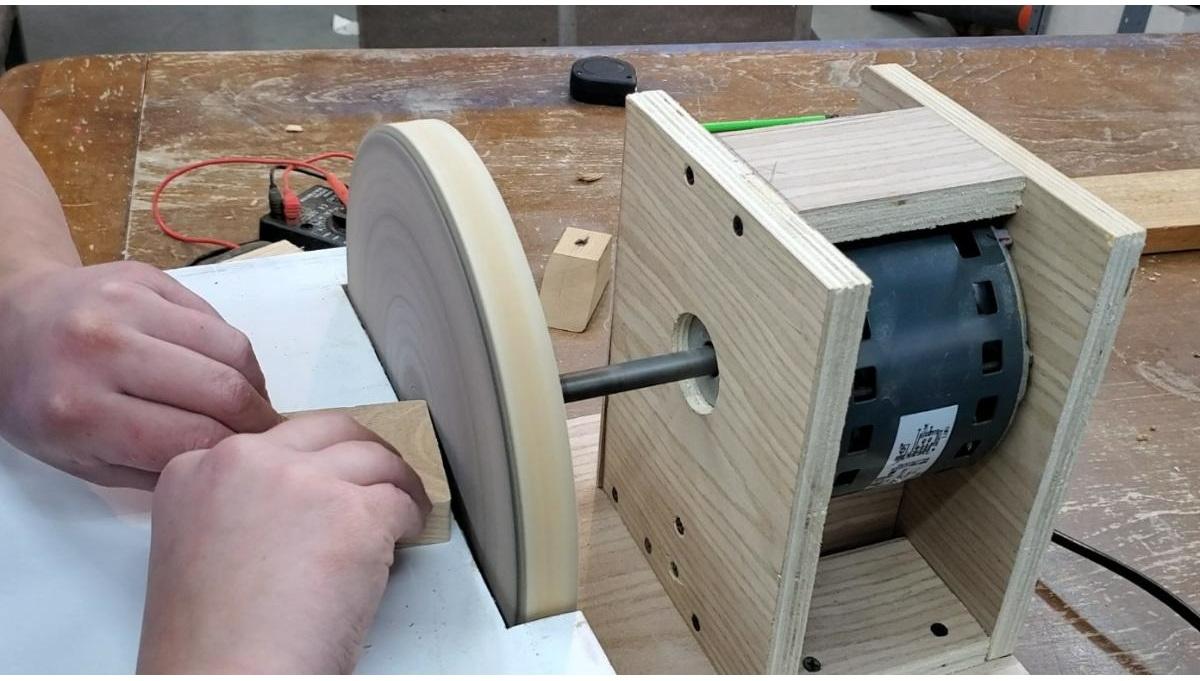
Turn on the motor and use a lathe chisel and tool-rest to shape the sanding disk to a perfect circle. Make the diameter 9-inches.

Once the sanding disk is perfectly round, it will no longer vibrate when spinning.

Cut out the surface for placing the samples, out of the smooth laminate board. Cut out a region for the sanding disk, so the opening should be about 9.5 inches wide.

Apply the hook-and-loop with adhesive backing to the sanding disk.

Apply a 9-inch hook-and-loop sandpaper to the sanding disk.

Next, build the support. Attach a blank to the base and screw the mount to the blank.

Try out your new homemade disk sander!

Finish it off by attaching an on/off switch to the side of the unit.

Enjoy you DIY Homemade Disk Sander! I use this unit quite a bit, and it works really well.

I hope you found this helpful, let me know how it went for you, in the comments!
Tools and Supplies Used:
- Motor – 1/4 to 1 hp (I used a 1/3 hp motor with 1800 RPM)
- Motor Shaft Hub Flange
- Wood for Motor Mount (3/4″ thick)
- Flat wood plate for Sanding Disk (3/4″ laminate sided)
- Jig Saw
- Phillips Screwdriver
- Cordless Drill (Best One)
- Hole-cutting Drill Bits
- Hook and Loop (Velcro) with Adhesive backing
- On/Off Switch
- 9-inch Sanding Disks (hook and loop)