How to Replace Spark Plugs – Honda Accord
Replacing spark plugs is a good idea if you are experiencing rough idling or misfires. It’s is also recommended to change plugs every 30,000 miles. Follow this picture guide for step-by-step instructions for replacing the spark plugs in your 2002-2007 Honda Accord.
Note: PracticalMechanic.com is reader-supported. If you buy through links on our site, we may earn an affiliate commission – at no cost to you. Thank you for your support!
Tools and Materials Needed:
- Spark Plugs
- Dielectric Grease
- Anti-seize Thread Treatment
- 10 mm wrench
- 5/8” spark plugs socket (magnetic – makes job a lot easier!)
- Socket extension
- Socket wrench
- Torque wrench
- Set of 4 Ignition Coil Boots (Optional)
Step-By-Step Instructions
Start with the engine cold.
The first step is to pop the hood and prop it up. I’ll often spread a rag over part of the engine bay to set tools and parts. Use your preferred method.

Use a 10 mm socket wrench to remove the 4 nuts holding down the spark plug cover.


Then remove the plastic cover.

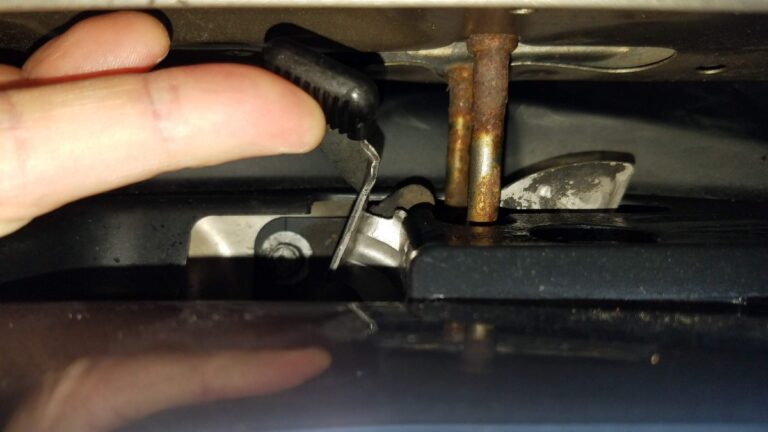
This will expose the spark plug boots. Remove the 10mm bolts holding those down.

Press the tabs on the sides of the plastic connectors, to remove the wires from each ignition coil boot.
Then, carefully grasp the boot and pull it upward, unseating it from the spark plug. You will likely hear a suction sounds as the connectors comes loose from the top of the spark plug, this is normal.
If the ignition coil boot is damaged, or replacing the spark plugs doesn’t fix your rough idle or misfiring, consider replacing these ignition coils. Here is the link for the correct parts (set of 4).


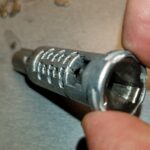
Now you will be able to see down into the bore, where the top of the old spark plug is. Use a 5/8″ spark plug socket and an extension on your socket wrench.
Update: This tool will make it a lot easier. Instead of duct tape and the old rubber boot (that never seems to work) this one uses a magnet – a no-brainer – to hold the spark plug in place!
Slide this down into the bore and get it seated onto the old spark plug. Turn counter clockwise to loosen and remove the old plug. Be very careful not to drop anything down into the hole. Sand blowing around, for example, would be very bad for your engine, so take care and cover the holes with a rag, if necessary.
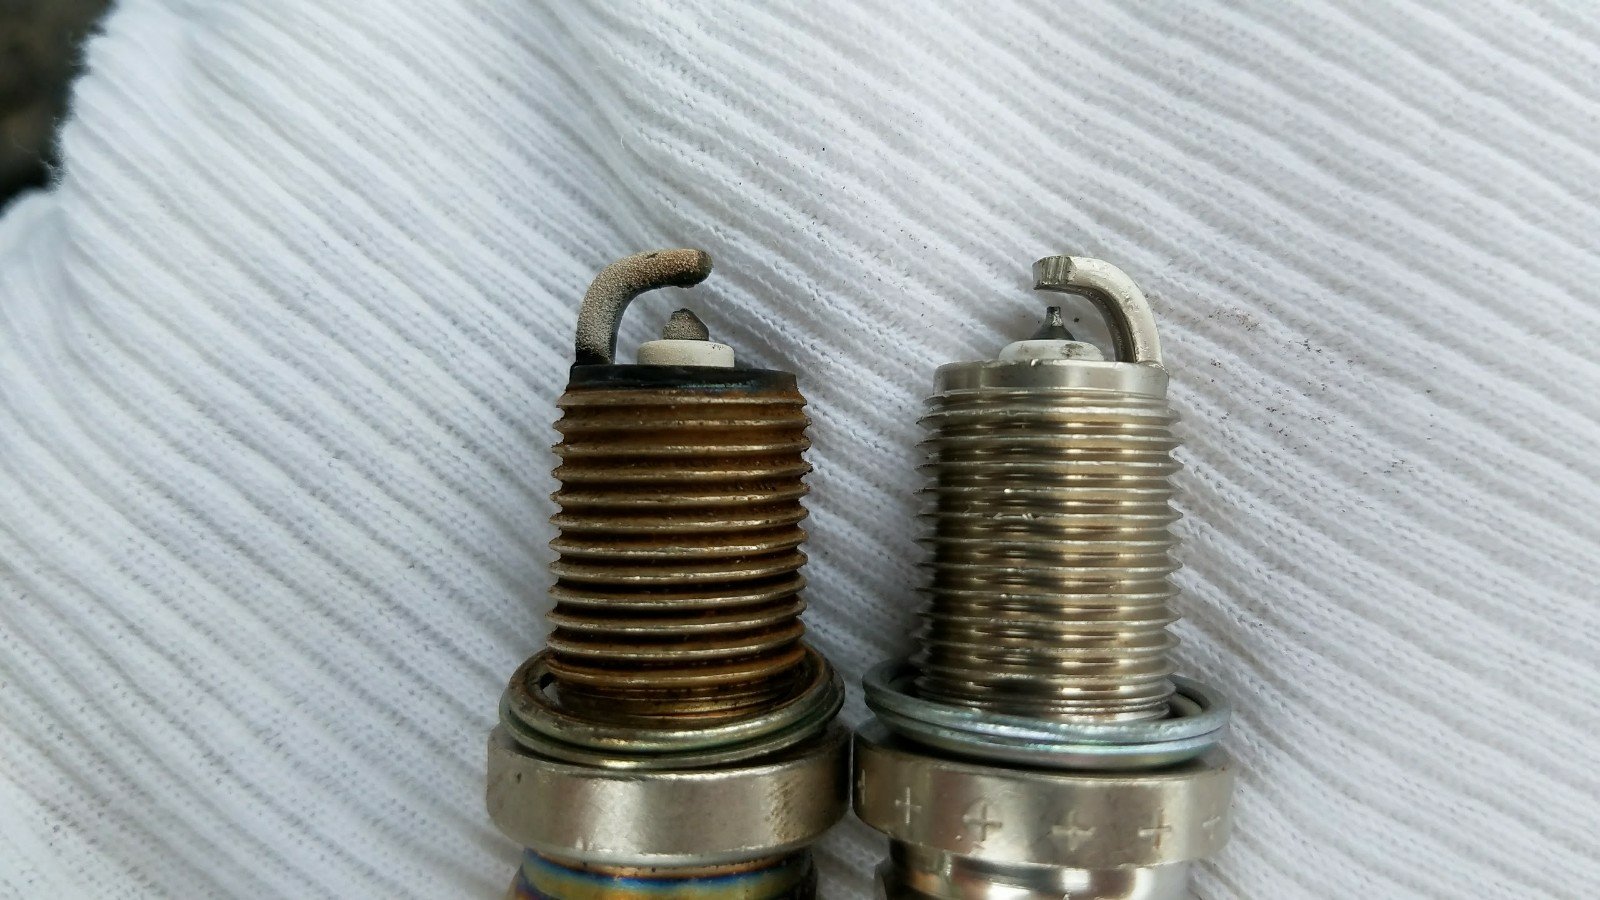
Once the old plugs are removed, inspect them. Things that indicate the plugs should be replaced include, carbon buildup, too large gap, corrosion, damage of some sort, etc…
Spark plugs, even good ones, are so cheap that even if you don’t notice anything obviously wrong with them, you may as well change them if you have gotten to this point. But if you’re short on money at the moment, just make sure there are no obvious problems.
Here is a picture of the old and new spark plug side by side, for reference.
You are now ready to put in the new plugs. I’ve always gone with the Denso plugs and they’ve worked great for me. The gap is already set, so you don’t have to adjust it.

If you really want to do this right, put some dielectric grease on the ceramic parts of the new plugs to reduce the chance of moisture interfering with the connection. Don’t get it anywhere near the gap.

Also, put some anti-seize in the threads as well. This will make your life easier the next time you do this, and it will make it less likely that you strip the threads in the bore. You DO NOT want to strip or cross thread the threads in the bore!
Also, the spark plugs come with a crush gasket. This is intentional, leave these on. They set the correct distance into the cylinder and assure a proper fit.

Now, use a torque wrench (this is the torque wrench I use), extension, and 5/8” spark plug socket to put in the new plugs.
Torque the plugs to 13 ft-lbs. (If you don’t have a torque wrench, follow the instructions on the box, it will usually tell you to tighten by hand, then another 1/2 turn it so.)
Put the boots back on each plug and press down on them firmly so that they seat nicely in the top of the plug.
Put the 10 mm bolts back in to hold the boots in place, then re-attach the plastic wire connectors. Just press those in, and they will click into place.
Now put the plastic cover back on and tighten up the 4 10 mm nuts that hold the cover down.
That about wraps it up. Thanks for visiting, and I hope you found this helpful!
For more information on 7th generation (2002-2007) Honda Accord maintenance, check out these articles:
Maintenance Articles on 2002-2007 Honda Accords
Tools and Materials Used for this Job:
- Spark Plugs
- Dielectric Grease
- Anti-seize Thread Treatment
- 10 mm wrench
- 5/8” spark plugs socket (magnetic – makes job a lot easier!)
- Socket extension
- Socket wrench
- Torque wrench
- Set of 4 Ignition Coil Boots (Optional)