How to Change the Alternator in a Dodge Pickup
The alternator went bad in my pickup. The battery stopped getting charged up. In this picture guide I walk through the steps I took to change out the alternator.
A Failing Alternator
It was getting tiring every time I needed to plow some snow, I would have to charge up the battery, just to have the truck stall after plowing for 20 minutes. I had recently replaced the 6 yr old battery, so I suspected either the battery or the alternator was bad. After swapping out the battery into another vehicle, I found out that the battery was working just fine.
This is the procedure I went through to change the alternator.
Tools and Supplies Used:
- 1/2″ wrench
- 9/16″ wrench
- 7/16″ socket
- dielectric grease
- refurbished alternator
- pry bar (optional – makes things easier)
Alright, let’s get started!
Step by Step Procedure to Change the Alternator
Here is a photo of the engine bay. The bad alternator is located at the bottom center of the image.

The first step was to disconnect the negative battery terminal. This required a 1/2″ wrench.

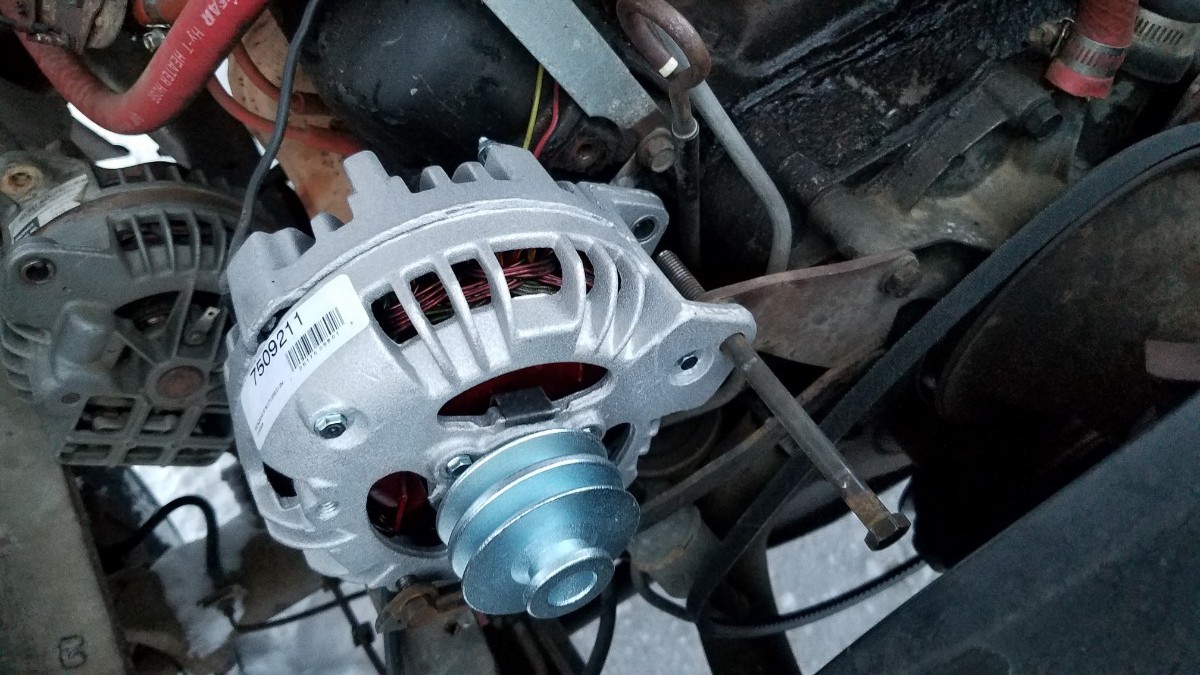
Here is the front of the alternator showing the belt pulleys.

Here is a view of the back showing the electrical connections.

Underneath the alternator is the lower mounting bolt attached to the slotted arm. I removed this 1/2″ bolt.

Then I moved on to the upper mounting bolt. This was a 9/16″ bolt.

Here is a photo of the wrenches used to remove these two bolts: 1/2″ and a 9/16″.

Removing the two slotted electrical connections required just pulling them off.

I removed the upper mounting bolt altogether making sure to not lose the spacers in the process.

With the mounting bolts removed, the belt was loose. I removed the belt from the pulley and slid the old alternator out.

There was one more connection to remove, and that was the battery wire. This required a 7/16″ socket to remove.

With the old alternator out, I got out the refurbished alternator I had ordered. I bought this alternator because the price was right. This is the 60-amp unit, but for a while I was considering going with a higher amperage unit just because I have had other electrical problems with this pickup in the past.

Here is a picture of the old and refurb alternators side-by-side. It was a direct fit replacement.

I put the new alternator in place, and got the upper mounting bolt started.

Then I fit the spacers on. It was a bit of a tight fit, but I didn’t end up needing to loosen the mounting bracket at all to get them on. Once the spacers were in place, I tightened the upper mounting bolt snug, but not too tight yet.

While doing the upper mounting bolt, it was helpful to have the lower mounting bolt in, and resting on the support arm, as shown below.

I then took out the lower bolt and rotated the alternator downward, so that I could get the belt onto it. I had to be careful not to crush the electrical wire connectors, as they were in a position where they could get smashed.

Once the belt was on, the alternator was then rotated upward and lined up with the slot in the mounting bracket arm. The bottom mounting bolt was then put in place.

Before tightening the alternator down, I wanted the belt to be tight. I took a long cheater-bar pipe and positioned it underneath the alternator with a good amount of leverage, and had a friend pry upward on it while I tightened down the two mounting bolts.

Now that the alternator was mounted in the correct position, I was ready to move on to the electrical connections. (It was starting to get dark now!)
I like to put a little dielectric grease on the connections. It helps repel water, so that water doesn’t get in there and mess with the contacts.

Here I put a smear of dielectric grease on each of the connectors before I pushed them on.

I then attached the battery cable using the same 7/16″ nut.

Here is a view of the engine bay with the new alternator installed.

After that I re-connected the negative battery terminal, removed all the tools from the engine, and re-checked everything to make sure I hadn’t forgotten something stupid.
The new alternator is working great now, as verified by the ammeter in the truck showing a nice charge!
Have you ever replaced an alternator? Anything to watch out for? What generally causes alternators to go bad in the first place? Feel free to reply in the comments section below.


0 Comments