

Follow along on this picture guide to replace the battery in your iPhone SE! I tell you about all the ‘gotchas’ involved in this battery replacement, so you can once again have a phone that lasts the whole day without requiring multiple re-charges!
Background
I bought a refurbished iPhone SE off of Amazon, and the battery life was not good. Looking in the “Battery Health” section of the settings, it said the maximum battery capacity was only 71%. Practically speaking, that meant that after a full charge to 100%, the phone would last for about 1.5 hrs and then be down to 35%! It was necessary to change the battery.
I was wondering what it would be like, and if I would damage the phone in the process. It seemed like the new battery reviews on Amazon were either that it went great and worked perfectly, the phone was somehow damaged in the process, or the new battery life was no better than the battery that was being replaced…
Obviously I was hoping for the first outcome. Well, I went ahead and took a chance, and it worked out great! Replacing the battery is not as easy as just removing a couple screws and plopping it in. BUT if you take your time, have photos to reference, and are at least marginally mechanical, you should have no trouble at all replacing the battery in your iPhone SE!
Okay, let’s get started!
Tools and Supplies:
- heating pad or hair dryer
- new battery kit (iPhoneSE)
Step-by-Step Instructions
I ordered a battery and repair kit package off of Amazon. This one is a 2180 mAh battery which has a little more juice than the original battery in the iPhone SE has.
The kit includes the replacement battery, the adhesive, and a variety of tools necessary to complete the repair.

Below is shown the tools included in the kit (except for the instruction sheet).
Note: the kit has changed slightly since I originally posted this. The kit now has a few different tools, but still has everything needed for the battery replacement. Check this link for pictures of the currently-included tool set.

The first step is to turn off the phone. Discharge the phone so it is at less than 15% charged, press and hold the power button, then use the on-screen prompts to slide the slider to turn off the phone.
Next, take out the SIM card. This is a precautionary step, so it doesn’t get damaged or erased while changing the battery. If you don’t have the special tool, use a paper clip to push in at the hole, until the SIM tray comes out. Remove the SIM card and the tray.


I recommend using a heating pad or a hair dryer to carefully heat up the back of the phone in order to loosen the adhesive that the battery is glued to the back of the phone with. Don’t over-do the heat, but a low heat setting can help to loosen the adhesive. Also, if using a hair dryer, wait until you get to that step before heating the phone. Again, don’t over-do this! you just want to get it comfortably warm, not hot!

Use the pentalobe screwdriver that is included in the kit to remove the two screws on either side of the charging port.

Use even pressure. Don’t strip the screws.
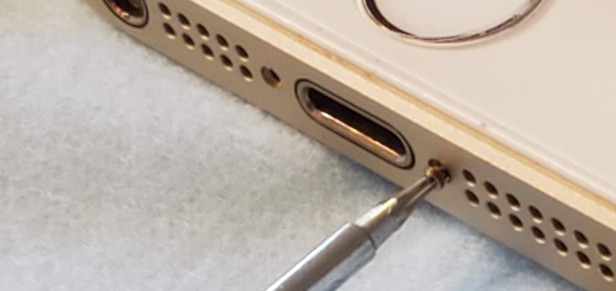
Tip: Put the screws into some sort of container. In the end, you will have 8 screws of varying sizes. Keep them separate so that you know where they go when it comes time to put your phone back together.

Next, put the suction cup on the screen just above the home button. You will use this to gently pull up on the screen as you pry the screen upward. Use one or more of the plastic prying tools to gently scrape the glue from the seam between the metal and the glass part of the screen.

Go all the way around the screen, using the corner of the plastic tool. Press the tool into the seam to begin to get it to separate.
Tip: Take your time with this step! This is where people damage the connection to the home button. If you rip the screen off too hard and fast, the connector will be broken, and your home button will no longer work! You can also break the screen here if you are not careful. Scrape around the edge, and apply gentle upward pressure on the screen (with the suction cup).

Once you have worked the tool around the bottom edge of the phone between the metal sides and the glass screen while pulling up on the suction cup, you will notice the screen starting to come up a little bit.
There is a slight indentation on the left-hand side, where you can fit a plastic prying tool. Notice that extra bit of gap in the image below. Use that as the first point where you start prying. But pry gently, and work your way back and forth along the bottom of the phone.

It helps to gently twist the plastic tool in order to slightly lift the screen. Don’t lift the screen up all the way, yet!

Once the screen has come up a bit, do not lift it more than about 3/4″. There is a connector that we need to disconnect. There is a ribbon cable going from the home button on the screen to this connector.

You need to remove the metal cover, seen near the center of the image below.

Use a tweezers to gently lift up on the metal protective cover.

Once you have removed the metal protective cover, use a plastic pry tool to gently lift the edge of the connector apart.

Once the ribbon cable is disconnected, tip the screen up.

You will now need to remove 6 tiny Phillips screws. They are shown in the circles below. Use the tiny Phillips screwdriver included in the kit.
Tip: Keep track of which screw goes where. Some of the screws are longer, and some are shorter. You’ll be glad you did when you are putting this back together.

Remove the 6 screws, and as you do, 2 metal plates will come off. Set those aside for now.

Next, use one of the plastic tools to gently pry up the battery connector, as shown.

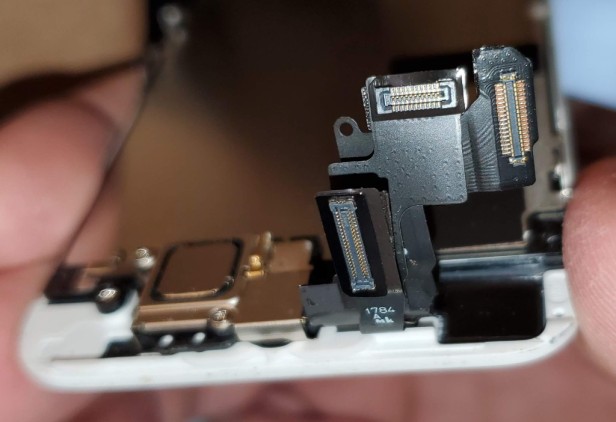
Now, gently pry up the 3 connectors going to the screen, so that the screen can be removed.

This shows the 3 connectors going to the screen, after the screen has been removed.
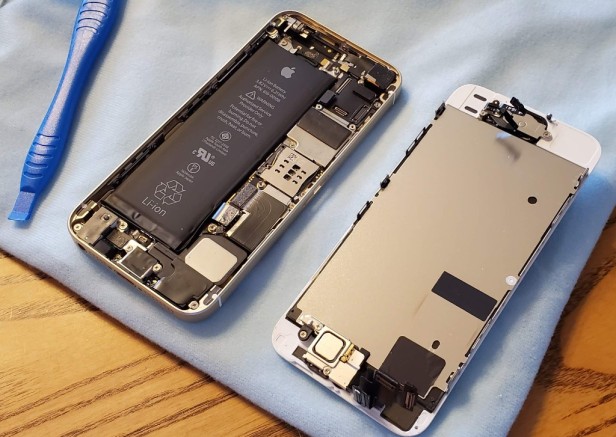
carefully set the screen aside while we work on removing the bad battery.
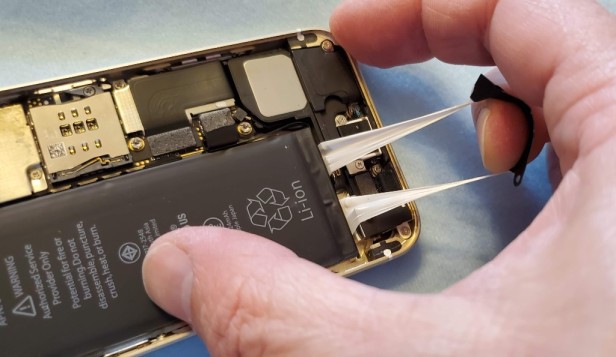
At the top edge of the battery, is a small fold of what looks like paper-thin plastic. Gently pull this up with one of the plastic tools.

The paper-thin piece of plastic is actually a grip to remove the adhesive that is below the battery. Grip the adhesive, and start gently pulling it out.

Keep pulling, with steady even pressure. Use your other hand to hold the phone steady.
Once the adhesive bands come out, the battery will easily lift out of the phone.
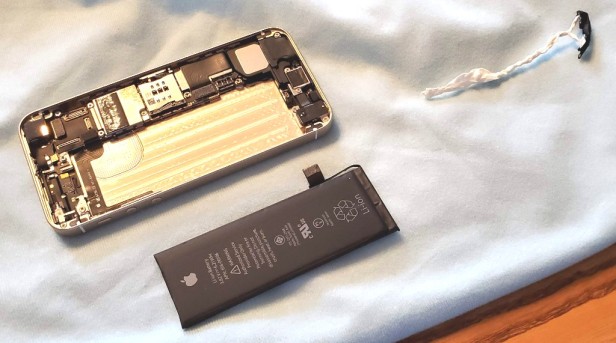
Here is a shot of the new and old battery, side-by-side.

Next, take the adhesive strips. Remove the plastic on one side, and place them into the battery slot.
Tip: Make sure that the black plastic grip is at the top end. Place the black end in first, so that it is even with the top of the battery slot.

Once the adhesive has been placed down, remove the top sheet of protective plastic.

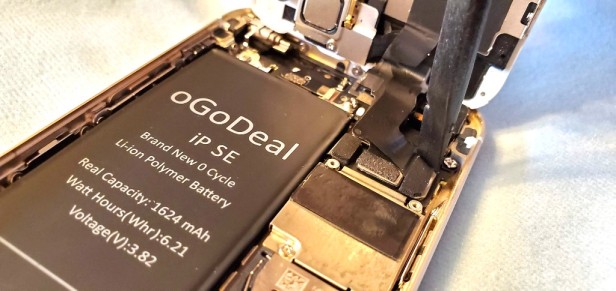
Now, take the new battery and place it into the slot. You only have one shot at this, so make sure that you have it oriented with the battery connector cable in the right spot!
Tip: If anything, put the battery closer to the bottom of the compartment. This ensures that the ribbon cable to the connector will reach.

Now, carefully line up the battery connector, then press it down until it snaps into place.

Here is a shot of the new battery installed.

Next, use the screwdriver to put the metal bracket back over the battery connector. The screwdriver in this battery replacement kit is magnetized, which is very helpful!
Update: I am not sure if the currently supplied screwdriver is magnetic.

Use the magnetized screwdriver to place the screw into the hole.


Then screw it down.
Tip: Don’t over-tighten any of the screws. They are there to hold the protective cover in place and that is it. Over-tightening the screws can have unintended consequences!

We’re now ready to put the screen back on. These are the 3 connectors that will need to be re-connected.

Hold the screen straight up, while you line up the connectors onto their ports. Make sure they are aligned properly, then, one by one, press them down until they snap lightly into place.
Tip: Make sure the connectors are lined up properly! Position the connector over its port, then lean down and look at it from the edge to ensure the pins are lined up as well as you can. Take your time! If you are pressing on the connector, and it won’t go, lift it up, examine where you are placing it, then try again!

Use one of the plastic tools to make sure the connectors are tight.
Position the metal protective cover over the screen connectors, and put in the 4 screws to hold it down. Don’t over-tighten the screws.

Once all the screws are in, examine your work to make sure you didn’t miss any connectors or screws. Carefully blow out any dust or lint that found its way into the phone.
Gently lower the screen. We need to re-connect the home-button connector.

Line up the connector, and use one of the plastic tools to press it down.

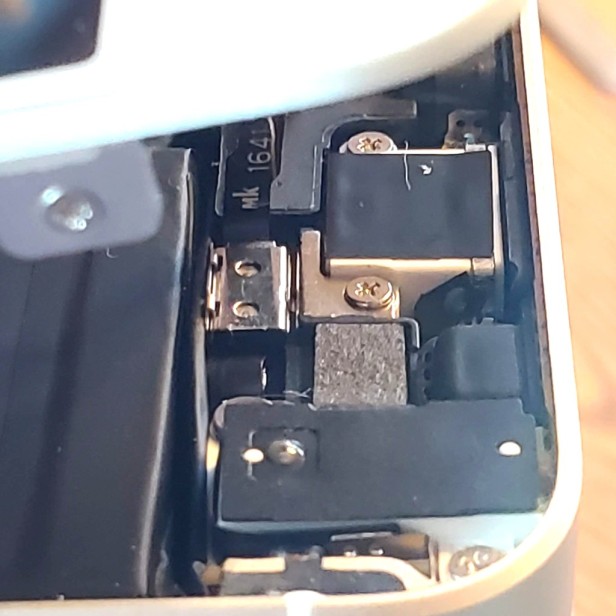
We now need to put the small metal protective cover back on. This was the most time-consuming part of the job for me, mostly because I couldn’t remember exactly how it went back on! That is why I am including several pictures of this connector here!
Use the tweezers to position the metal cover over the connector. It works best if the back end of the connector is in first, then the front end is pressed down.

By ‘back’ end, I mean the side on the left in the picture below. Once the back end is in, then press the front end until it snaps into place.
Next, gently press the screen down all the way around the phone. Put the 2 screws back in with the pentalobe screwdriver.
Turn the phone on, and verify the functionality of all the buttons and the touchscreen.
Navigate to the “Battery Health” screen in the settings and check that the maximum capacity is 100%!

There are a couple more steps to finish things off. First, power down the phone and put the SIM card back in.
Next, we need to calibrate the battery in order to give your phone optimal performance. To do this, drain the battery below 5% through normal use, then turn the phone off and charge it uninterrupted to 100%. Repeat this 2-3 times.
Hey, I hope this helped you out! Nothing better than spending ~$20 instead of buying a whole new phone!
If you performed a battery change, let us know about it in the comments! What was the most difficult part for you? I’d love to hear it!
Tools and Supplies Used:
- heating pad or hair dryer
- new battery kit (iPhoneSE)

Hi, you do not have to remove the screen connections, just flip the screen up against a vertical box like the SE box and put a rubber band over it to keep it vertical, then remove the battery after the battery connection and cover have been removed.
Hi, thanks for the tip! Yes, you are correct, it can also be done that way.
Originally I tried it without removing the screen, however there is so much jostling when removing the old battery adhesive that I found it easier and less prone to damaging the screen connectors to just remove the screen.
Have a great day!
Hello Richard,
Thank you very much for your clear and detailed instructions and excellent photos. The whole process went well the first time and phone is working perfectly.
The most fiddly part for me was reattaching the home button connector and putting the metal cover back on, but got there after a few attempts.
The only thing I did differently was a hint from other instructions was to cut between the two adhesive strips and pulled them out one at a time, reheating the back of the phone before pulling out the second strip. I couldn’t believe that the strips stretched to about 60cm whilst pulling them out.
THANK YOU AGAIN.
Regards, George
Hi George,
Thanks for the note and I’m glad the instructions were helpful! Yes, the little metal clip can be tricky to maneuver into place and clip down.
Thanks for the extra tip on removing the adhesive, I’m sure that will be helpful to others attempting the same repair!
Richard
A printable PDF would be helpful since I can’t look at the video or webpage while my phone is disassembled!