

Replacing the brake drums and shoes is a pretty straightforward repair. The main thing is remembering how everything goes together. This article includes lots of pictures to help in getting all of the brake components back into the correct positions.
Note: If you buy through links on our site, we may earn an affiliate commission – at no cost to you.
Background
I had replaced the rear bearing on the 2004 Toyota Corolla, and while inspecting the rear brakes, I decided it was time to change them. Usually, the rear brakes wear down quite a bit more slowly than the front brakes, however, the parking brake activates the rear brakes, so it is a good idea to make sure they aren’t too worn down.
The following article details the process I went through to change the rear brake shoes and drums on a 2004 Toyota Corolla. This should be similar for Toyota Corollas with rear drum brakes.
If your front brakes are bad, check out this post on how to change the front brake pads on a Toyota Corolla.
Tools you’ll need:
- jack-stands – use jack stands for safety
- jack
- brake spring pliers
- impact wrench
- metric socket set ½” drive
- Torque Wrench
Parts and supplies:
- Rear Brake Shoes/Drums/Hardware Kit (Toyota Corolla 2003-2008)
- Rear Brake Shoe Set
- Rear Brake Drum
- Hardware Kit
- Brake Cleaner
- Anti-Seize Lubricant
- Brake cylinder (driver’s side) (optional)
- Brake cylinder (passenger’s side) (optional)
Alright, let’s get started!
How to Change Rear Brake Drums and Shoes
The first step is to jack up the rear wheel and put a jack-stand under there. Pry off the hubcap and set it aside.
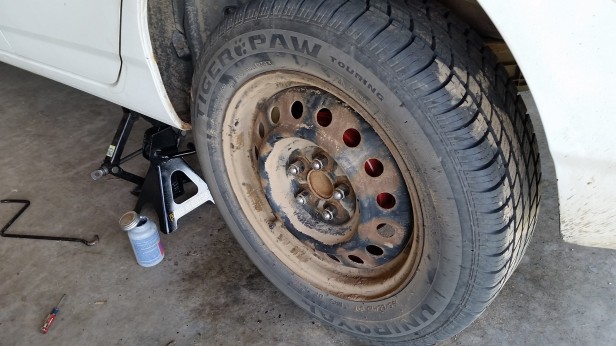
Remove the lug nuts. I use a socket wrench or impact wrench. If you are not using air tools at this point, and you are doing this sort of repair, you owe it to yourself to get an air compressor and some air tools. You can easily 1/2 the time it takes you to do most of these sorts of repairs and maintenance. By the way, if you don’t have an air compressor to power a pneumatic impact wrench, check out this DeWalt impact wrench that runs on lithium-ion batteries… I never thought I’d see the day when a battery-powered impact wrench was a legitimate tool!
Remove the wheel and set it aside. If the wheel is rusted on, check out this post on how to remove rusted-on wheels, and how to prevent it in the future.
If the brake drum is rusted onto the hub, don’t feel bad, this is very common. Use the 2 holes in the drum. Insert a bolt into those and tighten it slowly until the drum pops off. These were metric in my case, M8 x 1.25 mm (8 mm diameter with 1.25 mm thread pitch). I don’t have picture of the old brake drums but take a look at the new ones. The 2 holes that are not being used are the removal holes.
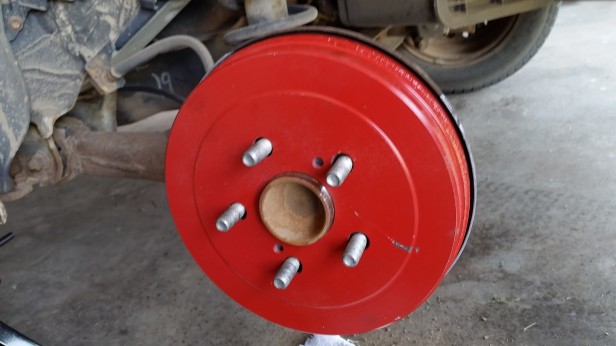
Slide the brake drum off of the hub.
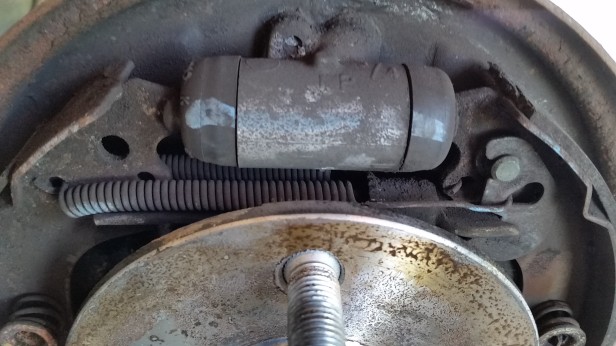
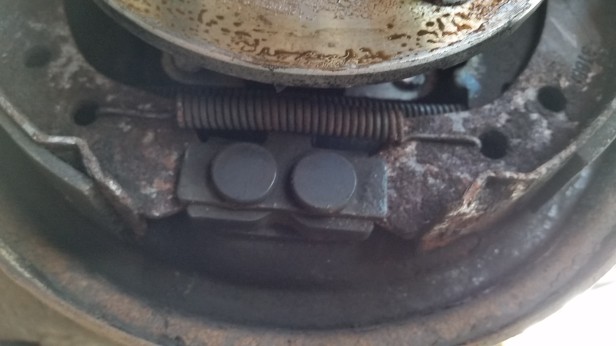
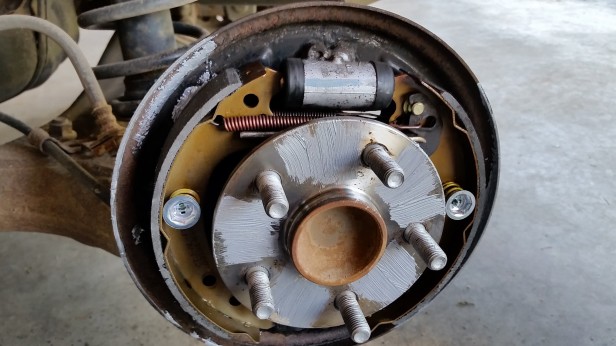
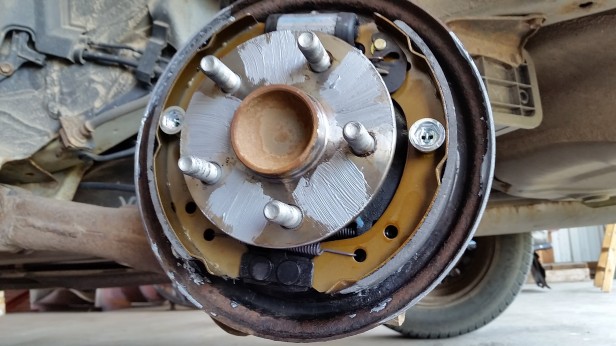
This is what you will be faced with. The following are a couple of photos showing the old brakes, and the positions of the components. The photo on the top is the top portion of the brake assembly and shows the position of the brake cylinder, and the photo on the bottom shows the bottom. Note in particular the position of the tiny springs and connectors.
I ordered the brake shoes, drums, and hardware kit from Amazon, but should be available from any parts store. In case it is helpful, here are the part numbers:
- Rear Brake Shoes/Drums/Hardware Kit (KOE15385DK) – (Toyota Corolla 2003-2008)


Carefully clean off all of the brake dust, dirt, and grime, so that you can see where everything is connected. Then take some photos. You are then ready to begin removing parts.
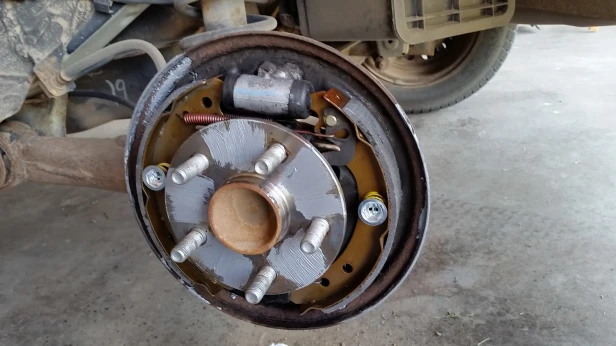
After removing the components, assemble the shoes and new hardware components the same way. Here is a shot of the fully assembled hardware. A pair of brake spring pliers will greatly ease the stretching and assembly of the tight brake springs.
Here is a shot focusing on the bottom portion.
I spread some anti-seize on the hub, so that the drum will not rust to the hub next time.
If your drivers-side brake cylinder or passengers-side brake cylinder is corroded or leaking, consider replacing them.
I also primed and painted the brake drum for aesthetic reasons, and so that it wouldn’t rust.
Slide the brake drum onto the hub.
Now put the wheel back on and tighten the lug nuts by hand. Then torque them to 76 ft-lbs., working in a “star” pattern. This is the torque wrench I use. Remember to release the tension on it when you are storing it.
Remove the jack-stand and lower the jack.
Nice work! Repeat the process on the other rear wheel.
That completes the job.
The following is included for your info and includes links for the parts/tools that I used for this job.
Parts and Tools used for this job:
- Rear Brake Shoes/Drums/Hardware Kit – (Toyota Corolla 2003-2008)
- brake spring pliers
- Air impact gun
- Metric Socket Set ½” drive
- Jack Stands: 2 Ton Capacity, 1 Pair
- Permatex 80078 Anti-Seize Lubricant
- Torque Wrench – 1/2 inch Drive (10-150 ft.-lb./13.6-203.5 Nm)
- Brakleen Brake Parts Cleaner
- Brake cylinder (driver’s side)
- Brake cylinder (passenger’s side)
Check out this post for how to change the front brakes on a Toyota Corolla!

You did not mention anything about adjusting the drums when completed.
This is extremely dangerous and very negligible on your part.
Please update post or take down
“Smokey” doesn’t mention that
Brakes adjust themselves. You should manually adjust brakes as it reduces the number of times you must depress brake pedal for proper fit. Beware of making brakes drag when manually adjusting them!
ALWAYS CHECK THAT BRAKES WORK BEFORE TAKING CAR OFF JACK STANDS! Parking brake may not work at first so use blocks to keep car from uncontrollably rolling away before dropping it to the ground. Apply brakes idling to be certain they work so if they do not the accident will cause minimal damage. Successfully make car stop using brakes at increasing speeds before going on a road.
Even a correctly done brake job leaves brakes loose and incapable of stopping car until after the brake pedal has been repeatedly actuated so self adjusting mechanism in brakes moves shoes or pads to proper ready position.